|
|
| Line 1: |
Line 1: |
| __NOTOC__
| | [[Category:Tools]][[Category:Lathes -- Metal]] |
| {{Shop
| | Link to:[[:Category:Machine Shop | Machine Shop Main Page]] |
| |shop_title = Metal Shop
| |
| |image = Weldingtable.jpg
| |
| |caption = Welding table
| |
| |lead = Eden Attar
| |
| |tool_testers = [https://www.artisansasylum.com/tool-testing Sign up here], or come to the shop on the first Wednesday night of the month
| |
| |hours = Same as membership hours | |
| }}
| |
|
| |
|
| == What gets made here? ==
| | {{EyeWarning}} |
| Fabricated metal projects–generally larger and less precise than found in the machine shop. Frames, structures, sculpture. Core processes include MIG & TIG welding, brazing, heating, bending, thermal cutting, forging/blacksmithing.
| |
|
| |
|
| == Major Shop Rules == | | {{ToolBox |
| * We require eye protection at ALL times, 24/7, in all parts of the shop.
| | |tool_title = South Bend Lathe |
| * Coated metals (painted, galvanized, etc) are strongly discouraged. A quick job is one thing, but hours of paint removal or welding on painted parts is not allowed.
| | |tool_subtitle = South Bend Lathe |
| * No gloves when using bench/pedestal grinders.
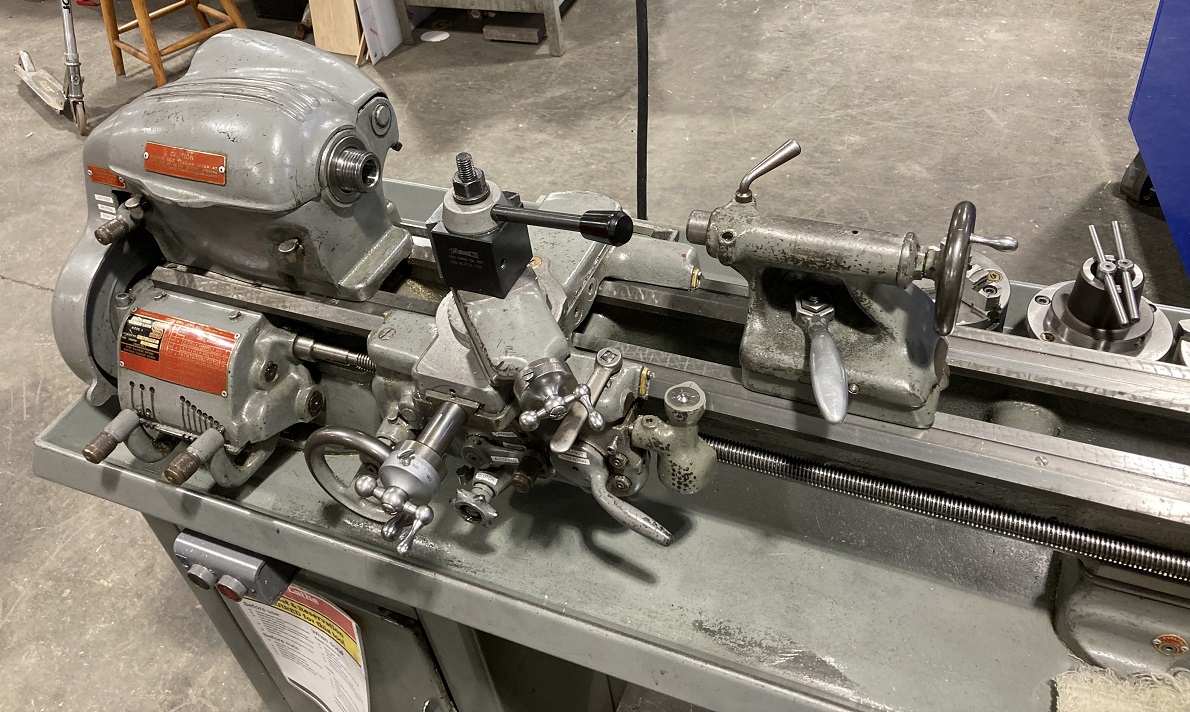
| | |image = Lathe_South_Bend.jpg |
| * No soft metals on pedestal grinders unless using a grinding wheel made for that purpose.
| | |caption = The South Bend manual bench lathe |
| * Turn on the air handlers when angle grinding or otherwise generating fume/particulate.
| | |make = South Bend |
| * No loud tools during classes and our monthly public community events. Loud tools include angle grinders and abrasive chop saws.
| | |model = |
| * Check all high-pressure gas cylinders are chained up every time you use the associated equipment (Oxy-fuel, MIG, TIG).
| | |serial = |
| * Policy for arc/flame use outside of welding booths:
| | |manufacturer_specs = |
| ** For welding/cutting processes that require shade 5 or less (oxy-fuel and handheld plasma cutting):
| | |manual = [https://drive.google.com/file/d/1seuiCHsli8SDRUk0GXnYwTaPPqchwlbK/view?usp=drive_link Textbook] |
| *** Use outside of a welding booth is OK. Welding screens are not required.
| | |location = Machine Shop |
| *** Be considerate to other shop users--consider handing out shade 3-5 eye protection before starting work; have some spare shaded glasses/goggles available for onlookers.
| | |rubric = N/A |
| ** For processes that require shade 8+ (MIG, TIG, stick welding):
| | |training = |
| *** Welding screens are generally required when using these processes outside of a welding booth.
| | |testing = [https://www.artisansasylum.com/tool-testing Tool testing] |
| *** Reasonable exceptions can be made, e.g. when the shop is otherwise empty or the welding job is very brief.
| | |restrictions = red |
| *** Users are obligated to set up welding screens if anyone requests.
| | |tool_categories = [[:Category:Lathes -- Metal | See the Lathes category for notes on using all lathes]] |
| | }} |
|
| |
|
| == Shop Communication & Governance == | | ==Safety== |
|
| |
|
| === Metal Shop Working Group ===
| | Link to: [https://wiki.artisansasylum.com/wiki/Category:Lathes_--_Metal#Safety Safety notes on the Metal-cutting lathes category page] |
| The Metal Shop Working Group [mailto:metalshopwg@artisansasylum.com metalshopwg@artisansasylum.com] is our governance body, like a Board of Directors for the shop, helping Shop Leads with things like setting shop policy, making spending decisions, and generally determining the shop’s direction. Please join!
| |
|
| |
|
| === Metal Shop Users === | | ==Changing the spindle speed== |
| Metal Shop Users [mailto:metal-shop-users@artisansasylum.com metal-shop-users@artisansasylum.com] is a group for users of the metal shop. Please join!
| |
|
| |
|
| == Shop Colors == | | {| class="infobox" cellspacing="5" style="width: 12em; text-align: left; font-size: 100%; line-height: 1.5em;" |
| '''[[RED]]''' and '''[[BLUE]]'''
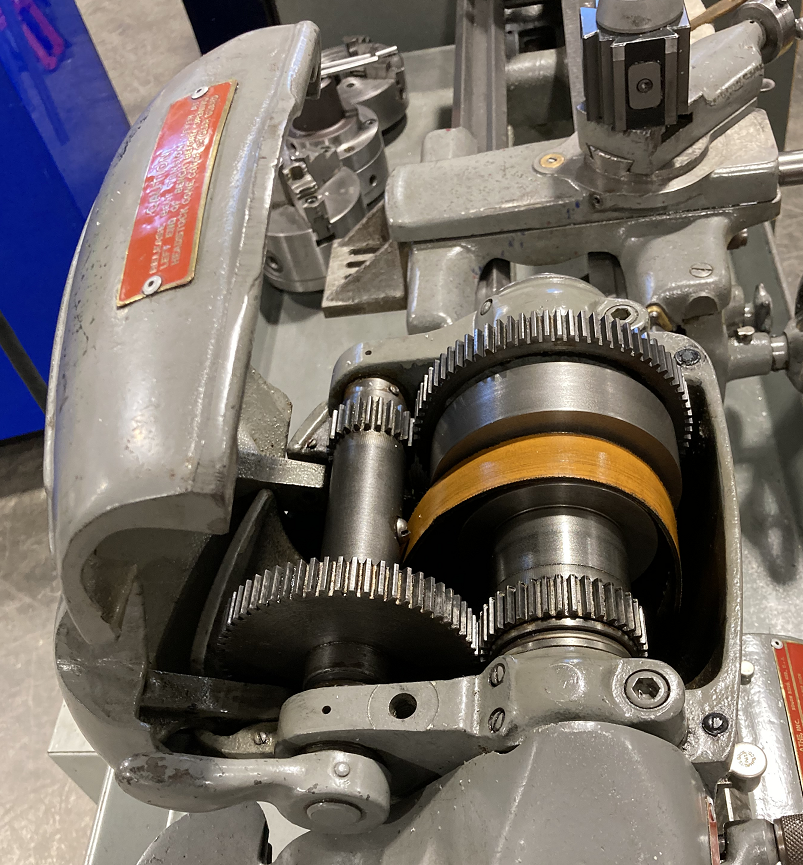
| | ! colspan="2" class="infobox-image" | [[File:Lathe_South_Bend_gearbox_nolabels.png|300px| gearbox]] |
| | | |- |
| == Community Events and Education Program ==
| | | colspan="2" | The South Bend lathe gear-box |
| | | |- |
| === Shop Events Calendar ===
| | |} |
| | |
| See our shop's [https://calendar.google.com/calendar/u/0?cid=NGQ1MWY3MDRmZTkzNTcxNWU5YWRmODRjMWIwODZhMDllOGE0YWM2MDA2NzQ2Y2U0ZGJjYjc3YTc0NTNmZGQyMEBncm91cC5jYWxlbmRhci5nb29nbGUuY29t Google Calendar] for the current schedule of our free community events and classes.
| |
| | |
| === Monthly Free Events ===
| |
| | |
| We host several free community events every month. These are '''free''' and '''open to all, no membership or experience needed'''. Please come out to learn, share skills, and build community with us!
| |
| | |
| ==== Shop Social & Skillswap ==== | |
| Are you new to metalworking, looking for ways to get familiar with the Artisan’s Asylum Metal Shop? Are you an experienced fabricator or an artist with techniques or ideas that you’d like to share? Attend our social night to swap skills, show off favorite projects, and find inspiration.
| |
| | |
| This event is free and open to the public. '''5:30 to 8:30 pm''' on the '''first Thursday of every month'''. Demonstrations, if scheduled, focus on techniques and ideas that can be showcased in a group format. Testing of class ideas is welcome! Donations are accepted for materials and supplies, but are not required.
| |
| | |
| Stop by to learn, make things with metal, and participate in the Metal Shop Community.
| |
| | |
| '''This event is not a substitute for classes or tool training and testing.''' For safety reasons, instruction or prior experience is required for those who wish to weld, powder coat, operate the oxyacetylene torches, or use the plasma cutters.
| |
| | |
| ==== Volunteer Work Night ==== | |
| Work Nite FAQ:
| |
| * Q: What is Work Nite? <br>
| |
| Work Nite is a monthly volunteer night in the Asylum Metal Shop. It's a chance to give back to the shop by building and improving our communal shop infrastructure. It's a great way to start getting to know the shop if you're new to the Asylum community or to the welding universe, and also a great way to offer expertise if you have more experience. Work Nite can involve a lot of hard, dirty work, but it's also usually a pretty fun, party atmosphere.
| |
| * Q: Can I come help volunteer even if I don't know anything about metal/welding/etc? <br>
| |
| A: OMG yes, please do, we need volunteers
| |
| * Q: What should I wear/bring? <br>
| |
| A: Come dressed in shop clothes if you have them, and bring PPE like eye protection, work boots, and gloves as well if you have them. We have plenty of PPE to loan if you need some.
| |
| * Q: Do I need to show up for the whole event? <br>
| |
| A: No, come for whatever part you can.
| |
| * Q: Will there be refreshments? <br>
| |
| A: Probably!
| |
| * Q: What will we work on? <br>
| |
| A: Depends on what's needed, it varies a lot from one Work Nite to another. The shop is a community effort, so if you can't find something to do, then look around and talk to other volunteers and come up with something that seems useful.
| |
| * Q: Will I be able to learn _____ skill or get tested on ____ tool? <br>
| |
| A: Probably not! Work Nite is NOT a class, a private lesson, or a tool testing session! You might learn or practice a new skill, but it's absolutely not formal instruction. Check out the Social Night if you're looking to learn or share a skill.
| |
|
| |
|
| ==== Tool Testing Night ====
| | This lathe features manual speed-changing where the user actually manipulates belts and gears inside the gearbox itself. |
| If you're interested in getting tool tested, come out to the shop on '''the first Wednesday night of the month between 6 and 8:30 pm'''. There's usually a tester or two available for all metal shop red tools.
| |
|
| |
|
| While this is the primary way tool testing occurs in our shop, you can still [https://www.artisansasylum.com/tool-testing sign up for a 1-1 tool test]. Tool testing night is an additional option, not a substitute.
| | Do not attempt to adjust these items unless you have been properly trained and tool-tested. |
|
| |
|
| FAQ:
| | === Belts and Pulleys === |
| * Is this event the only way to get tool tested in the metal shop?
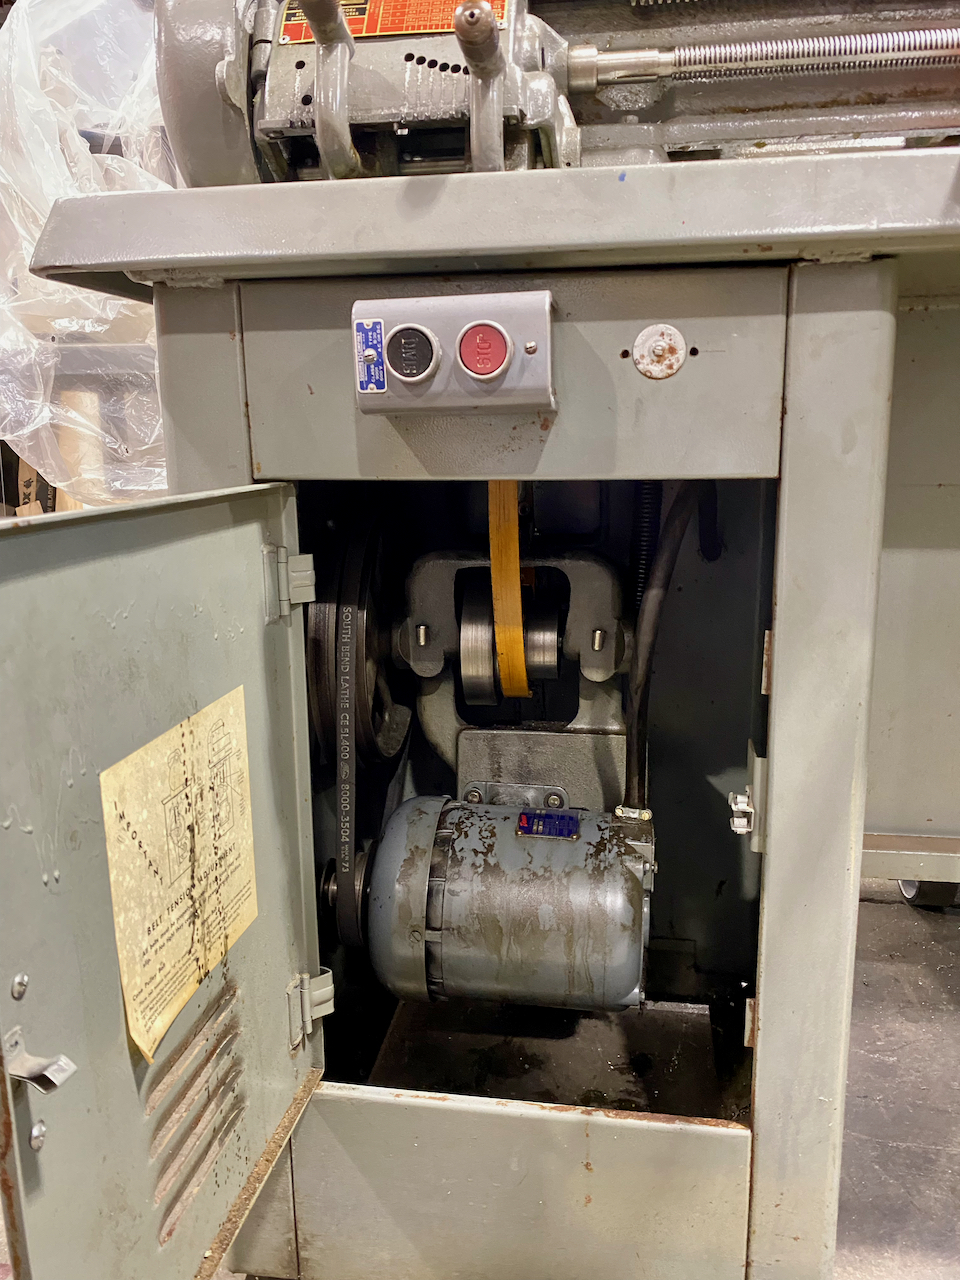
| | The South Bend has two belts. The V-belt between the motor and the lathe drive shifts between high range and low range, and the flat belt between the lathe drive and the spindle allows adjustments within these ranges. To adjust the speed, loosen the belt tension lever on the left side of the machine, then move the belts to achieve the appropriate speed. Tighten the belt tension when you're ready to use the lathe |
| No! This is the preferred way to get tested out in the metal shop, but not the only way--message the shop lead to set up a one-on-one time if this event doesn't work for you.
| | [[File:Sb motor and belts.jpeg|alt=South Bend motor and drive belts|thumb|Motor, motor belt, and drive belt under the South Bend lathe. The motor belt (black, on the left) switches between the high speed range and the low speed range, and the orange leather belt (center) allows three different speeds within each range. Note that the loose belt tension here; adjusting either belt requires loosening the belt tension.]] |
| * Is the metal shop distinct from the machine shop?
| |
| Yes! We in the metal shop are more the blacksmithing, welding, and thermal cutting types. The machine shop is higher precision, generally producing smaller pieces with tighter tolerances. Also machining is subtractive, where the metal shop can be additive (e.g. welding). The metal shop is also dirtier, and often louder :D
| |
| * Can I get tested on _______ tool?
| |
| Maybe.<br>
| |
| Formal tool testing is only for RED tools, and only for people who have enough experience to "test out of" an intro/101 class.<br>
| |
| You are eligible for testing only if you have experience equivalent to at least having taken an introductory/101 class on that tool.<br>
| |
| If you need instruction on a RED tool that has a class associated with it, then DO NOT come to Tool Testing Night expecting instruction--take the relevant class instead.<br>
| |
| For RED tools lacking an associated class, you are responsible for acquiring the knowledge necessary to pass the tool test on your own, using the metal shop tool manual, Youtube, and/or informal instruction outside of a Tool Testing Night. Tool testing is NOT instruction.<br>
| |
| By definition, there is no tool testing required on GREEN tools. We can still offer guidance and help on those tools, but there's no formal recordkeeping for them.
| |
| Most Asylum metal shop 101 level classes (including TIG 101 and Metal Shop 101) include tool testing as part of the class.<br>
| |
| '''We do NOT do tool testing on loud tools when the shop is busy''', which it often is on Tool Testing Night. This includes angle grinders and abrasive chop saws.
| |
| * Do I need to be there at 6pm sharp?
| |
| No! This is a drop-in thing. Feel free to show up anytime during the event, just not, like, as we're packing up to leave for the night, please.
| |
|
| |
|
| === Welding With Neighbors ===
| |
|
| |
|
| [https://www.eventbrite.com/e/welding-with-neighbors-tickets-840753996837?aff=oddtdtcreator/ Welding with Neighbors] is a discounted welding class for residents of under-served neighborhoods on the 2nd Friday of every month. The class topic differs every month but can include TIG + MIG welding, blacksmithing, hot and cold metal forming, and plasma cutting. | | [picture of belt tension lever] [picture/chart of lathe speeds] |
|
| |
|
| We invite residents from the following neighborhoods to join us:
| | === Back Gear === |
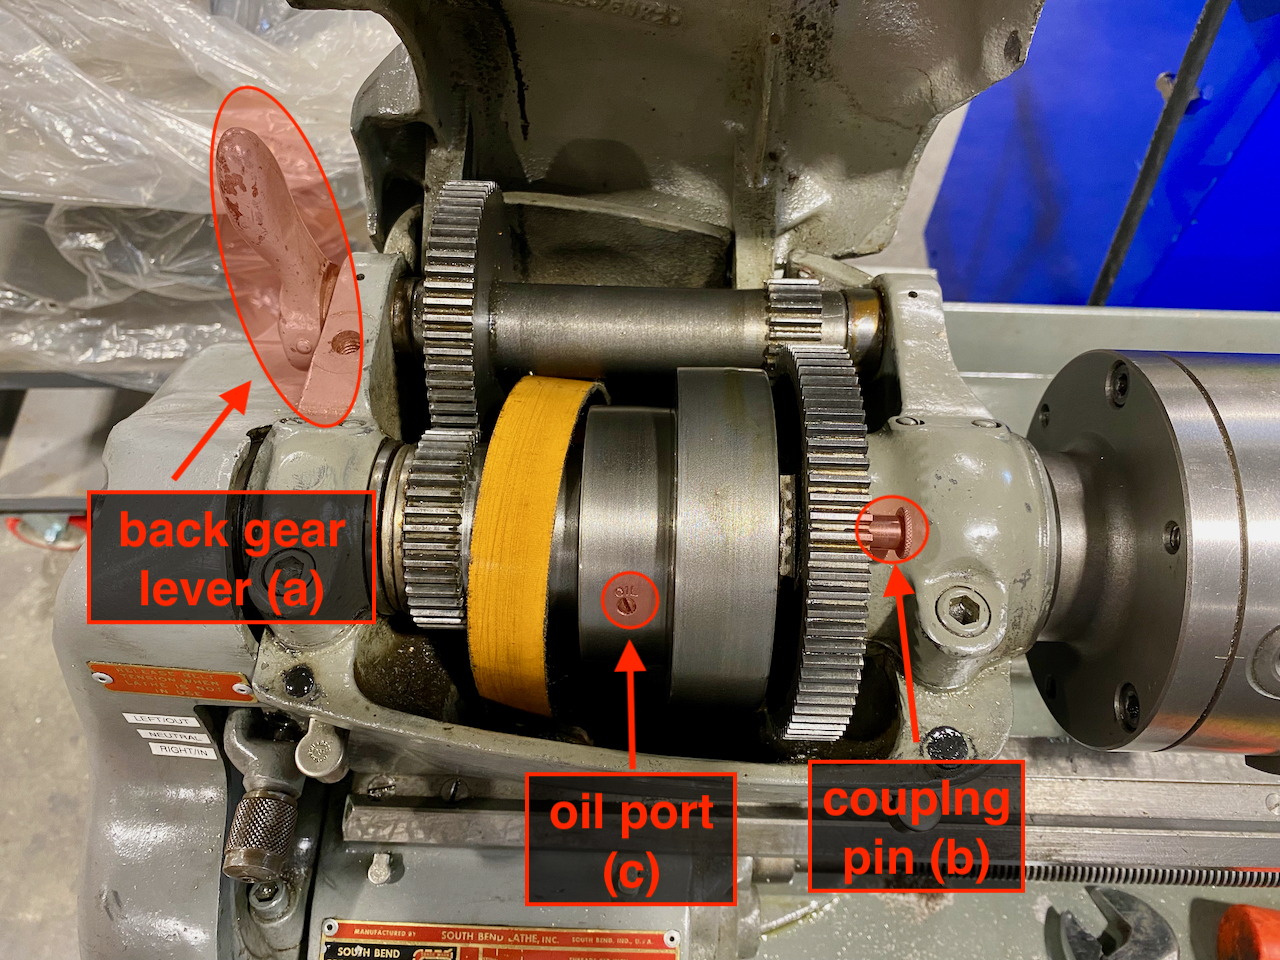
| | The back gear control on the lathe allows low speed, high torque rotation. To use the back gear, pull the back gear lever until the back gears engage with the spindle gear. If the gears are not meshing, manually spin the chuck while pulling the back gear lever to the rear. |
|
| |
|
| Alston-Brighton, East Boston, Dorchester, Roxburry, Roslindale, and Jamaica Plain.
| | Next, pull the coupling pin out of the largest drive gear. If you don't remove this pin, the chuck and gears will be locked. This will prevent the spindle from turning, and it's useful for loosening the chucks, but operating the lathe in this condition will cause the belts to rub. |
|
| |
|
| Class topics:
| | The additional mechanical components in the back gear drivetrain creates more mechanical, gear-clanging noise. This noise is normal, but grinding or rubbing noises are not. Stop the lathe if you hear these kinds of noises. |
|
| |
|
| March: MIG Welding
| | To disable the back gear, move the back gear lever to the rear to disengage the back gear and re-insert the coupling pin. Ensure that the pin is fully seated in the cutout, which is in-line with the oil port on the middle spindle pulley. |
| | | [[File:Sb back gear and locking pin.jpeg|alt=Overview of the South Bend headstock spindle controls|thumb|Overview of the headstock spindle controls on the South Bend lathe. To engage back gear, pull the back gear lever (a) towards the front of the lathe and pull out the coupling pin (b). To disengage back gear, push the back gear lever towards the rear of the lathe and push in the coupling pin. Align the coupling pin with the oil port (c) before trying to push the coupling pin back into place.]] |
| April: Metal Shop 101 (A 3-hour version of our [https://www.eventbrite.com/e/metal-shop-101-tickets-681827443237/ 3-day Metal Shop 101])
| | [picture of back gear mechanism and oil port] |
| | |
| May: Weld A Garden Trellis
| |
| | |
| === Classes ===
| |
| | |
| Over the past year and a half, the Metal Shop has been developing a comprehensive metalworking curriculum to better serve our users and community.
| |
| | |
| {| class="wikitable"
| |
| |+ Class Catalog
| |
| |-
| |
| ! 101 Courses !! Level 2 Courses !! Topic Courses
| |
| |-
| |
| | [https://www.eventbrite.com/e/welding-prelim-intro-to-mig-tig-stick-tickets-679440052487?aff=oddtdtcreator/ Welding Prelim]|| [https://www.eventbrite.com/e/cnc-plasma-201-the-art-of-plasma-cutting-tickets-778606140927/ Plasma 2] || [https://www.eventbrite.com/e/aluminum-tig-tickets-801920835807/ TIG Aluminum]
| |
| |-
| |
| | [https://www.eventbrite.com/e/metal-shop-101-tickets-681827443237/ Metal Shop 101]|| [https://www.eventbrite.com/e/tig-201-tickets-737365137977/ TIG 2] || TIG Stainless
| |
| |- | |
| | [https://www.eventbrite.com/e/tig-welding-101-one-day-edition-tickets-721472743397?aff=oddtdtcreator/ TIG 101 (5 hrs, Saturday)] [https://www.eventbrite.com/e/tig-welding-101-two-day-edition-tickets-851996673987?aff=oddtdtcreator/ TIG 101 (5 hrs, 2 weeknights )] || [https://www.eventbrite.com/e/mig-welding-201-tickets-726950958887/ MIG 2] || [https://www.eventbrite.com/e/welded-chain-sculpture-tickets-747698435147/ Sculptural Chain Welding]
| |
| |-
| |
| | [https://www.eventbrite.com/e/blacksmithing-basics-tickets-705488995577/ Introduction to Blacksmithing] || [https://www.eventbrite.com/e/welding-102-tickets-840797155927/ Welding 102] || [https://www.eventbrite.com/e/weld-a-smore-a-saurus-tickets-681838426087/ Weld a S’more-a-Saurus!]
| |
| |-
| |
| | [https://www.eventbrite.com/e/plasma-cutting-101-getting-started-with-cnc-and-handheld-plasma-cutting-tickets-681851434997?aff=oddtdtcreator/ Plasma Cutting 101 (CNC & handheld)] || || Weld a Garden Trellis
| |
| |-
| |
| | [https://www.eventbrite.com/e/oxy-acetylene-cutting-and-welding-tickets-851089540727?aff=oddtdtcreator/ Oxy-Acetylene Cutting and Welding] || ||
| |
| |}
| |
| | |
| | |
| {| class="wikitable"
| |
| |+ Standard Monthly Class + Event Schedule
| |
| |-
| |
| ! !! Sunday !! Monday !! Tuesday !! Wednesday !! Thursday !! Friday !! Saturday
| |
| |-
| |
| ! 1st week
| |
| | Welding Prelim
| |
| |
| |
| | Metal Shop 101 pt. 1
| |
| | Tool Testing Night
| |
| | Skill Swap + Social Night
| |
| |
| |
| |
| |
| |-
| |
| ! 2nd week
| |
| | Welding Prelim
| |
| |
| |
| | Metal Shop 101 pt. 2
| |
| | New Class Experimental Laboratory
| |
| | Blacksmithing Basics
| |
| | Welding With Neighbors
| |
| | TIG 101 - 1 day edition
| |
| |-
| |
| ! 3rd week
| |
| | Welding Prelim
| |
| | Seasonal Topic Course
| |
| | Metal Shop 101 pt. 3
| |
| | Plasma Cutting 101
| |
| | Shop Nite
| |
| |
| |
| |
| |
| |-
| |
| ! 4th week
| |
| |
| |
| | Oxyacetylene
| |
| | TIG 101 pt. 1
| |
| | Blacksmithing Basics
| |
| | TIG 101 pt. 2
| |
| |
| |
| |
| |
| |-
| |
| ! 5th week
| |
| |
| |
| |
| |
| | TIG Aluminum
| |
| | Welding 102 on odd numbered months TIG and MIG 2 alternating on even months
| |
| | Plasma 2
| |
| |
| |
| | TIG Stainless
| |
| |}
| |
| | |
| === Residency Program ===
| |
| | |
| == Tool Testers ==
| |
| * Eden Attar (she/her)
| |
| * Scraps Sparcs (they/them)
| |
| * Ethan Labowitz (he/they)
| |
| | |
| == Tools ==
| |
| | |
| {| class="wikitable"
| |
| !| Tool
| |
| !| Class
| |
| !| Tool Tester(s)
| |
| |-
| |
| {{ ToolTableItemRed | link=[[Angle Grinder]]s }} || Tool Testing Night
| |
| {{ ToolTableItemGreen | link=[[Jet Horizontal Band Saw]] }} || Tool Testing Night
| |
| {{ ToolTableItemGreen | link=[[Milwaukee 6232 Portable Band Saw]] }} || Tool Testing Night
| |
| {{ ToolTableItemGreen | link=[https://drive.google.com/file/d/1Cvb3oFD2ozZe5JINYUk9nIMUkqz-gT0_/view?usp=drive_link Wilton Horizontal Band Saw] }} || Tool Testing Night
| |
| {{ ToolTableItemRed | link=[[Belt Sander]] }} || Tool Testing Night
| |
| {{ ToolTableItemRed | link = [https://wiki.artisansasylum.com/wiki/Category:Bench_Grinders Bench_Grinders] }} || Tool Testing Night
| |
| {{ ToolTableItemGreen | link=[[Compact Bender]] }} || N/A
| |
| {{ ToolTableItemGreen | link=[[Hydraulic Pipe Bender]] }} || N/A
| |
| {{ ToolTableItemGreen | link=[[JD Squared Air Assisted Bender]] }} || N/A
| |
| {{ ToolTableItemGreen | link=[[Pro Tools Tube Bender]] }} || N/A
| |
| {{ ToolTableItemGreen | link=[[Roller Tube Bender]] }} || N/A
| |
| {{ ToolTableItemGreen | link=[[Shop Made Benders]] }} || N/A
| |
| {{ ToolTableItemGreen | link=[[Box and Pan Brake]] }} || N/A
| |
| {{ ToolTableItemRed | link=[[Buffing Machine]] }} || Tool Testing Night
| |
| {{ ToolTableItemRed | link=[[Abrasive Blade Metal Chop Saw]] }} || Tool Testing Night
| |
| {{ ToolTableItemRed | link=[[Carbide Blade Chop Saw (Metal Devil)]] }} || Tool Testing Night
| |
| {{ ToolTableItemRed | link=[[Cold Saw]] }} || Tool Testing Night
| |
| {{ ToolTableItemRed | link=[[Dake Drill Press]] }} || Tool Testing Night
| |
| {{ ToolTableItemRed | link=[[Flex Shaft Die Grinder]] }} || Tool Testing Night
| |
| {{ ToolTableItemGreen | link=[[48-inch Jump Shear]] }} || N/A
| |
| {{ ToolTableItemRed | link=[https://drive.google.com/file/d/1oTVvW4fWryTHoiEYy35-QkcxLm0EDAVF/view?usp=drive_link Atlas Plus Forge] }} || Tool Testing Night
| |
| {{ ToolTableItemGreen | link = [[Ironworker]] }} || Tool Testing Night
| |
| {{ ToolTableItemRed | link=[https://drive.google.com/file/d/1m_d5_20QzKY1D45aKSGtD9yZwenhGijV/view?usp=drive_link ONYX Compressed Air Tools] }} || Tool Testing Night
| |
| {{ ToolTableItemRed | link=[[Oxy-Acetylene Torches]] }} || Tool Testing Night
| |
| {{ ToolTableItemRed | link=[https://drive.google.com/file/d/17nGsbnM_HJbLj3D0NvkLIv9QuNXYZuC5/view?usp=drive_link Hand Held Plasma Cutter] }} || Tool Testing Night
| |
| {{ ToolTableItemGreen | link=[https://drive.google.com/file/d/18m-epBtOhd48czxgPTIoYahOvT8kV3vW/view?usp=drive_link Slip Roll] }} || N/A
| |
| {{ ToolTableItemRed | link=[https://drive.google.com/file/d/1aqZBDN8QviwYb_WyY5oR0sqch83Xxbh8/view?usp=drive_link Lencospot Mark II Welder] }} || Tool Testing Night
| |
| {{ ToolTableItemRed | link=[https://wiki.artisansasylum.com/wiki/Category:MIG_Welders MIG Welders ](Category) }} || Tool Testing Night
| |
| {{ ToolTableItemGreen | link=[[Spot Welder Chicago 61206]] }} || N/A
| |
| {{ ToolTableItemRed | link=[https://wiki.artisansasylum.com/wiki/Category:TIG_Welders TIG Welders ](Category) }} || Tool Testing Night
| |
| {{ ToolTableItemGreen | link=[[Foot Shear]]}} || Tool Testing Night
| |
| |}
| |


