Spot Welder Chicago 61206
| Chicago Spot Welders | |
|---|---|
| General Info | |
| Make | Various |
| Model | n/a |
| Serial | Unknown |
| Specs | n/a |
| Manual | n/a |
| Asylum Info | |
| Location | Metal Shop |
| Rubric | n/a |
| Training | Tool classes |
| Testing | Tool testing, or [[:Category:Metal Shop#Tool
Testing Night|come to the shop on Tool Testing Night]] |
| Restrictions | green |
Use for:
- Sheet metal, including uncoated mild steel, galvanized steel, and stainless.
- Mild Steel Capacity: up to 3/16” combined thickness.
- Galvanized Steel Capacity: two pieces 16 ga (0.059”).
Do Not Use for:
- Aluminum, copper or copper alloys.
- Note that spot welds are weak, typically for ornamental applications.
Safety Hazards
height: 1.5em;"1. Sparks from the welding process. Eye Protection Required.
2. Electrocution, causing potential injury or death.
3. Burns from flame, sparks, hot workpieces. Wear protective clothing and shoes, leather gloves.
4. Poisoning from breathing gases produced by the welding process. Use proper ventilation. Do not stick head in fumes. Respirator recommended.
5. Keep workplace clear of flammable materials, including grease, oil, solvents, paper.
Operation Notes
height: 1.5em;"
| |
|---|---|
- Avoid Electric Shock.
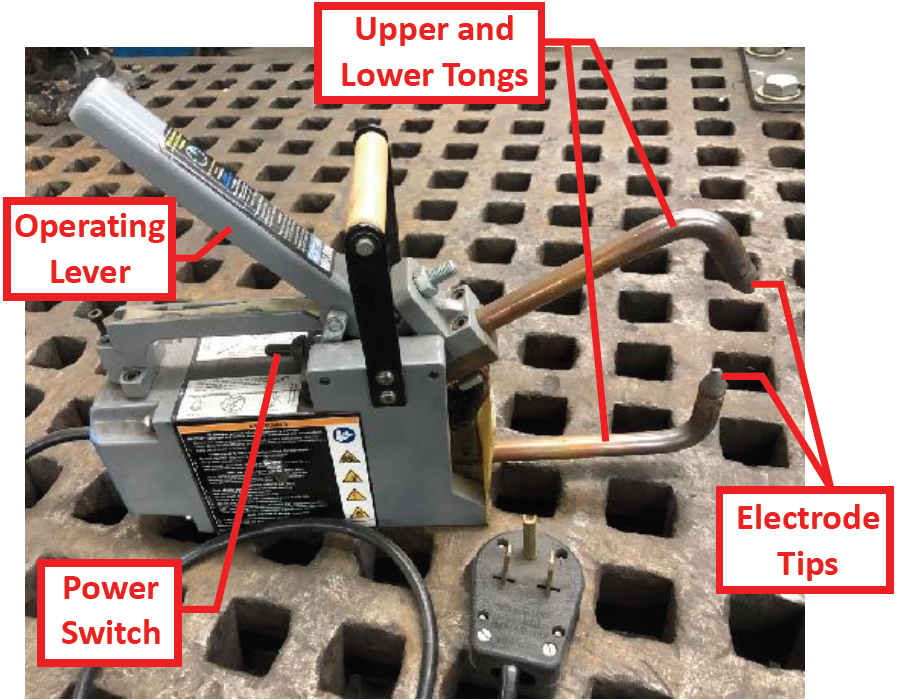
- Never touch the Upper and Lower Tongs when unit plugged in.
- Never touch Electrode Tips to grounded material when unit is plugged in.
- Never expose unit to water or damp objects, especially during use.
- Metal workpiece must be clean. Remove rust, scale, oxides, paint, grease, and oil.
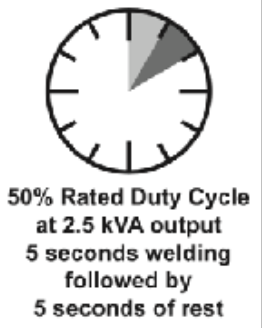
- Welder has a 50% duty cycle. Unit can weld for 5 seconds out of each 10 second time interval without overheating. Failure to observe duty cycle can destroy the welder.
- 'Excessive Tong pressure can damage the Electrode Tips. Do not use the Tongs as a clamp or vise. Use separate clamps to hold workpieces together for good contact at the weld point.
- The Electrode Tips deform during use and occasionally need dressing. For optimal weld quality, inspect Electrode Tips before use and clean, dress (resurface), or replace as needed for proper contact surface.
- For successful welds, do not weld more than two pieces of metal at a time.
| Eye protection required! | ||
|---|---|---|

| |
|---|---|
| Parts of the Spot Welder |
Basic Operating Instructions
1. Perform a safety check.
- Are the Electrode Tips in good condition?
- Do the Electrode Tips align?
- Check if the Tong Pressure is appropriate for your workpiece. Adjust as needed.
- Prevent unintentional starting. Ensure the power switch is in the off-position before connecting to power source or moving the welder.
- Check for loose, cracked or broken parts.
- Do not use if the cord is damaged.
2. Clean the work pieces. Remove scale, dross, paint, grease, oil.
3. Clamp the workpieces together and place between the Electrode Tips.
- Ensure good contact between metal pieces to be welded. Gaps weaken welds.
- Do not use the Tongs or Electrode Tips as a clamp.
- The Workpiece and Tongs will get very hot. DO NOT place hands on the workpiece for the weld. Hold the clamp when welding.
4. Steady the workpiece and press down on the Operating Lever to close the Tongs.
5. To weld, push the Power Switch sideways in either direction, then release.
The Power Switch provides quick application of electric current, allowing precise control of the weld time. Weld time is determined by the thickness of the workpieces, the metal type, and the skill of the operator.
6. Raise the Operating Lever to open the Tongs to release the workpiece. Allow the Electrode Tips and the workpiece to cool before handling.
