Cyclone Sand Blaster: Difference between revisions
No edit summary |
|||
| (119 intermediate revisions by 3 users not shown) | |||
| Line 1: | Line 1: | ||
[[Category:Tools]] | [[Category:Tools]] | ||
Link to: | Link to: [[:Category:Metal Shop | Metal Shop main page]] | ||
Link to: [[:Category:Metal Shop#Tools | Metal Shop tool list]] | |||
This tool is used in [[:Brackets_Tutorial_3:_No_Frills_Shelf_Bracket#Cleaning | Brackets tutorial 3.]] | |||
{{ToolBox | {{ToolBox | ||
| Line 8: | Line 11: | ||
|tool_subtitle = Cyclone Manufacturing | |tool_subtitle = Cyclone Manufacturing | ||
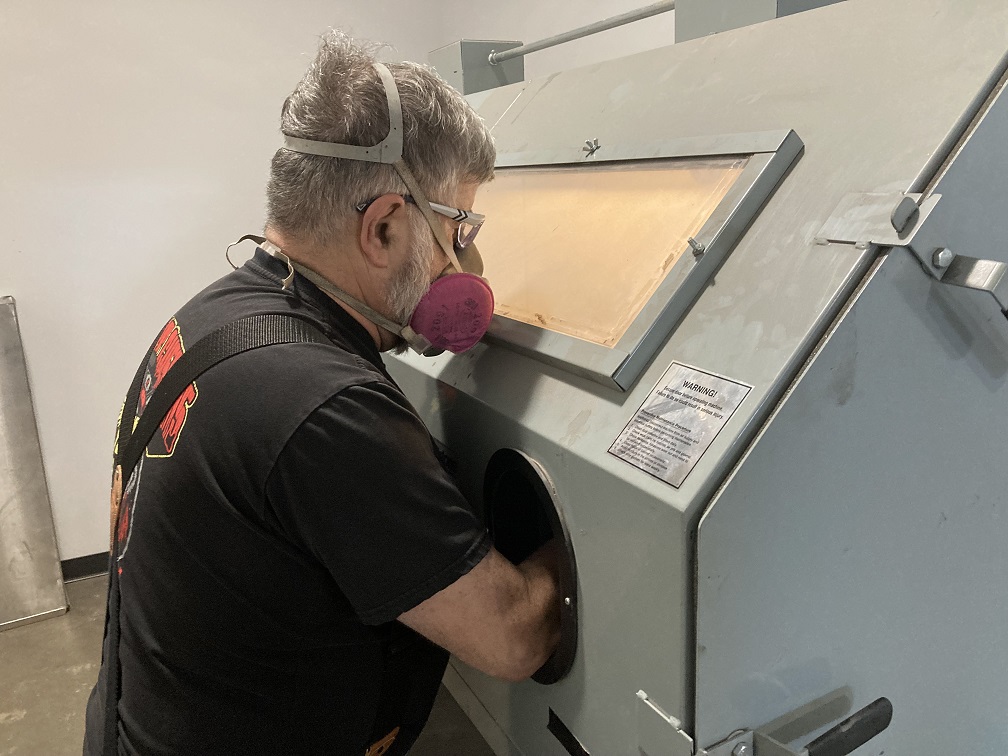
|image = Metal_shop_sandblaster_action_shot.jpg | |image = Metal_shop_sandblaster_action_shot.jpg | ||
|caption = A | |caption = A happy blaster | ||
|make = Cyclone Manufacturing | |make = Cyclone Manufacturing | ||
|model = DW-7335 | |model = DW-7335 (obsolete) | ||
|serial = Unknown | |serial = Unknown | ||
|manufacturer_specs = | |manufacturer_specs = | ||
|manual = | |manual = [[media:Cyclone-Manual-FT-6035-5532.pdf | Manual for a similar model]] | ||
|location = Metal Shop | |location = Metal Shop | ||
|rubric = | |rubric = | ||
|training =[https://www.artisansasylum.com/class-catalog Tool classes] | |training =[https://www.artisansasylum.com/class-catalog Tool classes] | ||
|testing = [https://www.artisansasylum.com/tool-testing Tool testing] | |testing = [https://www.artisansasylum.com/tool-testing Tool testing] <span style="color:red">OR</span> [[:Category:Metal Shop#Tool Testing Night|come to the shop on Tool Testing Night]] | ||
Night|come to the shop on Tool Testing Night]] | |restrictions = RED | ||
|restrictions = | |||
|tool_categories = | |tool_categories = | ||
}} | }} | ||
[[File:No lead warning.png|127x127px]][[File:Blaster dust hazard.png|127x127px]][[File:Goggle mask.png|149x149px]] | |||
{ | {{EyeWarning}} | ||
== Description == | |||
A sand blaster mixes abrasive grains with a jet of compressed air that's used to abrade the surface of a (usually metal) part. This cleans paint, rust, and other forms of dirt off the part; it also roughens the part's surface. The blast gun is enclosed in a sealed steel cabinet. The user manipulates the tool with thick rubber gloves that pass through the wall of the cabinet. | |||
The sand blaster cabinet is located in a small room within the metal shop on the south wall adjacent to the fenced-in outdoor porch. | |||
'''Sand blasting is the LAST stage, not the first, in cleaning a part and preparing the surface for finishing.''' | |||
''Do not use the sandblaster to clean heavily rusted pieces.'' This would be a slow, inefficient way to do that and is likely to clog and damage the equipment. After testing for lead, remove surface rust with wire brushes, manually or with a power tool attachment. Only then is the piece ready for sandblasting. | |||
= | {{Warning|text="Sandblasting" is a misnomer. NEVER use actual sand in a blasting process.}} | ||
== Use For == | |||
* Steel | * Steel | ||
* Stainless | * Stainless steel | ||
* Zinc-coated | * Zinc-coated (aka galvanized) steel | ||
* Aluminum, | * Aluminum, titanium, brass | ||
* Painted metal | * Painted metal (abrade with wire brush or sandpaper first) | ||
* Lightly | * Lightly rusted parts after initial cleaning | ||
== Do Not Use For == | |||
* Lead-based paints | * Lead-based paints | ||
* Asbestos | * Asbestos | ||
* Greasy or | * Greasy or oily parts | ||
* Massively | * Massively rusty parts | ||
{{Warning|text=Use a lead-test swab to verify that paint is NOT lead-based!}}{{Warning|text=If the sandblaster becomes contaminated with lead the media must be disposed as TOXIC WASTE and the cabinet must be thoroughly cleaned out!}} | |||
== Personal Safety == | |||
[[File:Goggle mask.png|right|186x186px]] | |||
* '''NEVER use silica sand as an abrasive media.''' Always use media designated for blast use. | |||
* '''Test paints and coatings for [[LEAD]] using the test swabs provided.''' The swabs change from yellow to red when lead is present. If lead is detected do not clean with the sand blaster. | |||
* '''Wear safety goggles.''' Eyeglasses don't protect against abrasive dust. | |||
* Wear respirator or N95 or better mask when using the machine or working in the room when the machine is being used. All fine dust is hazardous to breathe. | |||
* Place the workpiece in the blast cabinet and close the hatch tightly to avoid dust escaping from the cabinet. Check that doors on both ends are latched close along with both hoppers. When removing workpieces, some dust will unavoidably mix with the room air. Wear a dust mask at all times when working in sand blast room. | |||
* Cabinet gloves and viewing window are at a fixed height above the floor. If they are too high, a stand should be provided. Use care on unstable stands. | |||
* If the blast gun is not properly grounded to the cabinet, static electricity can cause shocks to the operator. If static shocks are encountered, check the ground connection to the gun. | |||
* Use caution when lifting heavy parts into the sandblaster cabinet. | |||
* If a part is too large to allow the hatch to close and seal, do not operate the sandblaster. | |||
* Use caution with the foot pedal and hoses. Place them where the trigger cannot be accidentally depressed when the hoppers or cabinet are open. | |||
== Shop and Equipment Care == | |||
* '''EMPTY THE SAND BLASTER CABINET OF USED MEDIA AFTER EVERY USE.''' Sift used media into provided bucket matching the type of media you are using, and dispose of filtered waste in trash. Do not leave machine full of used media. Do not "top-off" with clean media in hoppers with used media. If media is too spent to use effectively, discard and start with fresh media. Mixing new media with partially spent media wastes media and makes an ineffective blast medium. | |||
* Shop standard media is [https://www.grainger.com/product/Blast-Media-Brown-Aluminum-6YY38 brown aluminum oxide]. If using alternate media, such as glass or ceramic beads, empty cabinet and ''thoroughly clean rails etc. inside the cabinet, both '''before and after''' using this media.'' | |||
* Do not abrade greasy or oily parts in the sandblaster. These can cause the media to clump and clog the flow lines, and damage the equipment. | |||
* Do not move the blast cabinet when it is full of abrasive media. | |||
* Do not point the blast gun at the rubber gloves or the cabinet window or the cabinet ceiling light. | |||
== How to Prepare Metal Workpieces for Blasting == | |||
{| class="wikitable" | |||
|+ | |||
![[File:Metal shop lead test instructions.png|none|thumb|250x250px|Lead test swabs]] | |||
![[File:Metal shop lead test swabs.png|thumb|250x250px|How to swab|none]] | |||
![[File:Metal shop lead test YES.jpg|thumb|250x250px|Color when lead is detected]] | |||
![[File:Metal shop lead test NO.jpg|thumb|250x250px|Color when no lead is detected]] | |||
|} | |||
{{Warning|text=If the machine becomes contaminated with lead, tell the facilities manager so that the media can be safely disposed. It is toxic waste. It is not legal to throw the media away yourself. The blast cabinet must be scrubbed to remove toxic dust.}} | |||
# '''TEST FOR LEAD.''' Lead and lead paint are forbidden on this machine. Use a lead test swab to verify that there is no lead on the surface of your workpiece. | |||
## Moisten the tip with water, wait 2 seconds for the reagent to dissolve, then rub the surface. | |||
## If no lead is present the swab stays yellow-orange. It turns crimson if lead is present. | |||
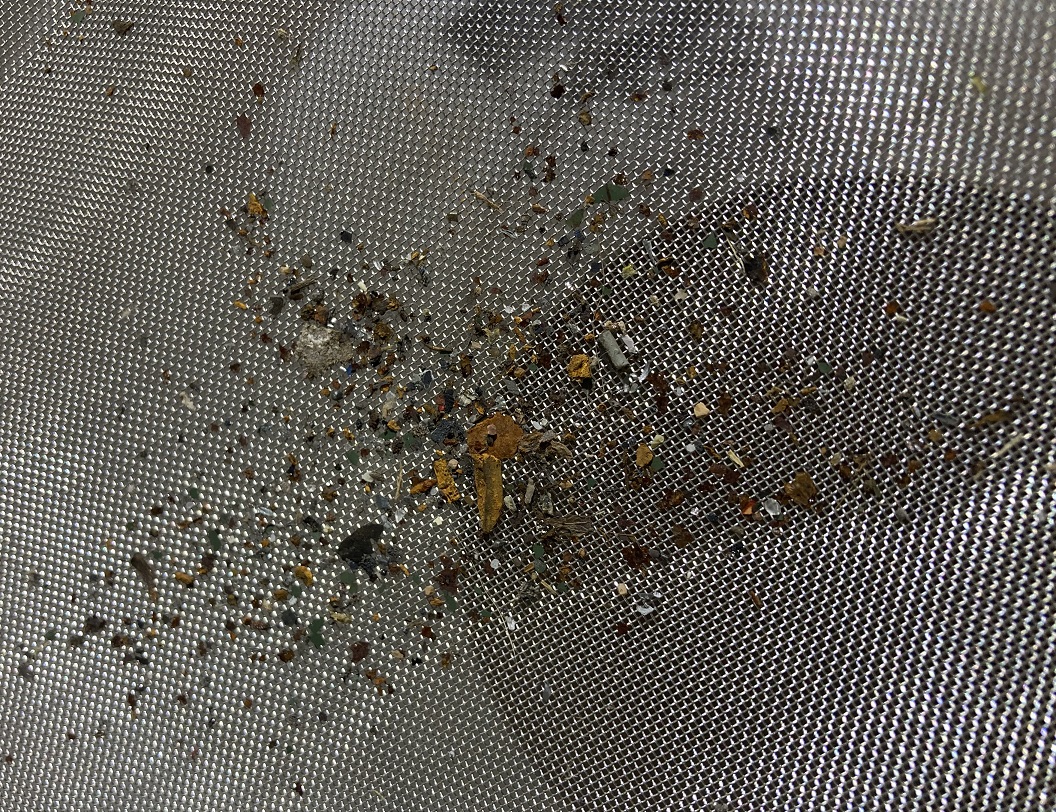
# '''Clean off any massive rust with a grinder before placing the workpiece in the sandblaster.''' Large flakes of rust can mix with the blasting media and clog the flow lines leading to the gun. | |||
# '''Degrease the workpiece.''' If greasy or oily, clean the workpiece with a solvent or a water-base cleaner such as Simple Green. Make sure it is dry before placing it in the blast cabinet. | |||
== Sandblaster Parts == | |||
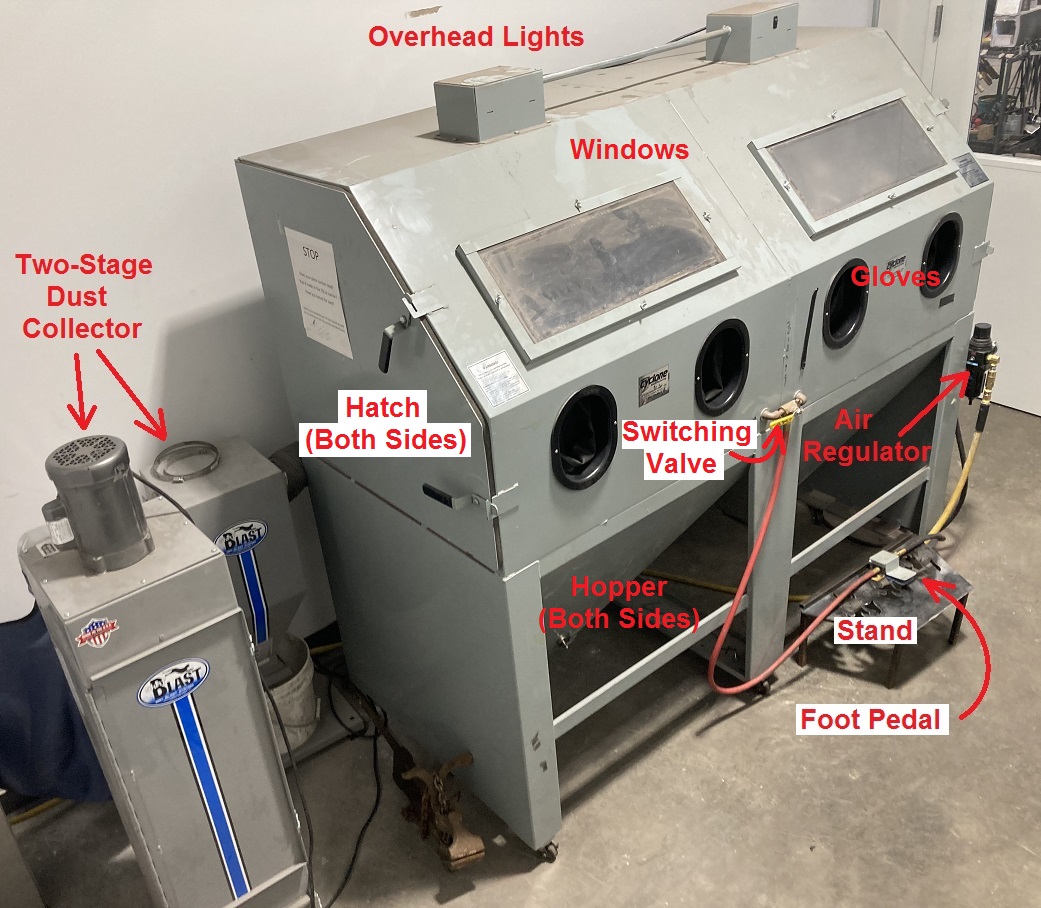
[[File:Blaster with dust collector labeled.jpg|thumb|400x400px|The sandblaster and dust collector installation]] | |||
The sand blasting room has ventilation to the outside. Turn on the ventilation using the timer switch on the wall next to the CNC plasma cutter. | |||
The sandblaster has three free-standing components. The cabinet is the largest, and the other two are the components of the two-stage dust collector to the left of the cabinet. | |||
The sandblaster has two bays. Presently the RIGHT bay is the only one used. Our [[Antwerp_Shop_Air | compressed air service]] is only sufficient for operating one bay. | |||
Turn on the dust collector (located in the back of the room) by plugging it and the air filter into the outlet on the left. | |||
Turn on the cabinet lights with the small switch on right hand box. | |||
The sandblasting action is controlled with the foot pedal on the floor or stand. Always stay aware of the placement of the foot pedal so it's not accidentally triggered. | |||
== Instructions For Use == | |||
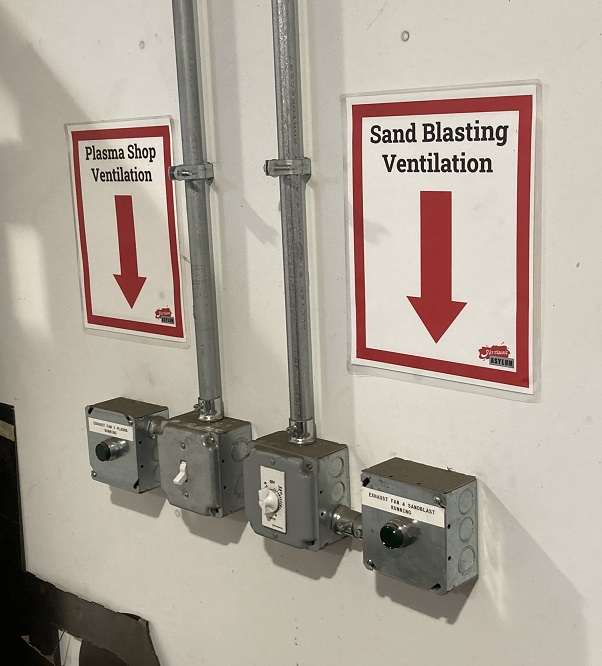
[[File:Sandblaster vent switch.jpg|thumb|221x221px|The power switch for the sandblast room ventilator is located around the corner on the back wall adjacent to the CNC plasma cutter.]] | |||
1. Ensure that the [[Antwerp_Shop_Air | air compressor]] is on. It is located in the closet in the loading dock area. | |||
2. '''Turn on the room ventilator.''' This switch is in the CNC Plasma area (see image on right). | |||
3. '''Put on goggles and a dust mask or respirator.''' | |||
4. Check the air pressure at the regulator on the blaster cabinet. Target pressure is 60 - 100psi. | |||
5. Plug in the two-stage air filter at the end of sand blaster room, and cabinet if that's not already plugged in. | |||
6. Check that the media hoppers were emptied by the last user. If they were not, empty and sift the media before beginning. | |||
7. Add media to the hopper where you intend to work, pouring it through the grate in the cabinet. The correct amount of media is between 10 and 20 lbs, depending on the media. Too much media will compact in the hopper can clog the feed hose. Make sure the feed tube is down in the media. | |||
{{Imbox|text=We use brown aluminum oxide for our standard media; use 3 - 5 quarts (yogurt container scoops). Glass bead media is also available for member use. Use ONLY media intended for blasting use - NEVER use actual, silica sand.}} | |||
8. Place the workpiece in the cabinet and latch the hatch shut. Confirm that the doors on both ends of the cabinet are latched, as well as both hoppers. | |||
9. Arrange the stand as/if needed and place the foot pedal in a convenient spot. Be careful of tippy step-stand. | |||
10. Turn on the cabinet light switch on top right of the cabinet. Optionally, also shut off room light for better visibility into the cabinet. | |||
11. Stick hands into rubber gloves, grasp blasting gun and step on the foot pedal to '''BLAST!!!''' | |||
* If no media appears to be coming out, and no abrasion is happening, check valve lever on front of cabinet. | |||
* While the air is flowing, it may be necessary to wiggle the dip tube that reaches down into the hopper where the media is located. | |||
* After a long period working, the media may migrate from the hopper in use to the hopper not in use. Simply place baker's tray under opposite hopper, open to collect media, close, and pour the tray back into the hopper in use. BE CAREFUL WHEN DOING THIS to stay always aware of the foot pedal location, so as not to accidentally trigger it while the cabinet is open. | |||
* Open the cabinet and inspect your work periodically. Give the hatch a thump and wait a minute or two for the dust to settle before opening it. | |||
12. When finished, place baker's tray under the hopper, empty the media out of the machine and carefully pour through the sifter back into the proper "in-use" bucket. Empty both hoppers as media will have migrated during use. | |||
13. Sweep loose media off the floor. Loose media is a respiratory hazard and can create a slip hazard. Remove used paper towel, gloves etc., from room; empty dust pan and waste from sieve into trash can in main metal shop. | |||
{{Imbox|text=If using any media other than the shop-standard aluminum oxide, you must thoroughly clean the cabinet when you are finished. Remove metal grates and use a broom to clean the rails inside the cabinet. When using shop standard media, emptying the hoppers and sifting is sufficient cabinet clean-up.}} | |||
= | {| class="wikitable" | ||
|+ | |||
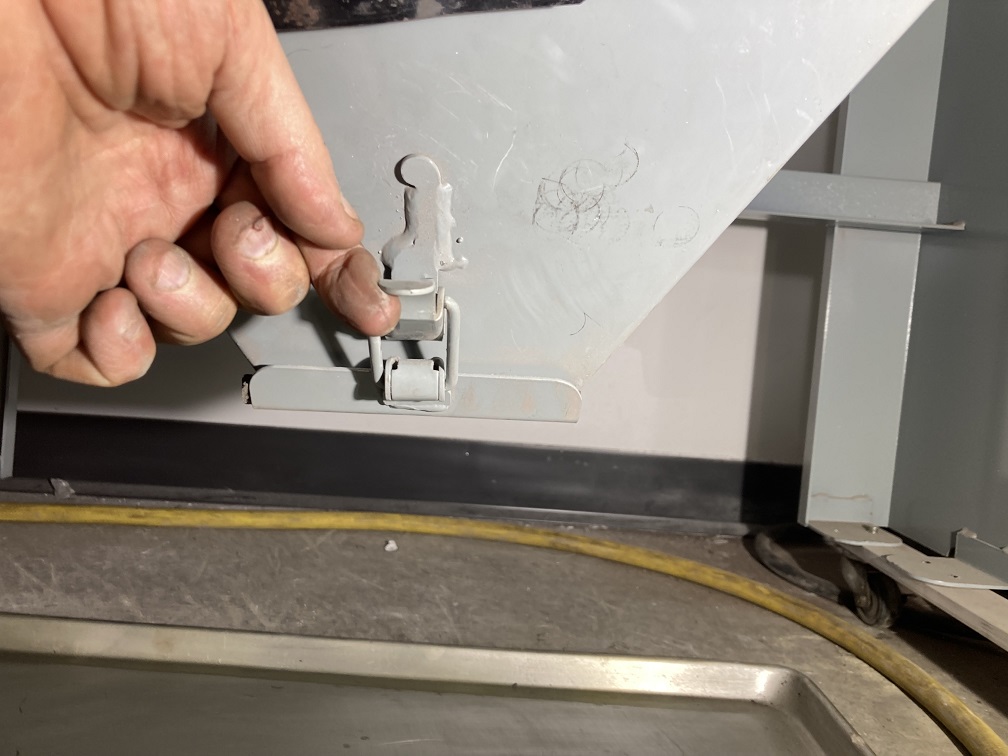
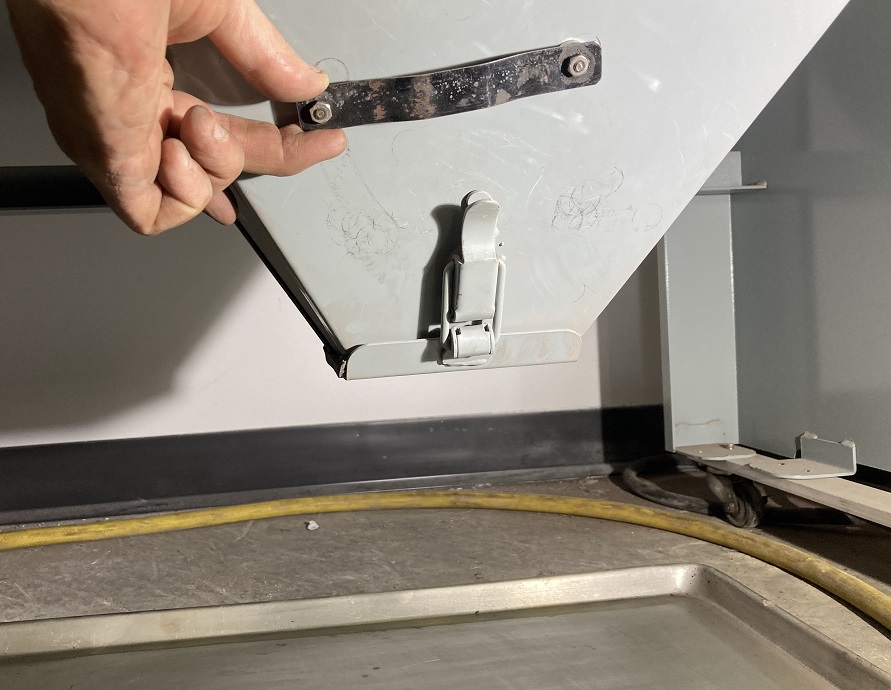
![[File:Blaster hopper drain 3.jpg|none|thumb|150x150px|Grasp the latch.]] | |||
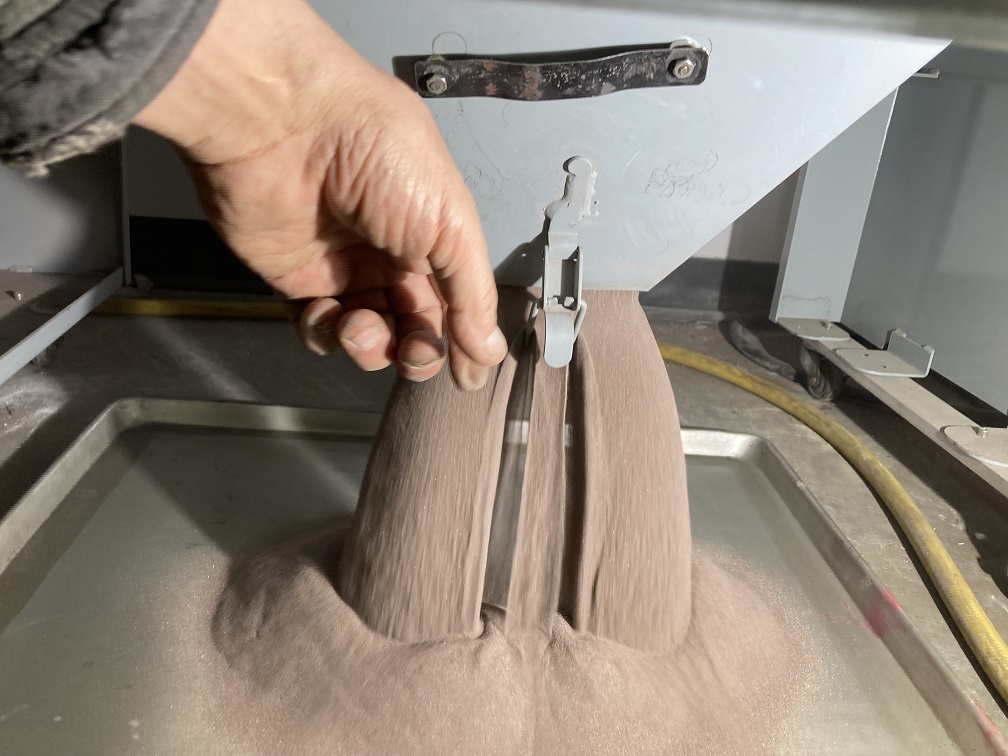
![[File:Blaster hopper drain 4.jpg|none|thumb|150x150px|Open the hatch, part way at first to begin opening, then fully to get all of the media out.]] | |||
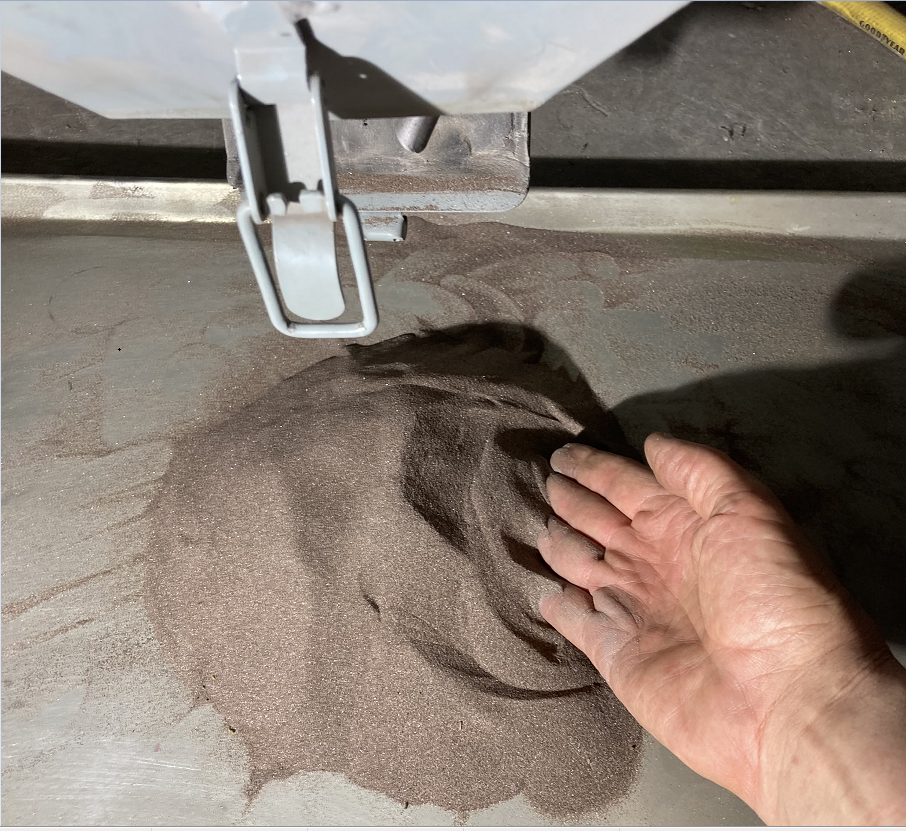
![[File:Sand blaster draining the hopper.png|none|thumb|150x150px|The total quantity of media in the hopper should be 10 - 20 lbs, or 3 - 5 quarts in volume of aluminum oxide media.]] | |||
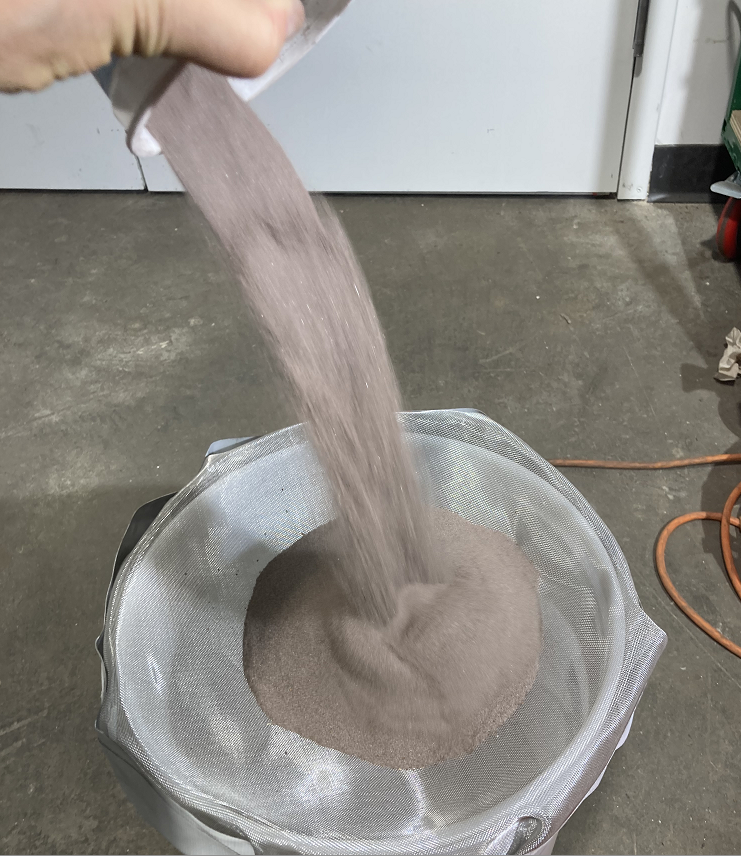
![[File:Sand blaster sifting the sand.png|none|thumb|173x173px|Pour the media through the screen provided to remove flakes.]] | |||
![[File:Sandblaster sifted residue.jpg|none|thumb|150x150px|Flakes can block the gun and damage the hoses.]] | |||
![[File:Blaster hopper drain 2.jpg|none|thumb|150x150px|Move the magnetic brace.]] | |||
|} | |||
== | == Draining Media from the Hopper == | ||
Empty the media hoppers and sift the media after each use. Each user in this shared facility must have access to good, clean media, not media contaminated by rust and remnants from the previous user's project. | |||
Place the baker's tray under the hopper before opening it. | |||
Sift media into the proper "In-Use" bucket. | |||
The latches holding the hopper hatches closed are supported by a magnetic brace helping hold the latch in place. Slide the brace out of the way before opening the latch. Open part way to allow media to begin to flow, then open the rest of the way. Always replace magnetic braces to support the latch after closing. | |||
== Adding Media to the Hopper == | |||
Open the hatch on the side of the blast cabinet and pour the media into the hopper. | |||
== Troubleshooting == | |||
{| class="wikitable" | |||
|+ | |||
!PROBLEM | |||
!CAUSE | |||
!REMEDY | |||
|- | |||
| rowspan="3" |Excessive Dust | |||
|Dust collection system malfunctioning | |||
|Empty canister and replace or clean filter bag | |||
|- | |||
|Abrasive media worn out | |||
|Replace media | |||
|- | |||
|Too much media in hopper | |||
|Remove excess media | |||
|- | |||
| rowspan="2" |Uneven blasting action | |||
|Too much media in hopper | |||
|Remove excess media | |||
|- | |||
|Top of abrasive tube covered | |||
|Move media away from top of pickup tube | |||
|- | |||
| rowspan="5" |Inadequate speed or efficiency of blast | |||
|Media worn out | |||
|Replace with new media | |||
|- | |||
|Worn blast gun parts or hoses | |||
|Inspect/adjust/replace parts | |||
|- | |||
|Too much blast material | |||
|Remove excess material, 10-15 pounds max | |||
|- | |||
|Too much air | |||
|Regulate air to 70-90 PSI | |||
|- | |||
|Too little air | |||
|Check shop air; make sure compressor is still on | |||
|- | |||
|Poor Blast Pattern | |||
|Nozzle worn | |||
|Replace nozzle | |||
|- | |||
| rowspan="3" |Static Electricity | |||
|Dry environmental conditions | |||
|Install static electricity band; Get lined gloves | |||
|- | |||
|Change in humidity | |||
|Stand on cardboard/rubber mat; | |||
Get lined gloves | |||
|- | |||
|Faulty ground wiring | |||
|Check electrical wiring | |||
|- | |||
|Surging | |||
|Too much media in hopper | |||
|Remove excess media | |||
|- | |||
|Unit won’t blast | |||
|Excessively worn blast gun parts | |||
|Properly replace parts | |||
|} | |||
== How it Works == | |||
The sandblasting gun is a pneumatic device called a '''Venturi'''. Compressed air is fed into the end of the gun and issues through the nozzle. Inside the gun the air jet traverses a side entry that is connected to a dip tube that reaches into the pile of media in the hopper. | |||
The jet of air from the high pressure side entrains slower-moving air in the side entry, causing it to be drawn up through the dip tube. Feeding 100 psi air from the air supply results in 2-5 psi of suction at the dip tube. | |||
= | {| class="infobox" cellspacing="5" style="width: 2em; text-align: left; font-size: 100%; line-height: 1.5em;" | ||
! colspan="2" class="infobox-image" | [[File:sandblaster_gun_with_dip_tube.jpg|250px|Gun and dip tube]] | |||
|- | |||
| colspan="2" | The blast gun with hose connections. Top: High pressure air feed; Middle Right: Blast Gun; Left: Suction hose with dip tube. | |||
|- | |||
|} | |||
{| class="infobox" cellspacing="5" style="width: 2em; text-align: left; font-size: 100%; line-height: 1.5em;" | |||
! colspan="2" class="infobox-image" | [[File:Ventri_effect.png|400px|Venturi]] | |||
|- | |||
| colspan="2" | A schematic view of the blast gun. | |||
|- | |||
|} | |||
The suction in the dip tube collects media from the hopper and feeds it into the air jet. Aluminum oxide has a density almost double that of glass. Excessive media in the hopper will cause it to compress in the lower portions and make it unflowable. | |||
'''The correct amount of aluminum oxide media for reliable operation is about 1 gallon, roughly 15 lbs.''' | |||
Latest revision as of 13:58, 15 October 2024
Link to: Metal Shop main page
Link to: Metal Shop tool list
This tool is used in Brackets tutorial 3.
| Sand Blaster | |
|---|---|
| General Info | |
| Make | Cyclone Manufacturing |
| Model | DW-7335 (obsolete) |
| Serial | Unknown |
| Specs | |
| Manual | Manual for a similar model |
| Asylum Info | |
| Location | Metal Shop |
| Rubric | |
| Training | Tool classes |
| Testing | Tool testing OR come to the shop on Tool Testing Night |
| Restrictions | RED |
| Eye protection required! | ||
|---|---|---|
Description
A sand blaster mixes abrasive grains with a jet of compressed air that's used to abrade the surface of a (usually metal) part. This cleans paint, rust, and other forms of dirt off the part; it also roughens the part's surface. The blast gun is enclosed in a sealed steel cabinet. The user manipulates the tool with thick rubber gloves that pass through the wall of the cabinet.
The sand blaster cabinet is located in a small room within the metal shop on the south wall adjacent to the fenced-in outdoor porch.
Sand blasting is the LAST stage, not the first, in cleaning a part and preparing the surface for finishing.
Do not use the sandblaster to clean heavily rusted pieces. This would be a slow, inefficient way to do that and is likely to clog and damage the equipment. After testing for lead, remove surface rust with wire brushes, manually or with a power tool attachment. Only then is the piece ready for sandblasting.
| "Sandblasting" is a misnomer. NEVER use actual sand in a blasting process. | |
|---|---|
Use For
- Steel
- Stainless steel
- Zinc-coated (aka galvanized) steel
- Aluminum, titanium, brass
- Painted metal (abrade with wire brush or sandpaper first)
- Lightly rusted parts after initial cleaning
Do Not Use For
- Lead-based paints
- Asbestos
- Greasy or oily parts
- Massively rusty parts
| Use a lead-test swab to verify that paint is NOT lead-based! | |
|---|---|
| If the sandblaster becomes contaminated with lead the media must be disposed as TOXIC WASTE and the cabinet must be thoroughly cleaned out! | |
|---|---|
Personal Safety
- NEVER use silica sand as an abrasive media. Always use media designated for blast use.
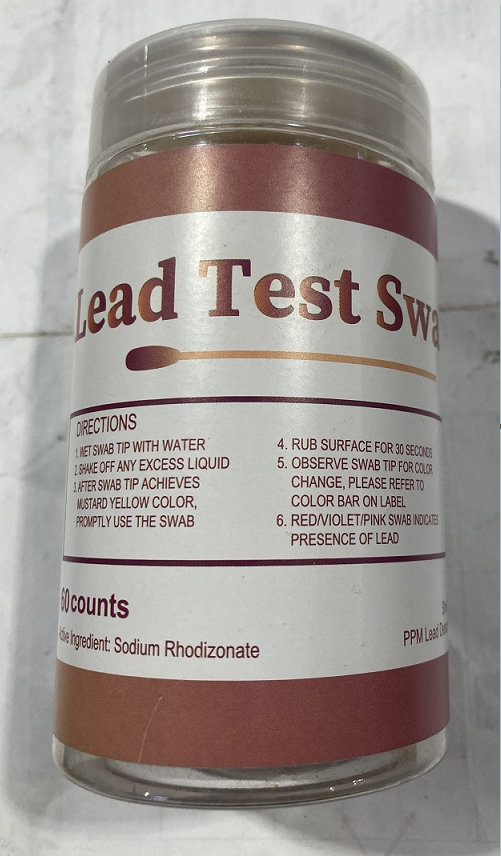
- Test paints and coatings for LEAD using the test swabs provided. The swabs change from yellow to red when lead is present. If lead is detected do not clean with the sand blaster.
- Wear safety goggles. Eyeglasses don't protect against abrasive dust.
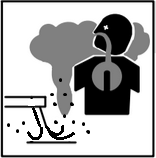
- Wear respirator or N95 or better mask when using the machine or working in the room when the machine is being used. All fine dust is hazardous to breathe.
- Place the workpiece in the blast cabinet and close the hatch tightly to avoid dust escaping from the cabinet. Check that doors on both ends are latched close along with both hoppers. When removing workpieces, some dust will unavoidably mix with the room air. Wear a dust mask at all times when working in sand blast room.
- Cabinet gloves and viewing window are at a fixed height above the floor. If they are too high, a stand should be provided. Use care on unstable stands.
- If the blast gun is not properly grounded to the cabinet, static electricity can cause shocks to the operator. If static shocks are encountered, check the ground connection to the gun.
- Use caution when lifting heavy parts into the sandblaster cabinet.
- If a part is too large to allow the hatch to close and seal, do not operate the sandblaster.
- Use caution with the foot pedal and hoses. Place them where the trigger cannot be accidentally depressed when the hoppers or cabinet are open.
Shop and Equipment Care
- EMPTY THE SAND BLASTER CABINET OF USED MEDIA AFTER EVERY USE. Sift used media into provided bucket matching the type of media you are using, and dispose of filtered waste in trash. Do not leave machine full of used media. Do not "top-off" with clean media in hoppers with used media. If media is too spent to use effectively, discard and start with fresh media. Mixing new media with partially spent media wastes media and makes an ineffective blast medium.
- Shop standard media is brown aluminum oxide. If using alternate media, such as glass or ceramic beads, empty cabinet and thoroughly clean rails etc. inside the cabinet, both before and after using this media.
- Do not abrade greasy or oily parts in the sandblaster. These can cause the media to clump and clog the flow lines, and damage the equipment.
- Do not move the blast cabinet when it is full of abrasive media.
- Do not point the blast gun at the rubber gloves or the cabinet window or the cabinet ceiling light.
How to Prepare Metal Workpieces for Blasting
| If the machine becomes contaminated with lead, tell the facilities manager so that the media can be safely disposed. It is toxic waste. It is not legal to throw the media away yourself. The blast cabinet must be scrubbed to remove toxic dust. | |
|---|---|
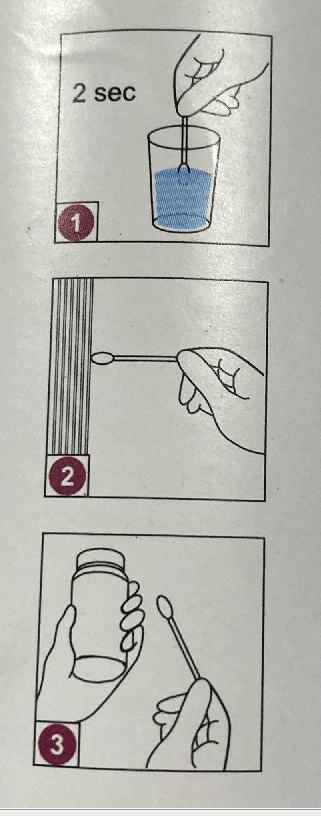
- TEST FOR LEAD. Lead and lead paint are forbidden on this machine. Use a lead test swab to verify that there is no lead on the surface of your workpiece.
- Moisten the tip with water, wait 2 seconds for the reagent to dissolve, then rub the surface.
- If no lead is present the swab stays yellow-orange. It turns crimson if lead is present.
- Clean off any massive rust with a grinder before placing the workpiece in the sandblaster. Large flakes of rust can mix with the blasting media and clog the flow lines leading to the gun.
- Degrease the workpiece. If greasy or oily, clean the workpiece with a solvent or a water-base cleaner such as Simple Green. Make sure it is dry before placing it in the blast cabinet.
Sandblaster Parts
The sand blasting room has ventilation to the outside. Turn on the ventilation using the timer switch on the wall next to the CNC plasma cutter.
The sandblaster has three free-standing components. The cabinet is the largest, and the other two are the components of the two-stage dust collector to the left of the cabinet.
The sandblaster has two bays. Presently the RIGHT bay is the only one used. Our compressed air service is only sufficient for operating one bay.
Turn on the dust collector (located in the back of the room) by plugging it and the air filter into the outlet on the left.
Turn on the cabinet lights with the small switch on right hand box.
The sandblasting action is controlled with the foot pedal on the floor or stand. Always stay aware of the placement of the foot pedal so it's not accidentally triggered.
Instructions For Use
1. Ensure that the air compressor is on. It is located in the closet in the loading dock area.
2. Turn on the room ventilator. This switch is in the CNC Plasma area (see image on right).
3. Put on goggles and a dust mask or respirator.
4. Check the air pressure at the regulator on the blaster cabinet. Target pressure is 60 - 100psi.
5. Plug in the two-stage air filter at the end of sand blaster room, and cabinet if that's not already plugged in.
6. Check that the media hoppers were emptied by the last user. If they were not, empty and sift the media before beginning.
7. Add media to the hopper where you intend to work, pouring it through the grate in the cabinet. The correct amount of media is between 10 and 20 lbs, depending on the media. Too much media will compact in the hopper can clog the feed hose. Make sure the feed tube is down in the media.
8. Place the workpiece in the cabinet and latch the hatch shut. Confirm that the doors on both ends of the cabinet are latched, as well as both hoppers.
9. Arrange the stand as/if needed and place the foot pedal in a convenient spot. Be careful of tippy step-stand.
10. Turn on the cabinet light switch on top right of the cabinet. Optionally, also shut off room light for better visibility into the cabinet.
11. Stick hands into rubber gloves, grasp blasting gun and step on the foot pedal to BLAST!!!
- If no media appears to be coming out, and no abrasion is happening, check valve lever on front of cabinet.
- While the air is flowing, it may be necessary to wiggle the dip tube that reaches down into the hopper where the media is located.
- After a long period working, the media may migrate from the hopper in use to the hopper not in use. Simply place baker's tray under opposite hopper, open to collect media, close, and pour the tray back into the hopper in use. BE CAREFUL WHEN DOING THIS to stay always aware of the foot pedal location, so as not to accidentally trigger it while the cabinet is open.
- Open the cabinet and inspect your work periodically. Give the hatch a thump and wait a minute or two for the dust to settle before opening it.
12. When finished, place baker's tray under the hopper, empty the media out of the machine and carefully pour through the sifter back into the proper "in-use" bucket. Empty both hoppers as media will have migrated during use.
13. Sweep loose media off the floor. Loose media is a respiratory hazard and can create a slip hazard. Remove used paper towel, gloves etc., from room; empty dust pan and waste from sieve into trash can in main metal shop.
Draining Media from the Hopper
Empty the media hoppers and sift the media after each use. Each user in this shared facility must have access to good, clean media, not media contaminated by rust and remnants from the previous user's project.
Place the baker's tray under the hopper before opening it.
Sift media into the proper "In-Use" bucket.
The latches holding the hopper hatches closed are supported by a magnetic brace helping hold the latch in place. Slide the brace out of the way before opening the latch. Open part way to allow media to begin to flow, then open the rest of the way. Always replace magnetic braces to support the latch after closing.
Adding Media to the Hopper
Open the hatch on the side of the blast cabinet and pour the media into the hopper.
Troubleshooting
| PROBLEM | CAUSE | REMEDY |
|---|---|---|
| Excessive Dust | Dust collection system malfunctioning | Empty canister and replace or clean filter bag |
| Abrasive media worn out | Replace media | |
| Too much media in hopper | Remove excess media | |
| Uneven blasting action | Too much media in hopper | Remove excess media |
| Top of abrasive tube covered | Move media away from top of pickup tube | |
| Inadequate speed or efficiency of blast | Media worn out | Replace with new media |
| Worn blast gun parts or hoses | Inspect/adjust/replace parts | |
| Too much blast material | Remove excess material, 10-15 pounds max | |
| Too much air | Regulate air to 70-90 PSI | |
| Too little air | Check shop air; make sure compressor is still on | |
| Poor Blast Pattern | Nozzle worn | Replace nozzle |
| Static Electricity | Dry environmental conditions | Install static electricity band; Get lined gloves |
| Change in humidity | Stand on cardboard/rubber mat;
Get lined gloves | |
| Faulty ground wiring | Check electrical wiring | |
| Surging | Too much media in hopper | Remove excess media |
| Unit won’t blast | Excessively worn blast gun parts | Properly replace parts |
How it Works
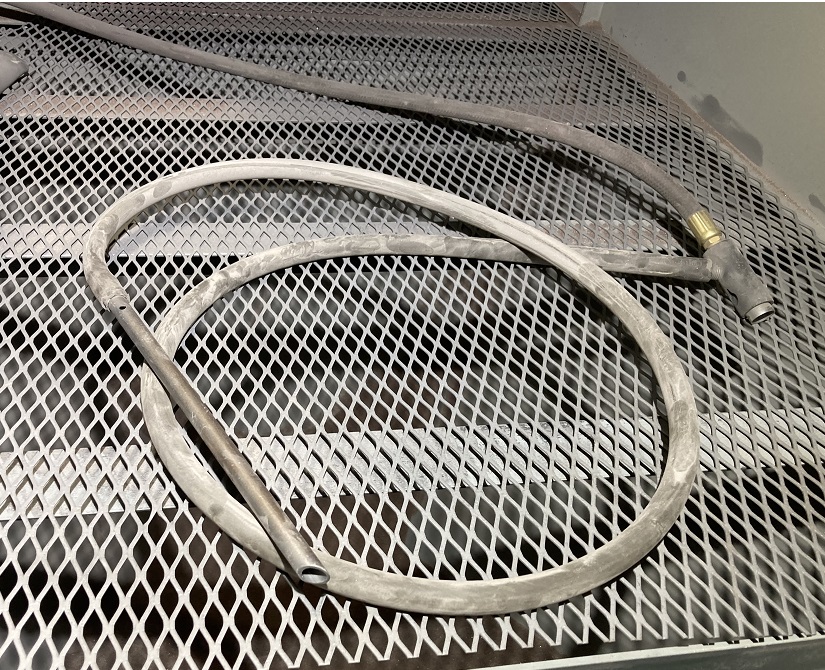
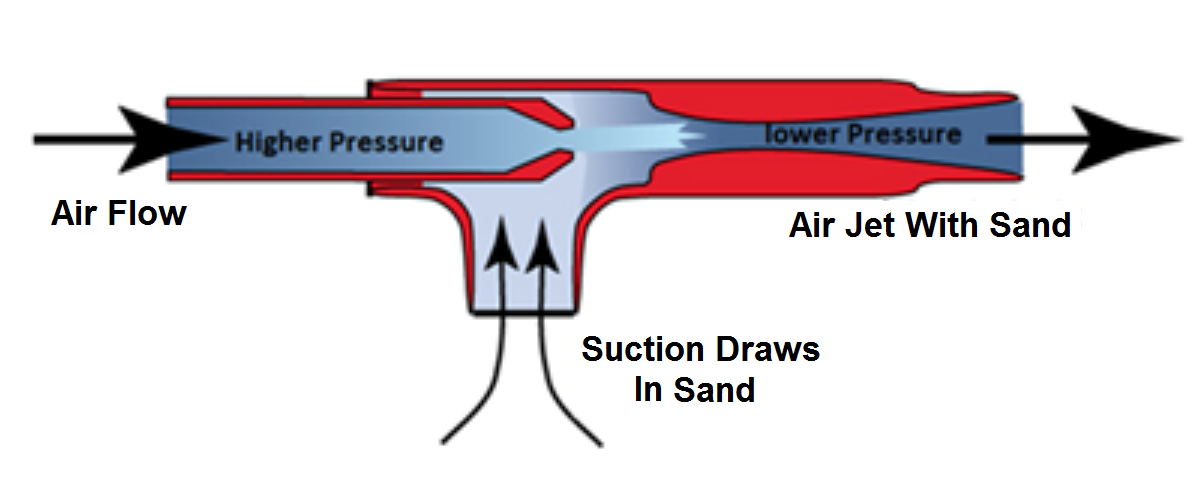
The sandblasting gun is a pneumatic device called a Venturi. Compressed air is fed into the end of the gun and issues through the nozzle. Inside the gun the air jet traverses a side entry that is connected to a dip tube that reaches into the pile of media in the hopper.
The jet of air from the high pressure side entrains slower-moving air in the side entry, causing it to be drawn up through the dip tube. Feeding 100 psi air from the air supply results in 2-5 psi of suction at the dip tube.
| |
|---|---|
| The blast gun with hose connections. Top: High pressure air feed; Middle Right: Blast Gun; Left: Suction hose with dip tube. |
| |
|---|---|
| A schematic view of the blast gun. |
The suction in the dip tube collects media from the hopper and feeds it into the air jet. Aluminum oxide has a density almost double that of glass. Excessive media in the hopper will cause it to compress in the lower portions and make it unflowable.
The correct amount of aluminum oxide media for reliable operation is about 1 gallon, roughly 15 lbs.
