SolidWorks Tutorial 1a: Design of a 3D Printed Electronic Box
Introduction
This tutorial is for students with no prior experience with SolidWorks. In it we create a new part from scratch: A simple electronics enclosure that could be printed on a 3D printer.
We cover sketching and extrusion of sketches into the third dimension. The sketching tools include rectangles, circles, lines, points, fillets and text on a surface. We also set some constraints for features in a sketch to introduce the students to parametric design. The feature tools we cover include extruding a boss, extruded cuts and fillets.
Load SolidWorks and Open a Sketch
These instructions pertain to the Solidworks installation at Artisans Asylum as of this writing, May 2025. There are presently ten seats in the Photo/Design Shop in the Holton building and two seats in the social area in the Antwerp building.
Double-click on the
SolidWorks 2024 icon on the desktop. It takes a minute or so to load, and then it will display a dialog box like the one shown below.
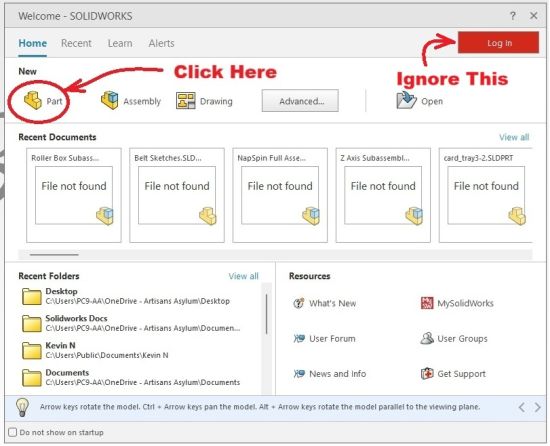
Click on the button that says "Part" to create a new document for a single 3D part (i.e. not an assembly or a 2D drawing.)
SolidWorks functions by taking 2-D sketches and expanding them into the third dimension. The first step is always to make a 2-D sketch.
In the upper-left-hand corner of the screen, click on the tab that says "Sketch" and click on the button there that also says "Sketch."
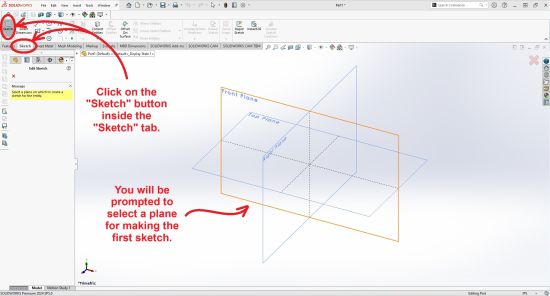
A set of planes will be displayed for the cardinal directions of the modeling space. Select one of them. For this tutorial, it doesn't matter which.
Start Sketching
We will use a few of the sketching tools displayed in the toolbar near the top of the screen under the "Sketch" tab.
Sketch a Rectangle
Move the cursor over the "Rectangle" tool in the toolbar. It is near the left of the collection. If you hover it there without clicking, a helpful animated window displays the action of the tool. This is shown below.
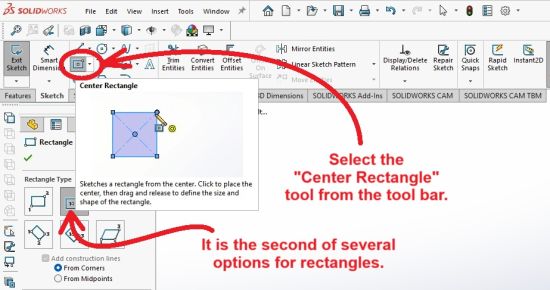
When you click (the left-mouse button) on the "Rectangle" tool, a display opens in the left margin giving several options for sketching rectangles in different ways. The second one in the list is the "Center Rectangle" tool. Select it. This is the one we want to use now.
Move the cursor over to the center of the window, where a small pair of arrows indicate the origin of the space. When you hover the cursor near to this cluster, the origin will light up, indicating that clicking will "snap" the location of the first point onto the origin. Click there and drag the cursor away from the origin. A rectangle will be displayed with its center-point at the origin.
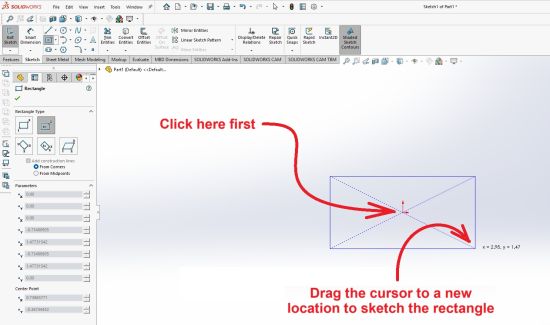
Release the left mouse button to complete the rectangle. You don't need to worry about its size on the screen.
Click on the (
) green check-mark in the upper left-hand corner to accept it.
The next step is to specify some dimensions. Click on the button that says "Smart Dimension."
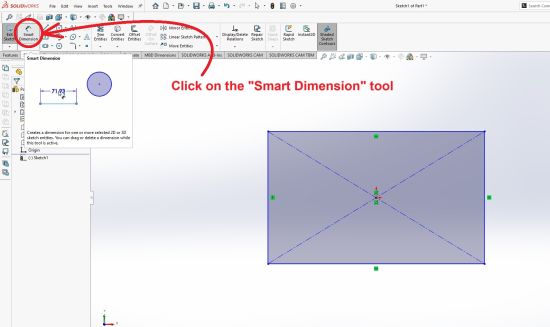
This opens a tool that allows you to rapidly set the size of the rectangle.
To operate the tool click the cursor on one of the sides of the rectangle. Holding down the left-mouse button, drag the cursor sideways and see the dimension arrows drag across the window to a new location. When you release the left mouse button, the arrows will stop moving and an edit window will open that allows you to type in a dimension for the selected rectangle side.
For this exercise we set the first box side to 2.5 inches.
With the "Smart Dimension" tool still selected, click on one of the perpendicular sides on the rectangle and drag the arrow to some other location. Set the dimension for the second side to 4.5 inches. This is the size to fit an Arduino Due circuit board somewhat closely.
Rounding the Corners
In this section we round the rectangle corners using the "Fillet" sketching tool.
Move the cursor up to the tool and select it.
A settings box appears in the left margin. Change the radius parameter from the default value of 0.1" to 0.25".
The move the cursor up to a corner of the rectangle and hover it close to the corner. A yellow prototype image should appear in the vicinity of the corner, showing the fillet. Click the mouse there to add it to the entities list.
Click on the other three corners to create fillets on all four corners. Click on the green check box to accept.
To exit the fillet tool you will need to click on the red "X" too. This will add the fillets to the sketch.
Click on the "Sketch" button to exit this finished sketch. Notice that the entity comprising the sketch has been added to the list of operations in the left margin. The blue highlighting means the entry has been selected.
Extruding the Box Walls
Make sure the sketch is selected in the history list in the left margin.
Then hit the "Features" tab on the extreme left and then hit the "Extruded Boss/Base" tool button on the extreme left.
This tool opens a new dialog on the left margin and changes the view in the window. A solid shape should be visible in yellow.
Click on the check-box that says "Thin Feature." The solid shape will turn into a thin shell. You can keep the thickness at its default value of 0.1".
Use a button with opposing arrows (shown below) to ensure that the thin shell is defined at the INSIDE of the contour of the sketch. This is important in the next section when we create the bottom of the box.
The height of the box is set to 1.50 inches in the indicated edit field.
Click the green check-mark in the upper left of the dialog box to accept the dimension of the box walls.
Adding the Box Bottom
Note that the history list shows the feature as a 3D feature called "Extrude-Thin 1". The sketch used to build it is now a member of this feature, and can be accessed by expanding the element on the list.
We can use this sketch a SECOND time to form the box bottom. Select Sketch1 and then click on "Extruded Boss/Base" from the "Features" tab.
If you DON'T check the "Thin Feature" check-box you get a solid that fills the whole area of the sketch. Click on the green check-mark to accept this feature with no changes.