Cold Saw: Difference between revisions
No edit summary |
No edit summary |
||
| (13 intermediate revisions by the same user not shown) | |||
| Line 1: | Line 1: | ||
[[Category:Tools]][[Category:Metal Shop]] | [[Category:Tools]] | ||
Link to: [[:Category:Metal Shop | Metal Shop main page]] | |||
Link to: [[:Category:Metal Shop#Tools | Metal Shop tool list]] | |||
Use of this tool is taught in {{:AAClass_MET_1}} | |||
{{ToolBox | {{ToolBox | ||
| Line 13: | Line 18: | ||
|location = Metal Shop | |location = Metal Shop | ||
|rubric = | |rubric = | ||
|training = | |training ={{:AAClass_MET_1}} | ||
|testing = [https://www.artisansasylum.com/tool-testing Tool testing], or [[:Category:Metal Shop#Tool Testing | |testing = [https://www.artisansasylum.com/tool-testing Tool testing], or [[:Category:Metal Shop#Tool Testing Night|come to the shop on Tool Testing Night]] | ||
Night|come to the shop on Tool Testing Night]] | |||
|restrictions = red | |restrictions = red | ||
|tool_categories = Metal Shop | |tool_categories = [[Category:Metal Shop]] | ||
}} | }} | ||
==Description== | |||
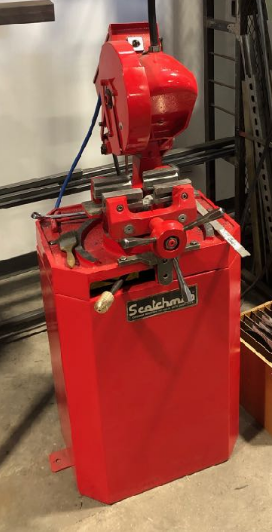
This tool is a circular saw mounted to a mechanical arm that allows it to travel smoothly in the plane of the cut. It can tilt up and down to cut a metal workpiece. The workpiece is clamped firmly in a vise. The vise can be rotated to make miter cuts. | |||
Superficially it resembles a chop saw but operates much differently. The rotation speed of the blade is slower and forces on the workpiece are much larger with a cold saw. The workpiece stays cool and the cuts are more precise. | |||
==Use for:== | ==Use for:== | ||
| Line 79: | Line 90: | ||
==Basic Operation Instructions== | ==Basic Operation Instructions== | ||
''To see a full-size rendering of the figures below, click on the image.'' | |||
1. Using the supplied wrench, loosen the bolt at the base of the Blade Guard. Fully open the Blade Guard and re-tighten the Blade Guard Bolt to keep it open. | |||
{| class="infobox" cellspacing="5" style="width: 22em; text-align: left; font-size: 100%; line-height: 1.5em;" | {| class="infobox" cellspacing="5" style="width: 22em; text-align: left; font-size: 100%; line-height: 1.5em;" | ||
! colspan="2" class="infobox-image" | [[File:Metal_Shop_cold_saw_blade_guard.png| | ! colspan="2" class="infobox-image" | [[File:Metal_Shop_cold_saw_blade_guard.png|350px|blade guard]] | ||
|- | |- | ||
| colspan="2" | Cold Saw blade guard | | colspan="2" | Cold Saw blade guard | ||
| Line 88: | Line 103: | ||
{| class="infobox" cellspacing="5" style="width: 22em; text-align: left; font-size: 100%; line-height: 1.5em;" | {| class="infobox" cellspacing="5" style="width: 22em; text-align: left; font-size: 100%; line-height: 1.5em;" | ||
! colspan="2" class="infobox-image" | [[File:Metal_Shop_cold_saw_blade_flange.png| | ! colspan="2" class="infobox-image" | [[File:Metal_Shop_cold_saw_blade_flange.png|500px|blade flange]] | ||
|- | |- | ||
| colspan="2" | Cold Saw blade flange | | colspan="2" | Cold Saw blade flange | ||
| Line 95: | Line 110: | ||
{| class="infobox" cellspacing="5" style="width: 22em; text-align: left; font-size: 100%; line-height: 1.5em;" | {| class="infobox" cellspacing="5" style="width: 22em; text-align: left; font-size: 100%; line-height: 1.5em;" | ||
! colspan="2" class="infobox-image" | [[File:Metal_Shop_cold_saw_blade_box.png| | ! colspan="2" class="infobox-image" | [[File:Metal_Shop_cold_saw_blade_box.png|250px|blade box]] | ||
|- | |- | ||
| colspan="2" | Cold Saw blade box | | colspan="2" | Cold Saw blade box | ||
| Line 103: | Line 118: | ||
{| class="infobox" cellspacing="5" style="width: 22em; text-align: left; font-size: 100%; line-height: 1.5em;" | {| class="infobox" cellspacing="5" style="width: 22em; text-align: left; font-size: 100%; line-height: 1.5em;" | ||
! colspan="2" class="infobox-image" | [[File:Metal_Shop_cold_saw_blade_rotation.png| | ! colspan="2" class="infobox-image" | [[File:Metal_Shop_cold_saw_blade_rotation.png|350px|blade rotation]] | ||
|- | |- | ||
| colspan="2" | Rotation direction of the blade on the Cold Saw | | colspan="2" | Rotation direction of the blade on the Cold Saw | ||
| Line 111: | Line 126: | ||
{| class="infobox" cellspacing="5" style="width: 22em; text-align: left; font-size: 100%; line-height: 1.5em;" | {| class="infobox" cellspacing="5" style="width: 22em; text-align: left; font-size: 100%; line-height: 1.5em;" | ||
! colspan="2" class="infobox-image" | [[File:Metal_Shop_cold_saw_blade_flange_installation.png| | ! colspan="2" class="infobox-image" | [[File:Metal_Shop_cold_saw_blade_flange_installation.png|500px|blade flange installation]] | ||
|- | |- | ||
| colspan="2" | Installation of the blade flange on the Cold Saw | | colspan="2" | Installation of the blade flange on the Cold Saw | ||
| Line 118: | Line 133: | ||
{| class="infobox" cellspacing="5" style="width: 22em; text-align: left; font-size: 100%; line-height: 1.5em;" | {| class="infobox" cellspacing="5" style="width: 22em; text-align: left; font-size: 100%; line-height: 1.5em;" | ||
! colspan="2" class="infobox-image" | [[File:Metal_Shop_cold_saw_blade_adjustment_knob.png| | ! colspan="2" class="infobox-image" | [[File:Metal_Shop_cold_saw_blade_adjustment_knob.png|350px|blade adjustment]] | ||
|- | |- | ||
| colspan="2" | Cold Saw cut depth adjustment | | colspan="2" | Cold Saw cut depth adjustment | ||
| Line 126: | Line 141: | ||
{| class="infobox" cellspacing="5" style="width: 22em; text-align: left; font-size: 100%; line-height: 1.5em;" | {| class="infobox" cellspacing="5" style="width: 22em; text-align: left; font-size: 100%; line-height: 1.5em;" | ||
! colspan="2" class="infobox-image" | [[File:Metal_Shop_cold_saw_parts_labeled.png| | ! colspan="2" class="infobox-image" | [[File:Metal_Shop_cold_saw_parts_labeled.png|350px|saw parts]] | ||
|- | |- | ||
| colspan="2" | The parts of the Cold Saw | | colspan="2" | The parts of the Cold Saw | ||
| Line 134: | Line 149: | ||
{| class="infobox" cellspacing="5" style="width: 22em; text-align: left; font-size: 100%; line-height: 1.5em;" | {| class="infobox" cellspacing="5" style="width: 22em; text-align: left; font-size: 100%; line-height: 1.5em;" | ||
! colspan="2" class="infobox-image" | [[File:Metal_Shop_cold_saw_support_roller_balance.png| | ! colspan="2" class="infobox-image" | [[File:Metal_Shop_cold_saw_support_roller_balance.png|650px|roller balance]] | ||
|- | |- | ||
| colspan="2" | Balance points for stock supports | | colspan="2" | Balance points for stock supports | ||
| Line 141: | Line 156: | ||
{| class="infobox" cellspacing="5" style="width: 22em; text-align: left; font-size: 100%; line-height: 1.5em;" | {| class="infobox" cellspacing="5" style="width: 22em; text-align: left; font-size: 100%; line-height: 1.5em;" | ||
! colspan="2" class="infobox-image" | [[File:Metal_Shop_cold_saw_capacities.png| | ! colspan="2" class="infobox-image" | [[File:Metal_Shop_cold_saw_capacities.png|550px|capacities]] | ||
|- | |- | ||
| colspan="2" | Stock capacities for the Cold Saw | | colspan="2" | Stock capacities for the Cold Saw | ||
|- | |- | ||
|} | |} | ||
2. Using the Red-Handled Hex Key Wrench, remove the Blade Bolt and Blade Flange. | 2. Using the Red-Handled Hex Key Wrench, remove the Blade Bolt and Blade Flange. | ||
| Line 212: | Line 225: | ||
* If necessary, clean the floor. | * If necessary, clean the floor. | ||
{| class="infobox" cellspacing="5" style="width: 22em; text-align: left; font-size: 100%; line-height: 1.5em;" | |||
! colspan="2" class="infobox-image" | [[File:Cold_Saw_100_tooth_blade.jpg|250px|100 tooth]] | |||
|- | |||
| colspan="2" | Appropriate stock sizes for the 100-tooth blade (Click on image to view at full scale) | |||
|- | |||
|} | |||
{| class="infobox" cellspacing="5" style="width: 22em; text-align: left; font-size: 100%; line-height: 1.5em;" | |||
! colspan="2" class="infobox-image" | [[File:Cold_Saw_120_tooth_blade.jpg|250px|120 tooth]] | |||
|- | |||
| colspan="2" | Appropriate stock sizes for the 120-tooth blade (Click on image to view at full scale) | |||
|- | |||
|} | |||
{| class="infobox" cellspacing="5" style="width: 22em; text-align: left; font-size: 100%; line-height: 1.5em;" | |||
! colspan="2" class="infobox-image" | [[File:Cold_Saw_150_tooth_blade.jpg|250px|150 tooth]] | |||
|- | |||
| colspan="2" | Appropriate stock sizes for the 150-tooth blade (Click on image to view at full scale) | |||
|- | |||
|} | |||
{| class="infobox" cellspacing="5" style="width: 22em; text-align: left; font-size: 100%; line-height: 1.5em;" | |||
! colspan="2" class="infobox-image" | [[File:Cold_Saw_180_tooth_blade.jpg|250px|180 tooth]] | |||
|- | |||
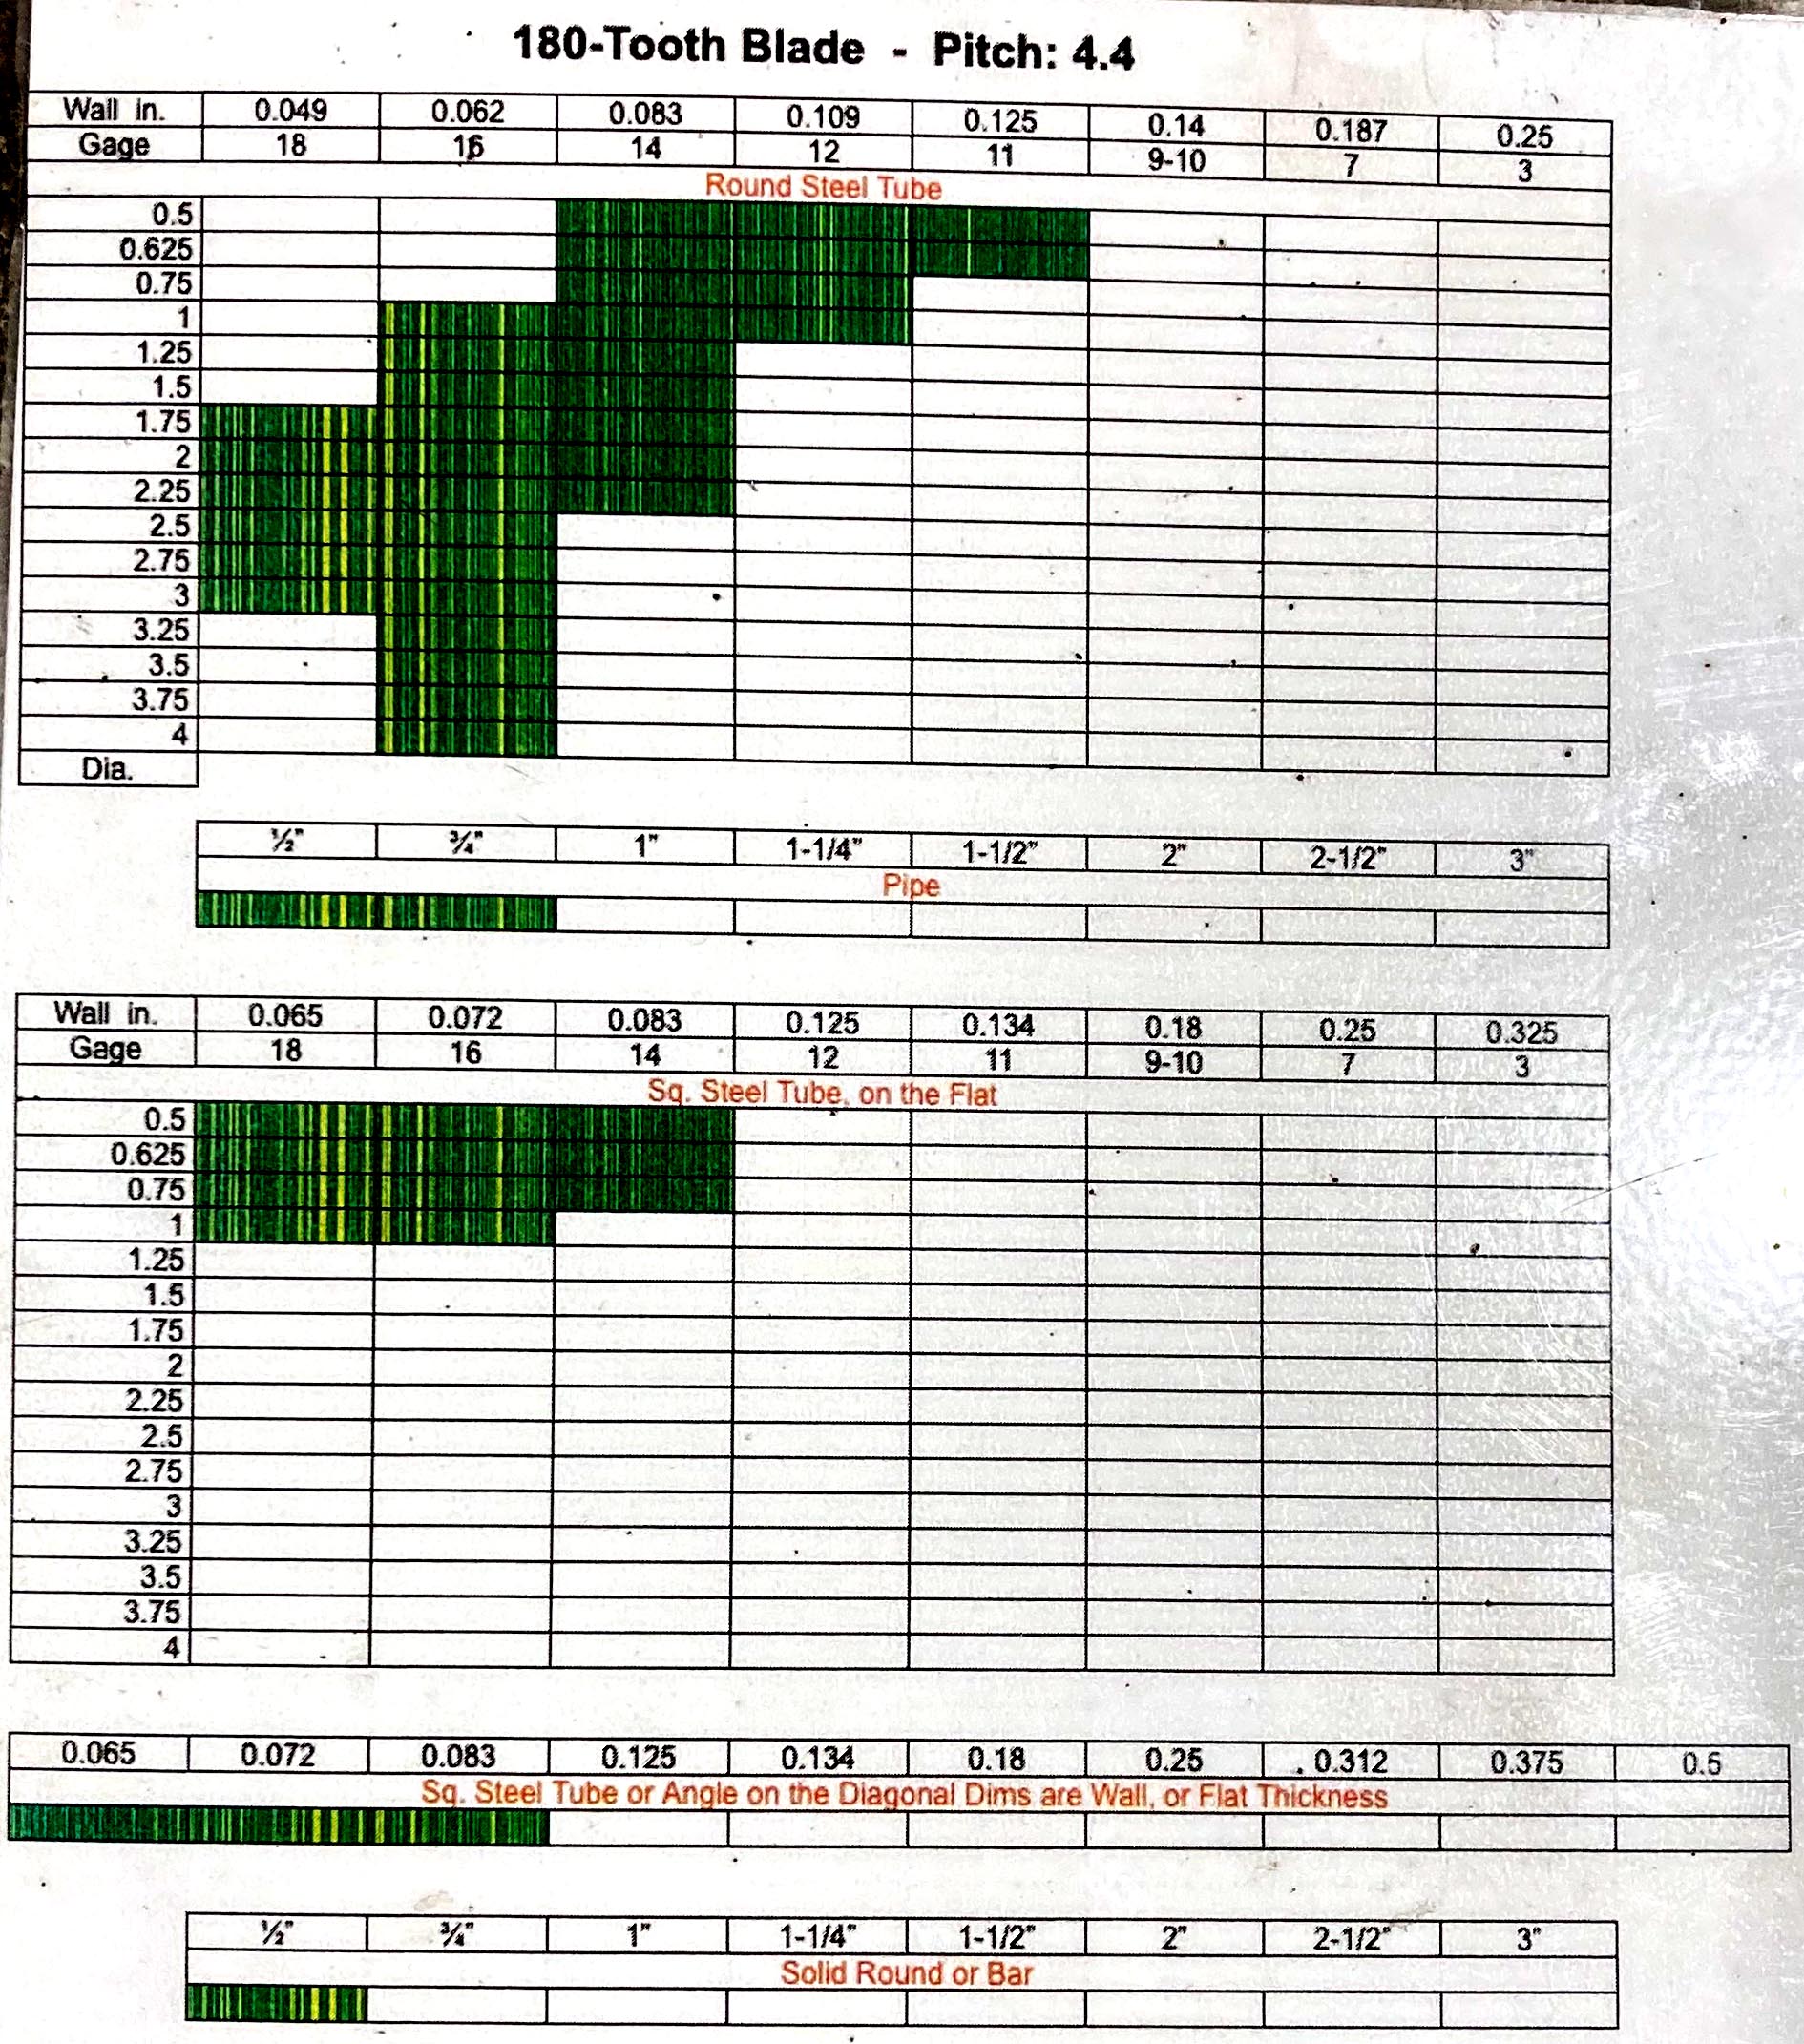
| colspan="2" | Appropriate stock sizes for the 180-tooth blade (Click on image to view at full scale) | |||
|- | |||
|} | |||
{| class="infobox" cellspacing="5" style="width: 22em; text-align: left; font-size: 100%; line-height: 1.5em;" | |||
! colspan="2" class="infobox-image" | [[File:Cold_Saw_240_tooth_blade.jpg|250px|240 tooth]] | |||
|- | |||
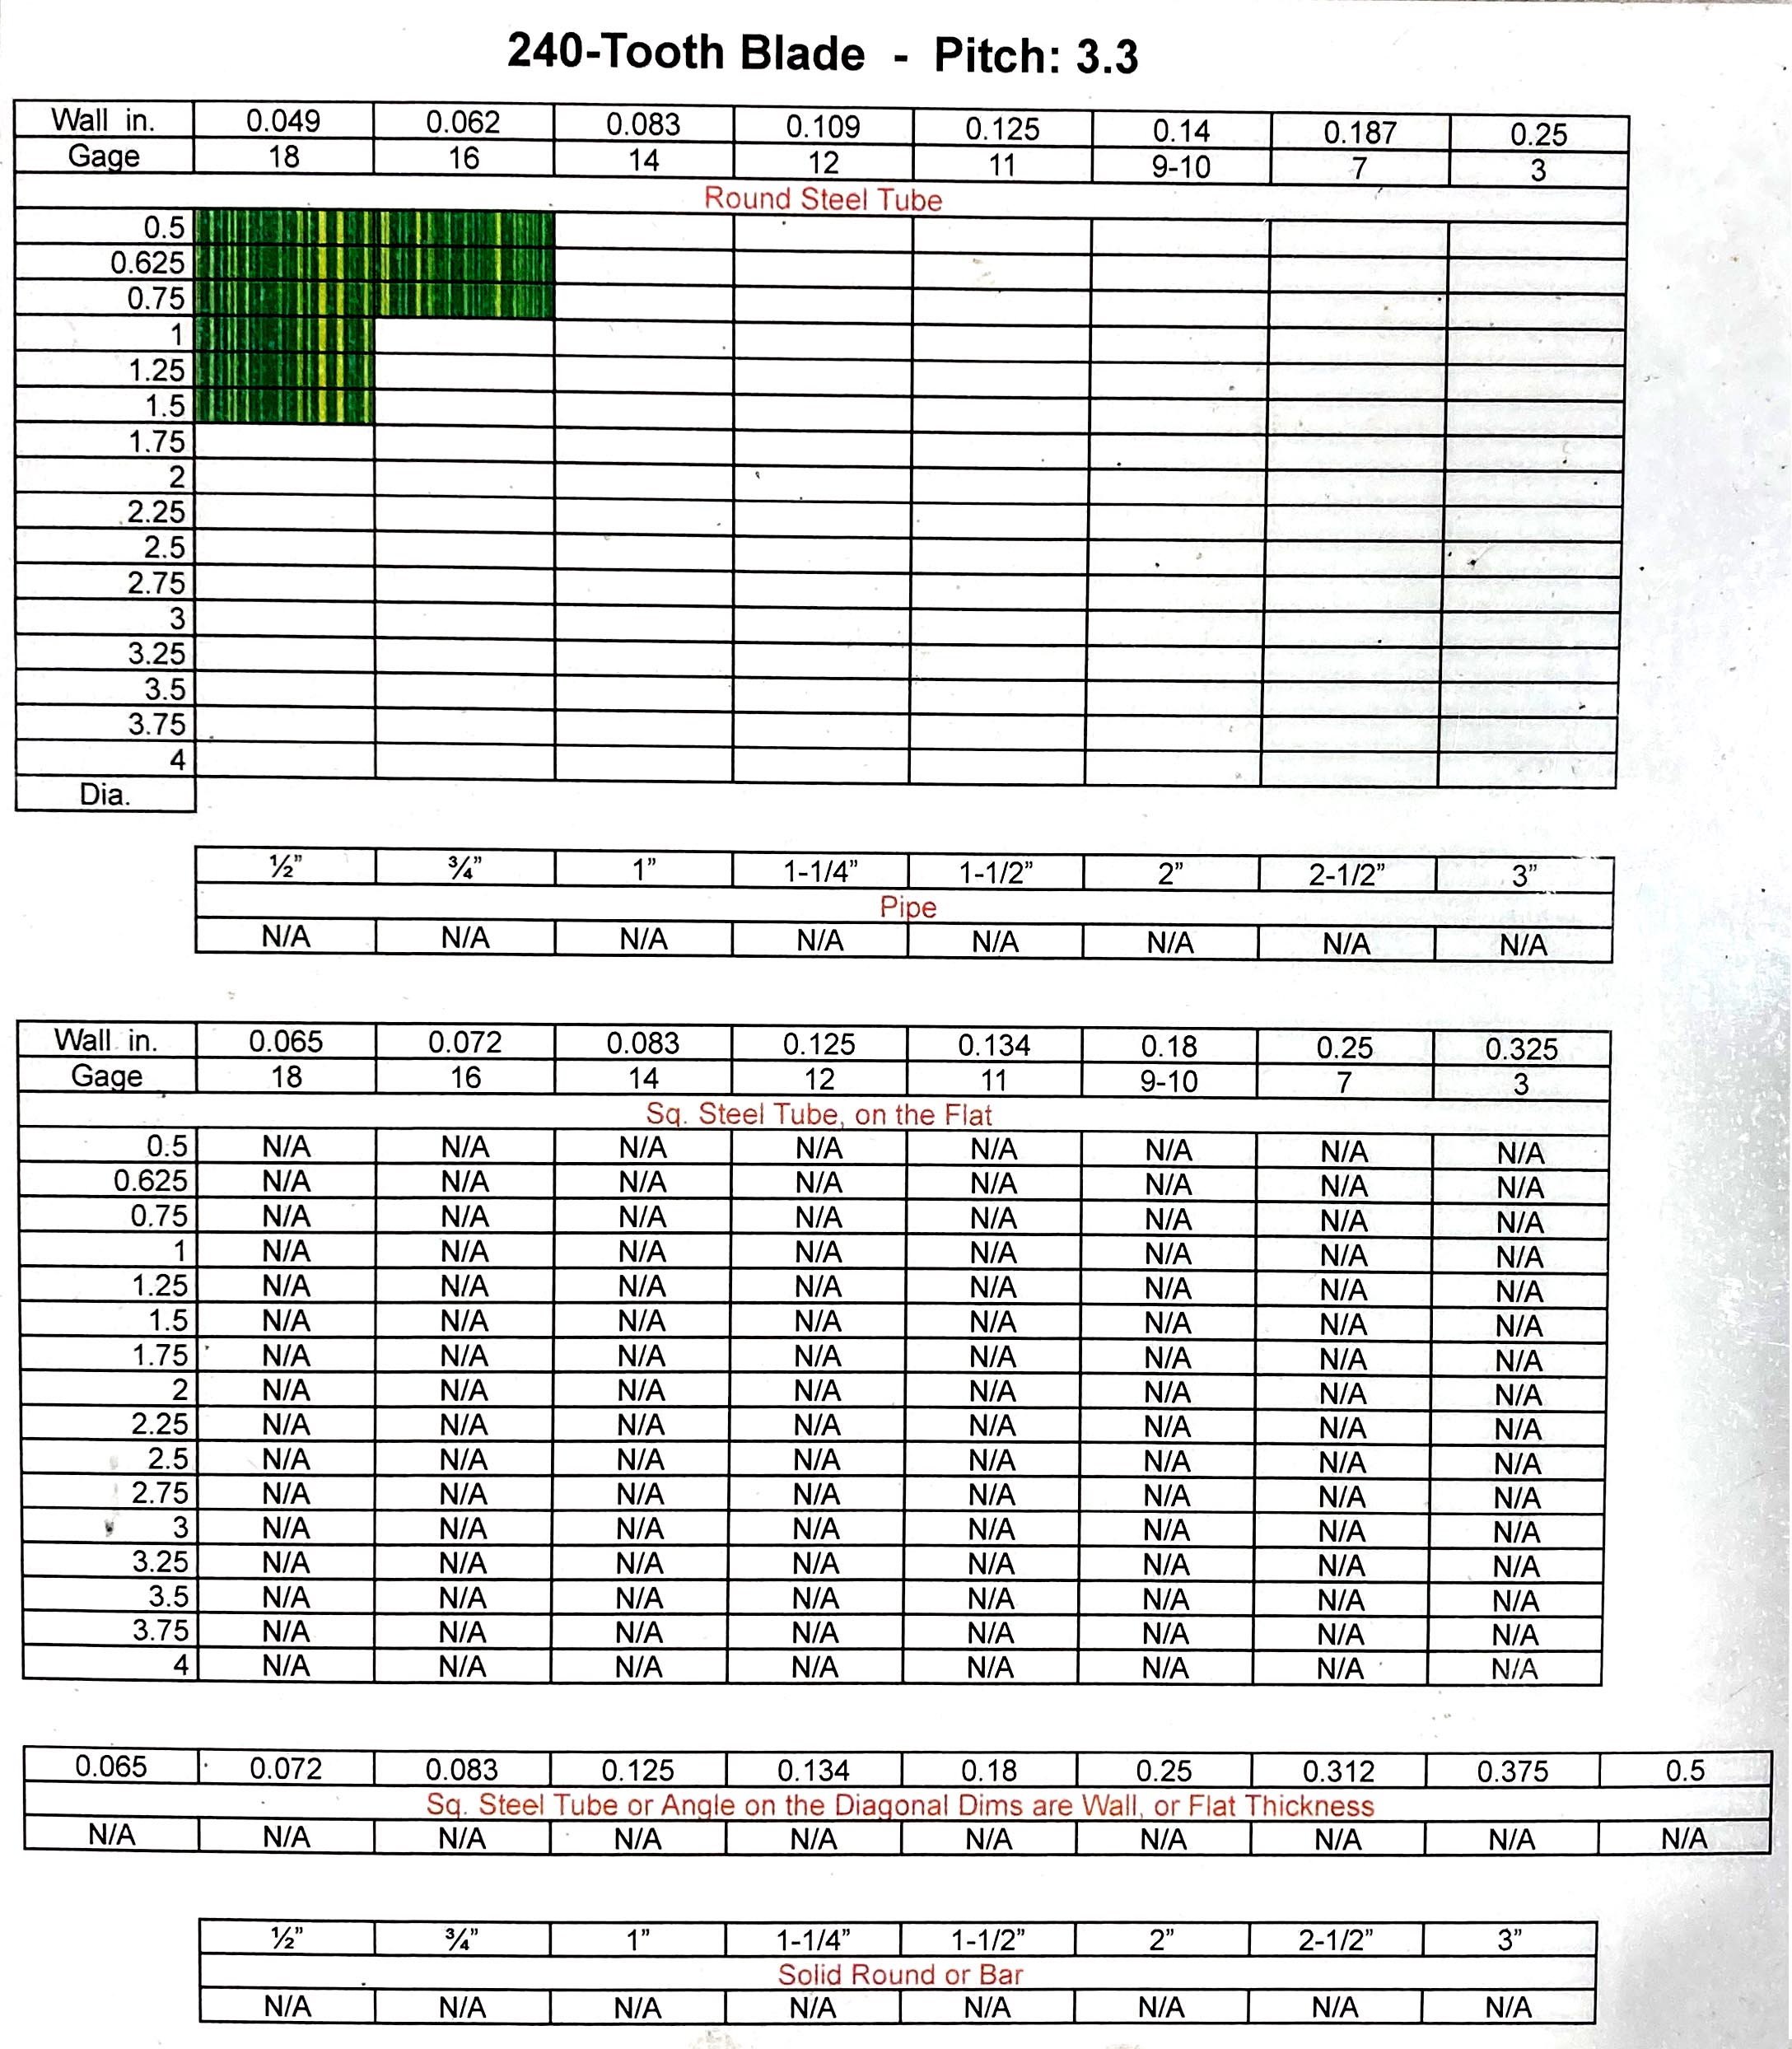
| colspan="2" | Appropriate stock sizes for the 240-tooth blade (Click on image to view at full scale) | |||
|- | |||
|} | |||
{| class="infobox" cellspacing="5" style="width: 22em; text-align: left; font-size: 100%; line-height: 1.5em;" | |||
! colspan="2" class="infobox-image" | [[File:Cold_Saw_300_tooth_blade.jpg|250px|300 tooth]] | |||
|- | |||
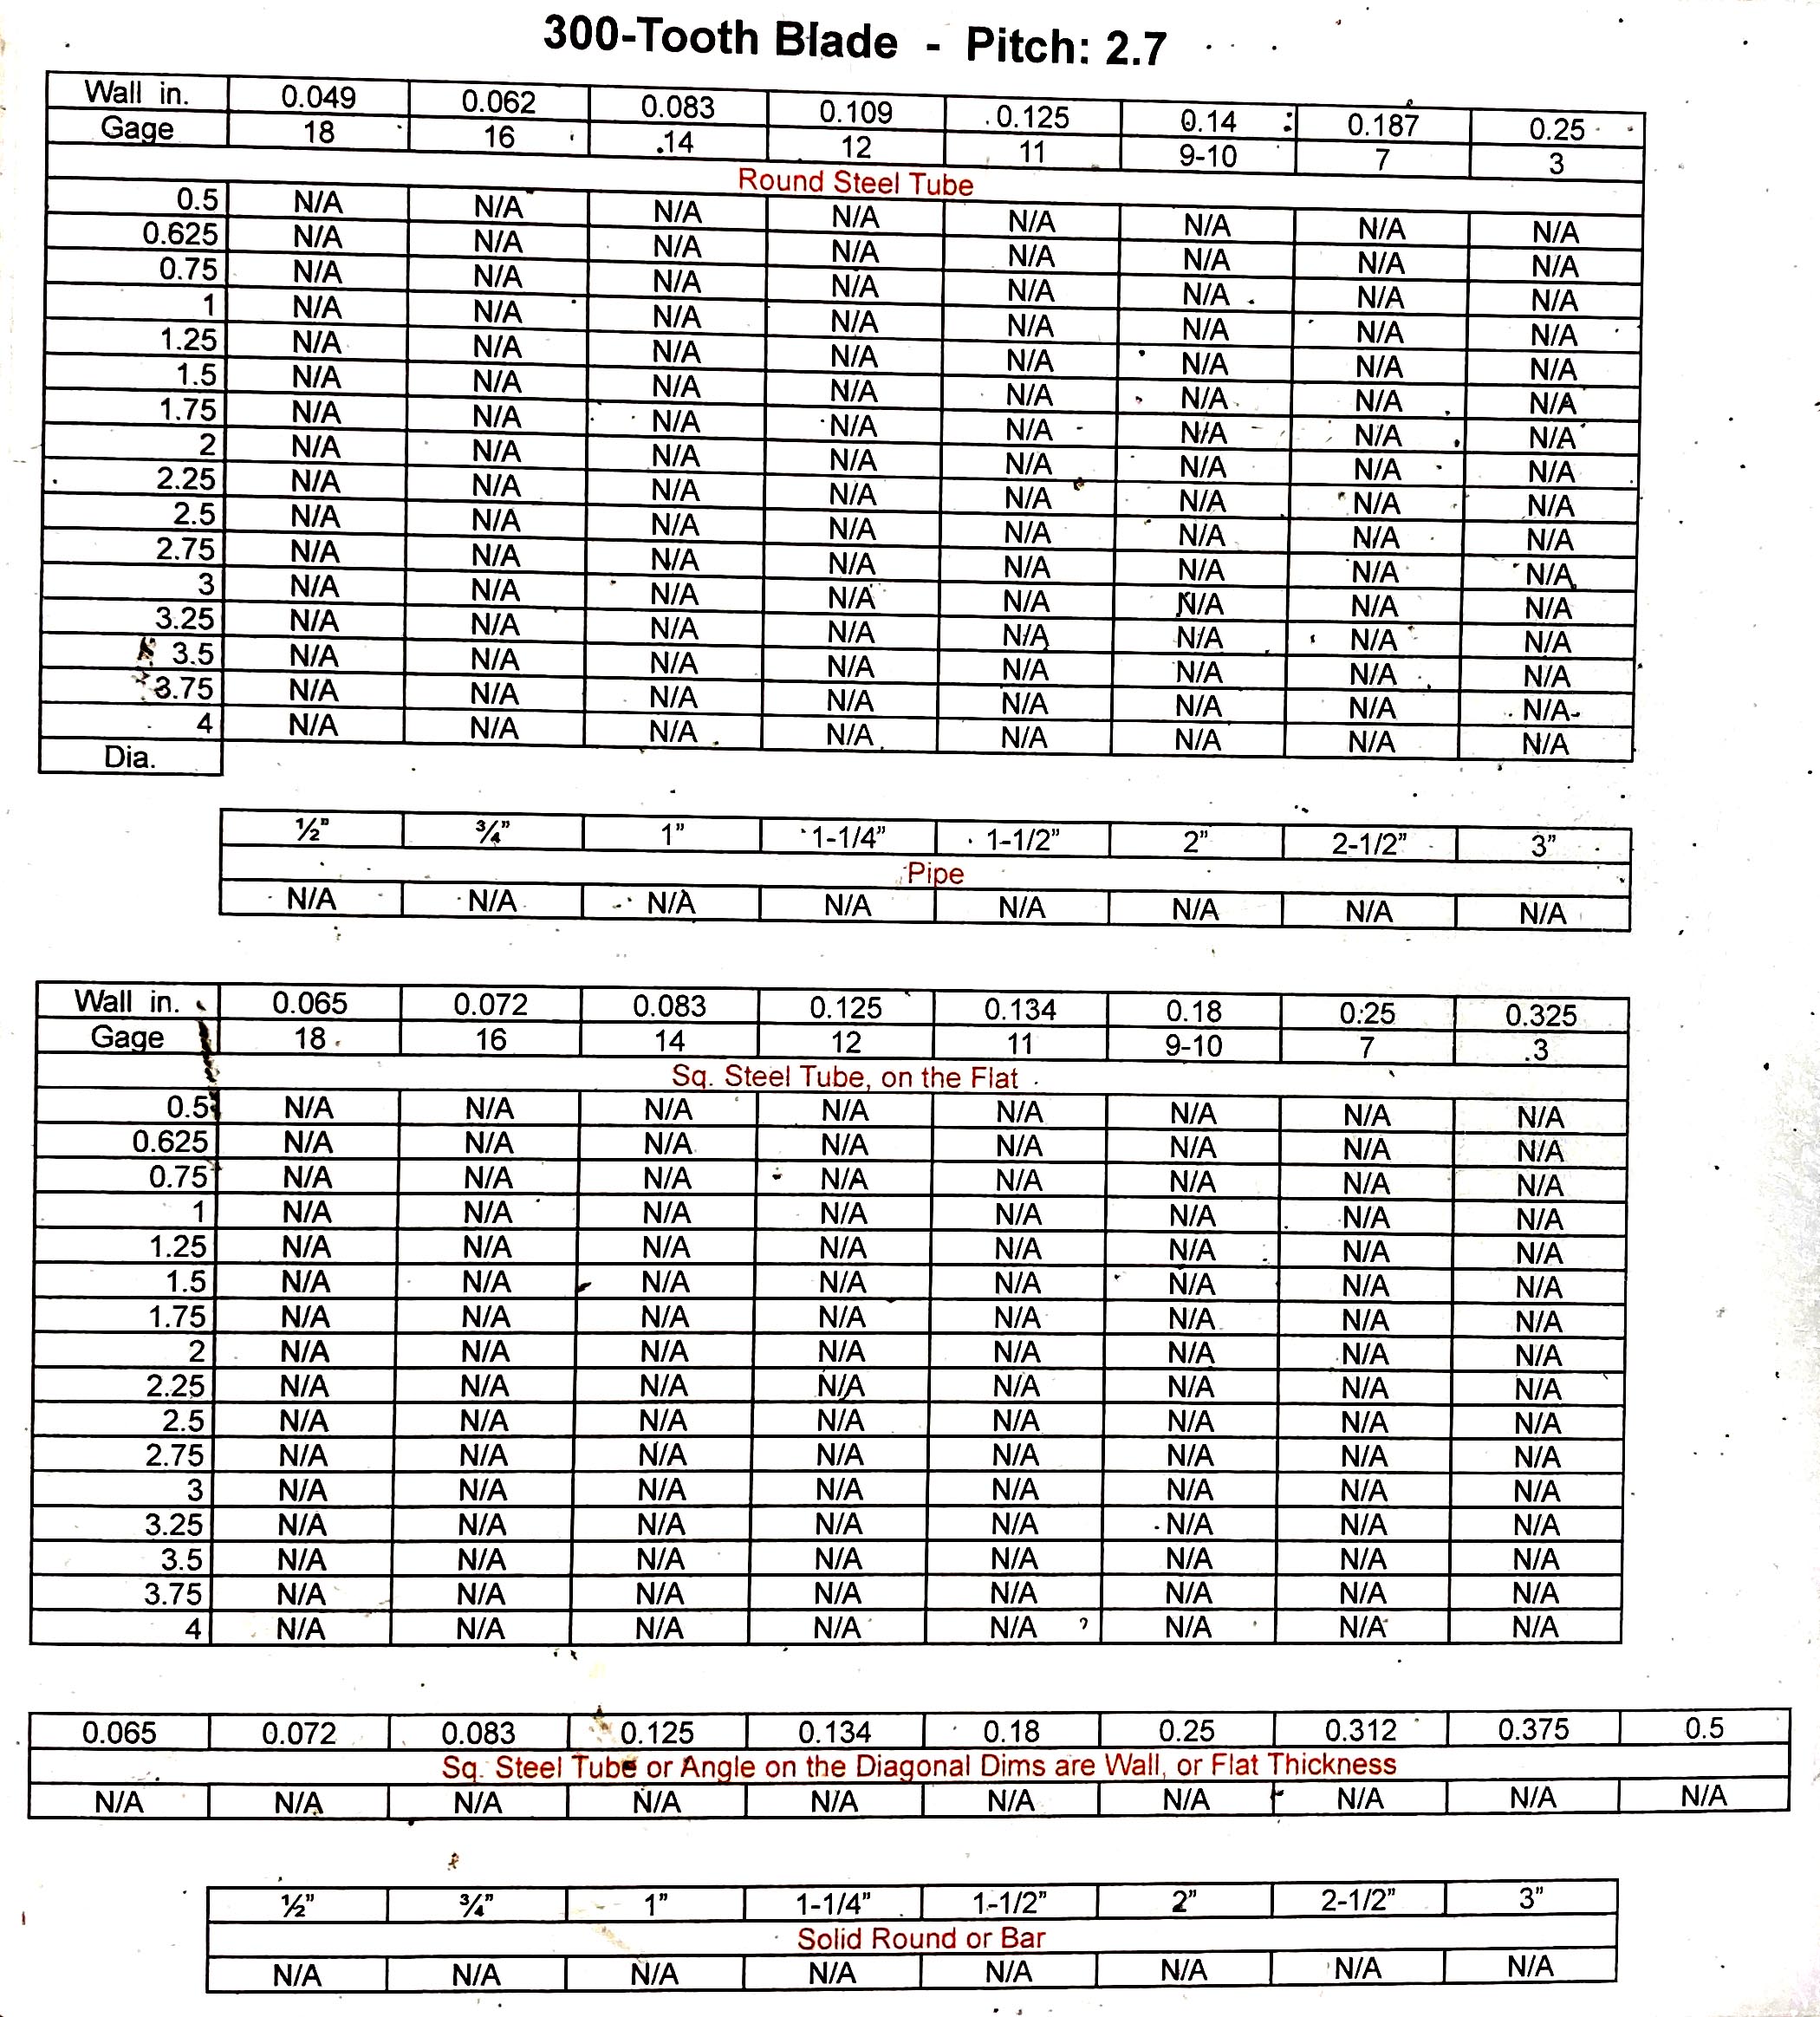
| colspan="2" | Appropriate stock sizes for the 300-tooth blade (Click on image to view at full scale) | |||
|- | |||
|} | |||
Latest revision as of 16:28, 10 October 2024
Link to: Metal Shop main page
Link to: Metal Shop tool list
Use of this tool is taught in Metal Shop 101
| Scotchman Cold Saw | |
|---|---|
| General Info | |
| Make | Scotchman |
| Model | CPO275LT |
| Serial | Unknown |
| Specs | Cold Saw Specifications |
| Manual | Cold Saw Manual |
| Asylum Info | |
| Location | Metal Shop |
| Rubric | |
| Training | Metal Shop 101 |
| Testing | Tool testing, or come to the shop on Tool Testing Night |
| Restrictions | red |
Description
This tool is a circular saw mounted to a mechanical arm that allows it to travel smoothly in the plane of the cut. It can tilt up and down to cut a metal workpiece. The workpiece is clamped firmly in a vise. The vise can be rotated to make miter cuts.
Superficially it resembles a chop saw but operates much differently. The rotation speed of the blade is slower and forces on the workpiece are much larger with a cold saw. The workpiece stays cool and the cuts are more precise.
Use for:
- Best choice for cutting softer metals – Aluminum, Copper, Brass, Bronze.
- Low speed: designed for solid mild steel, solid stainless steel & thick wall pipe.
- High Speed (Not Available): designed for thin wall tube .060 wall thickness or thinner and non-ferrous material.
- Titanium
Do Not Use for:
- Hardened steel or very small parts
Hazard Analysis

| |
|---|---|
- Tool can be loud. Hearing protection recommended.
- Cutting Tool: Eye protection required.
- Coolant spray can spill on the floor
- Prevent drawn-in injuries. No loose clothing or gloves.
- Cuts/ scrapes from sharp cut edges of work
Operation Notes
- The blade should always be removed when the machine is not in use.
-The size and number of teeth on a blade needs to match the workpiece. Blade removal encourages proper blade selection by the next tool user.
- Ripping off the teeth is possible, especially when cutting harder metals.
- Blade can hit the vise on angle cuts. Adjust the vise jaws accordingly.
- Cutting into the base of the vise is possible. Use the Cutting Depth Adjustment Knob on the back of the machine to limit cut depth.
- This tool has a broken speed switch. (Stuck on Low speed – not ideal for soft metals, but it works.)
- Coolant tank can be topped off with water if low, but is generally filled with properly diluted coolant.
| Eye protection required! | ||
|---|---|---|
| |
|---|---|
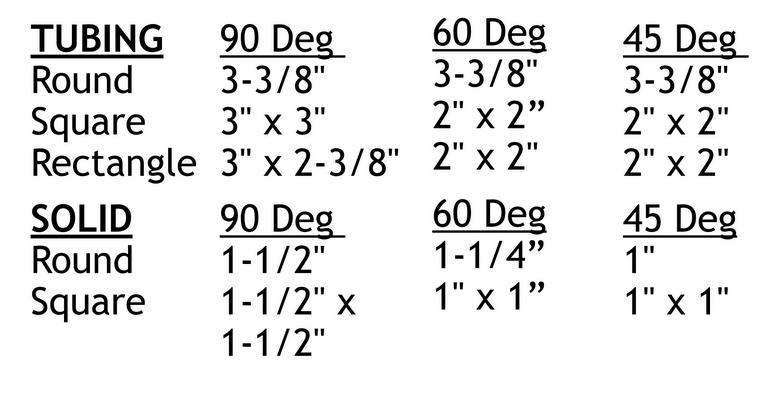
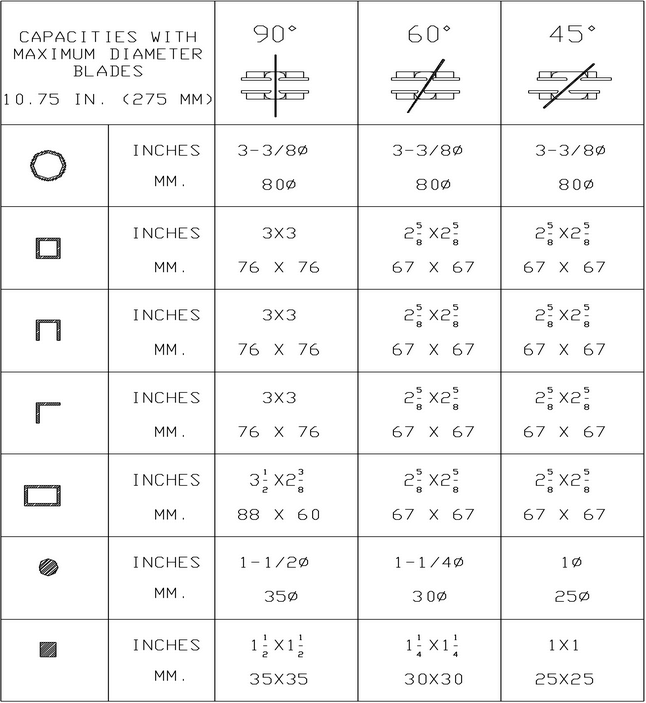
| Table of Maximum Work Sizes |
Basic Operation Instructions
To see a full-size rendering of the figures below, click on the image.
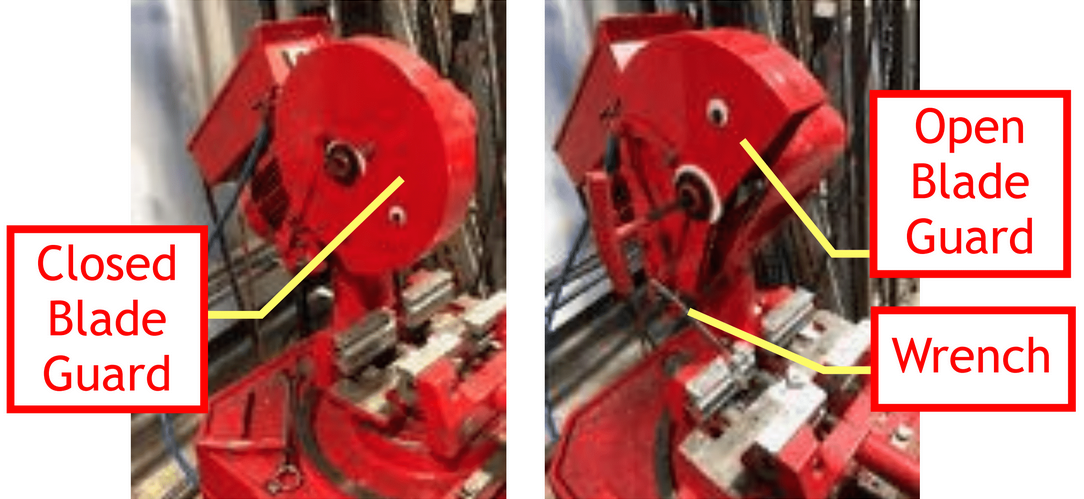
1. Using the supplied wrench, loosen the bolt at the base of the Blade Guard. Fully open the Blade Guard and re-tighten the Blade Guard Bolt to keep it open.
| |
|---|---|
| Cold Saw blade guard |

| |
|---|---|
| Cold Saw blade flange |
| |
|---|---|
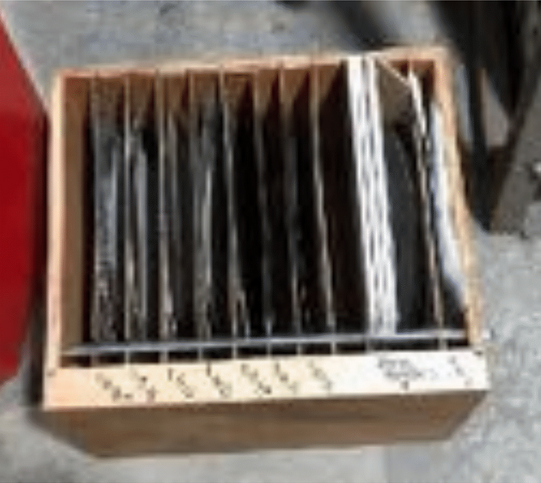
| Cold Saw blade box |
| |
|---|---|
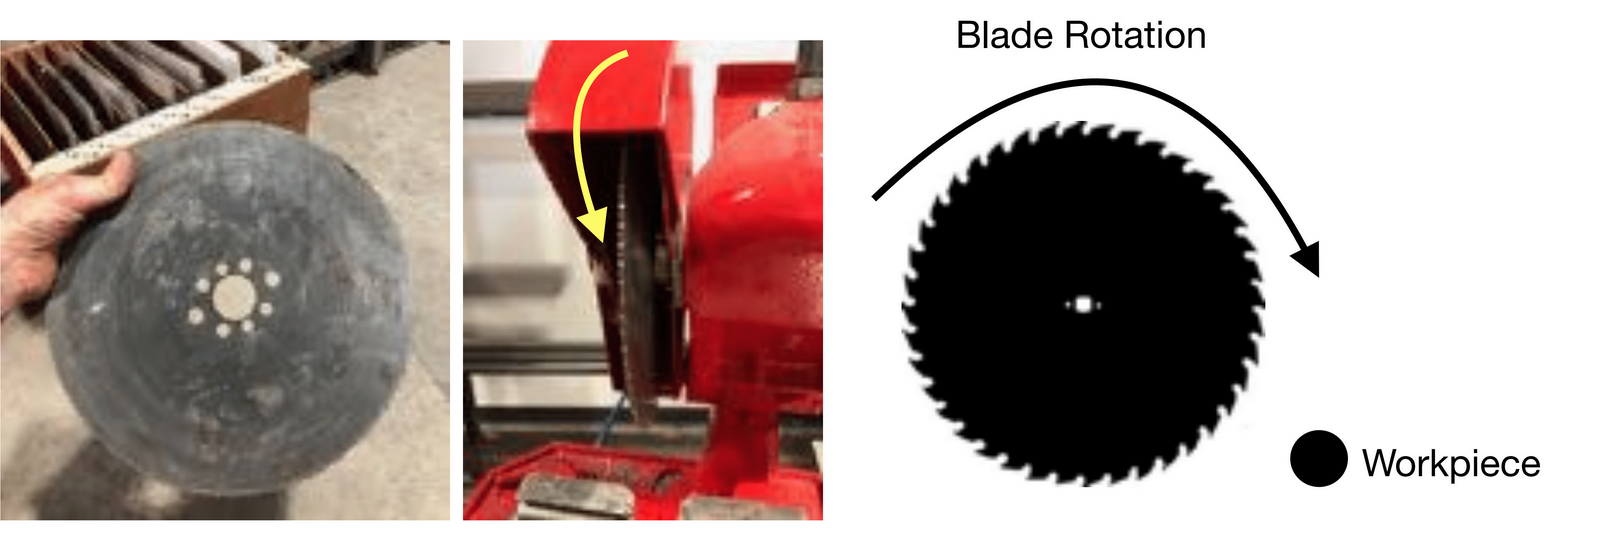
| Rotation direction of the blade on the Cold Saw |
| |
|---|---|
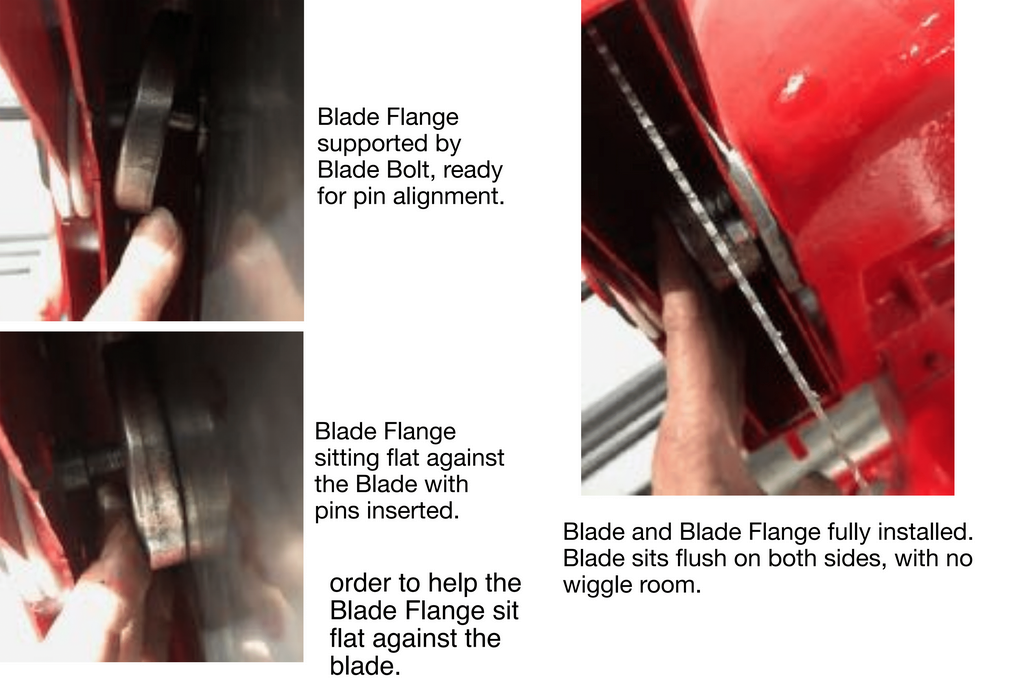
| Installation of the blade flange on the Cold Saw |
| |
|---|---|
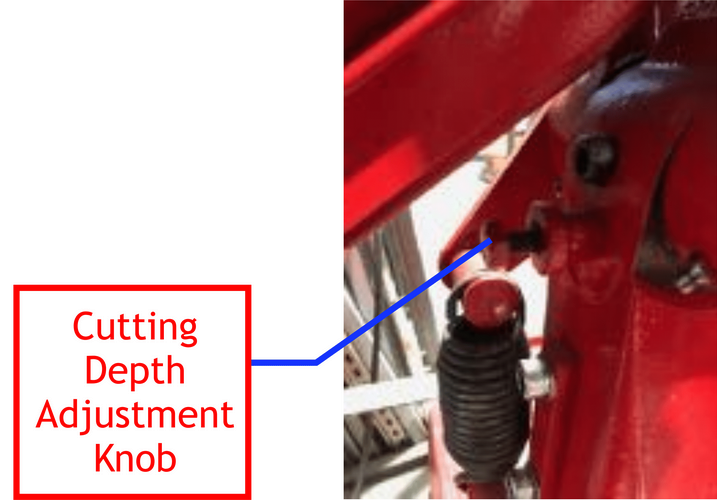
| Cold Saw cut depth adjustment |
| |
|---|---|
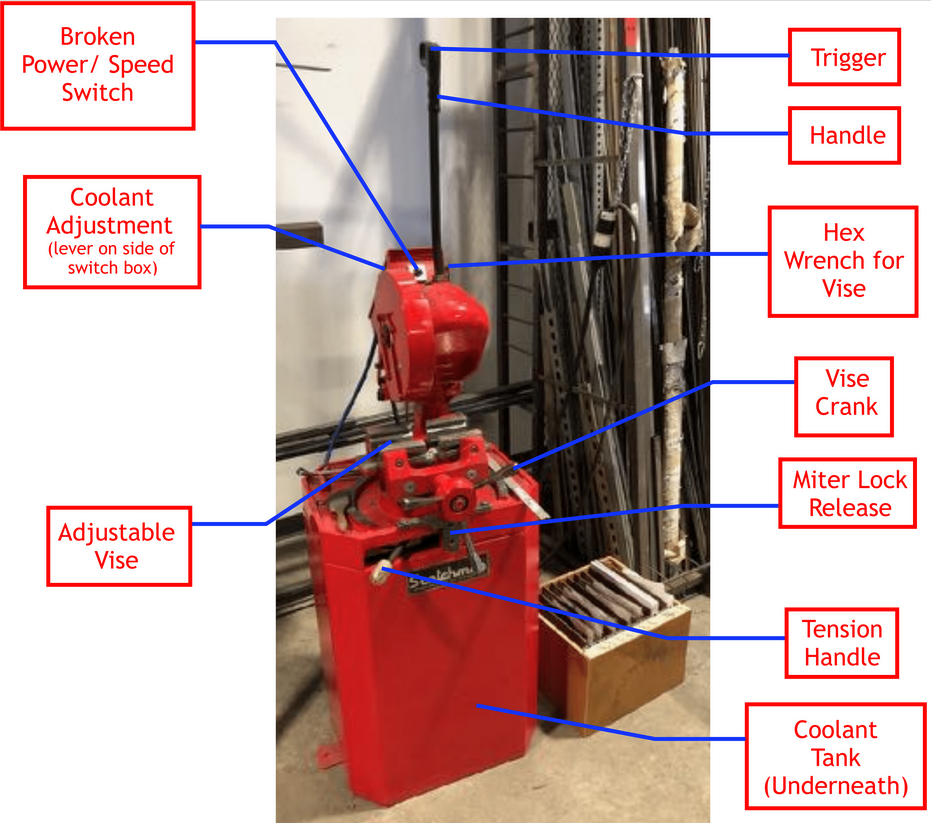
| The parts of the Cold Saw |

| |
|---|---|
| Balance points for stock supports |
| |
|---|---|
| Stock capacities for the Cold Saw |
2. Using the Red-Handled Hex Key Wrench, remove the Blade Bolt and Blade Flange.
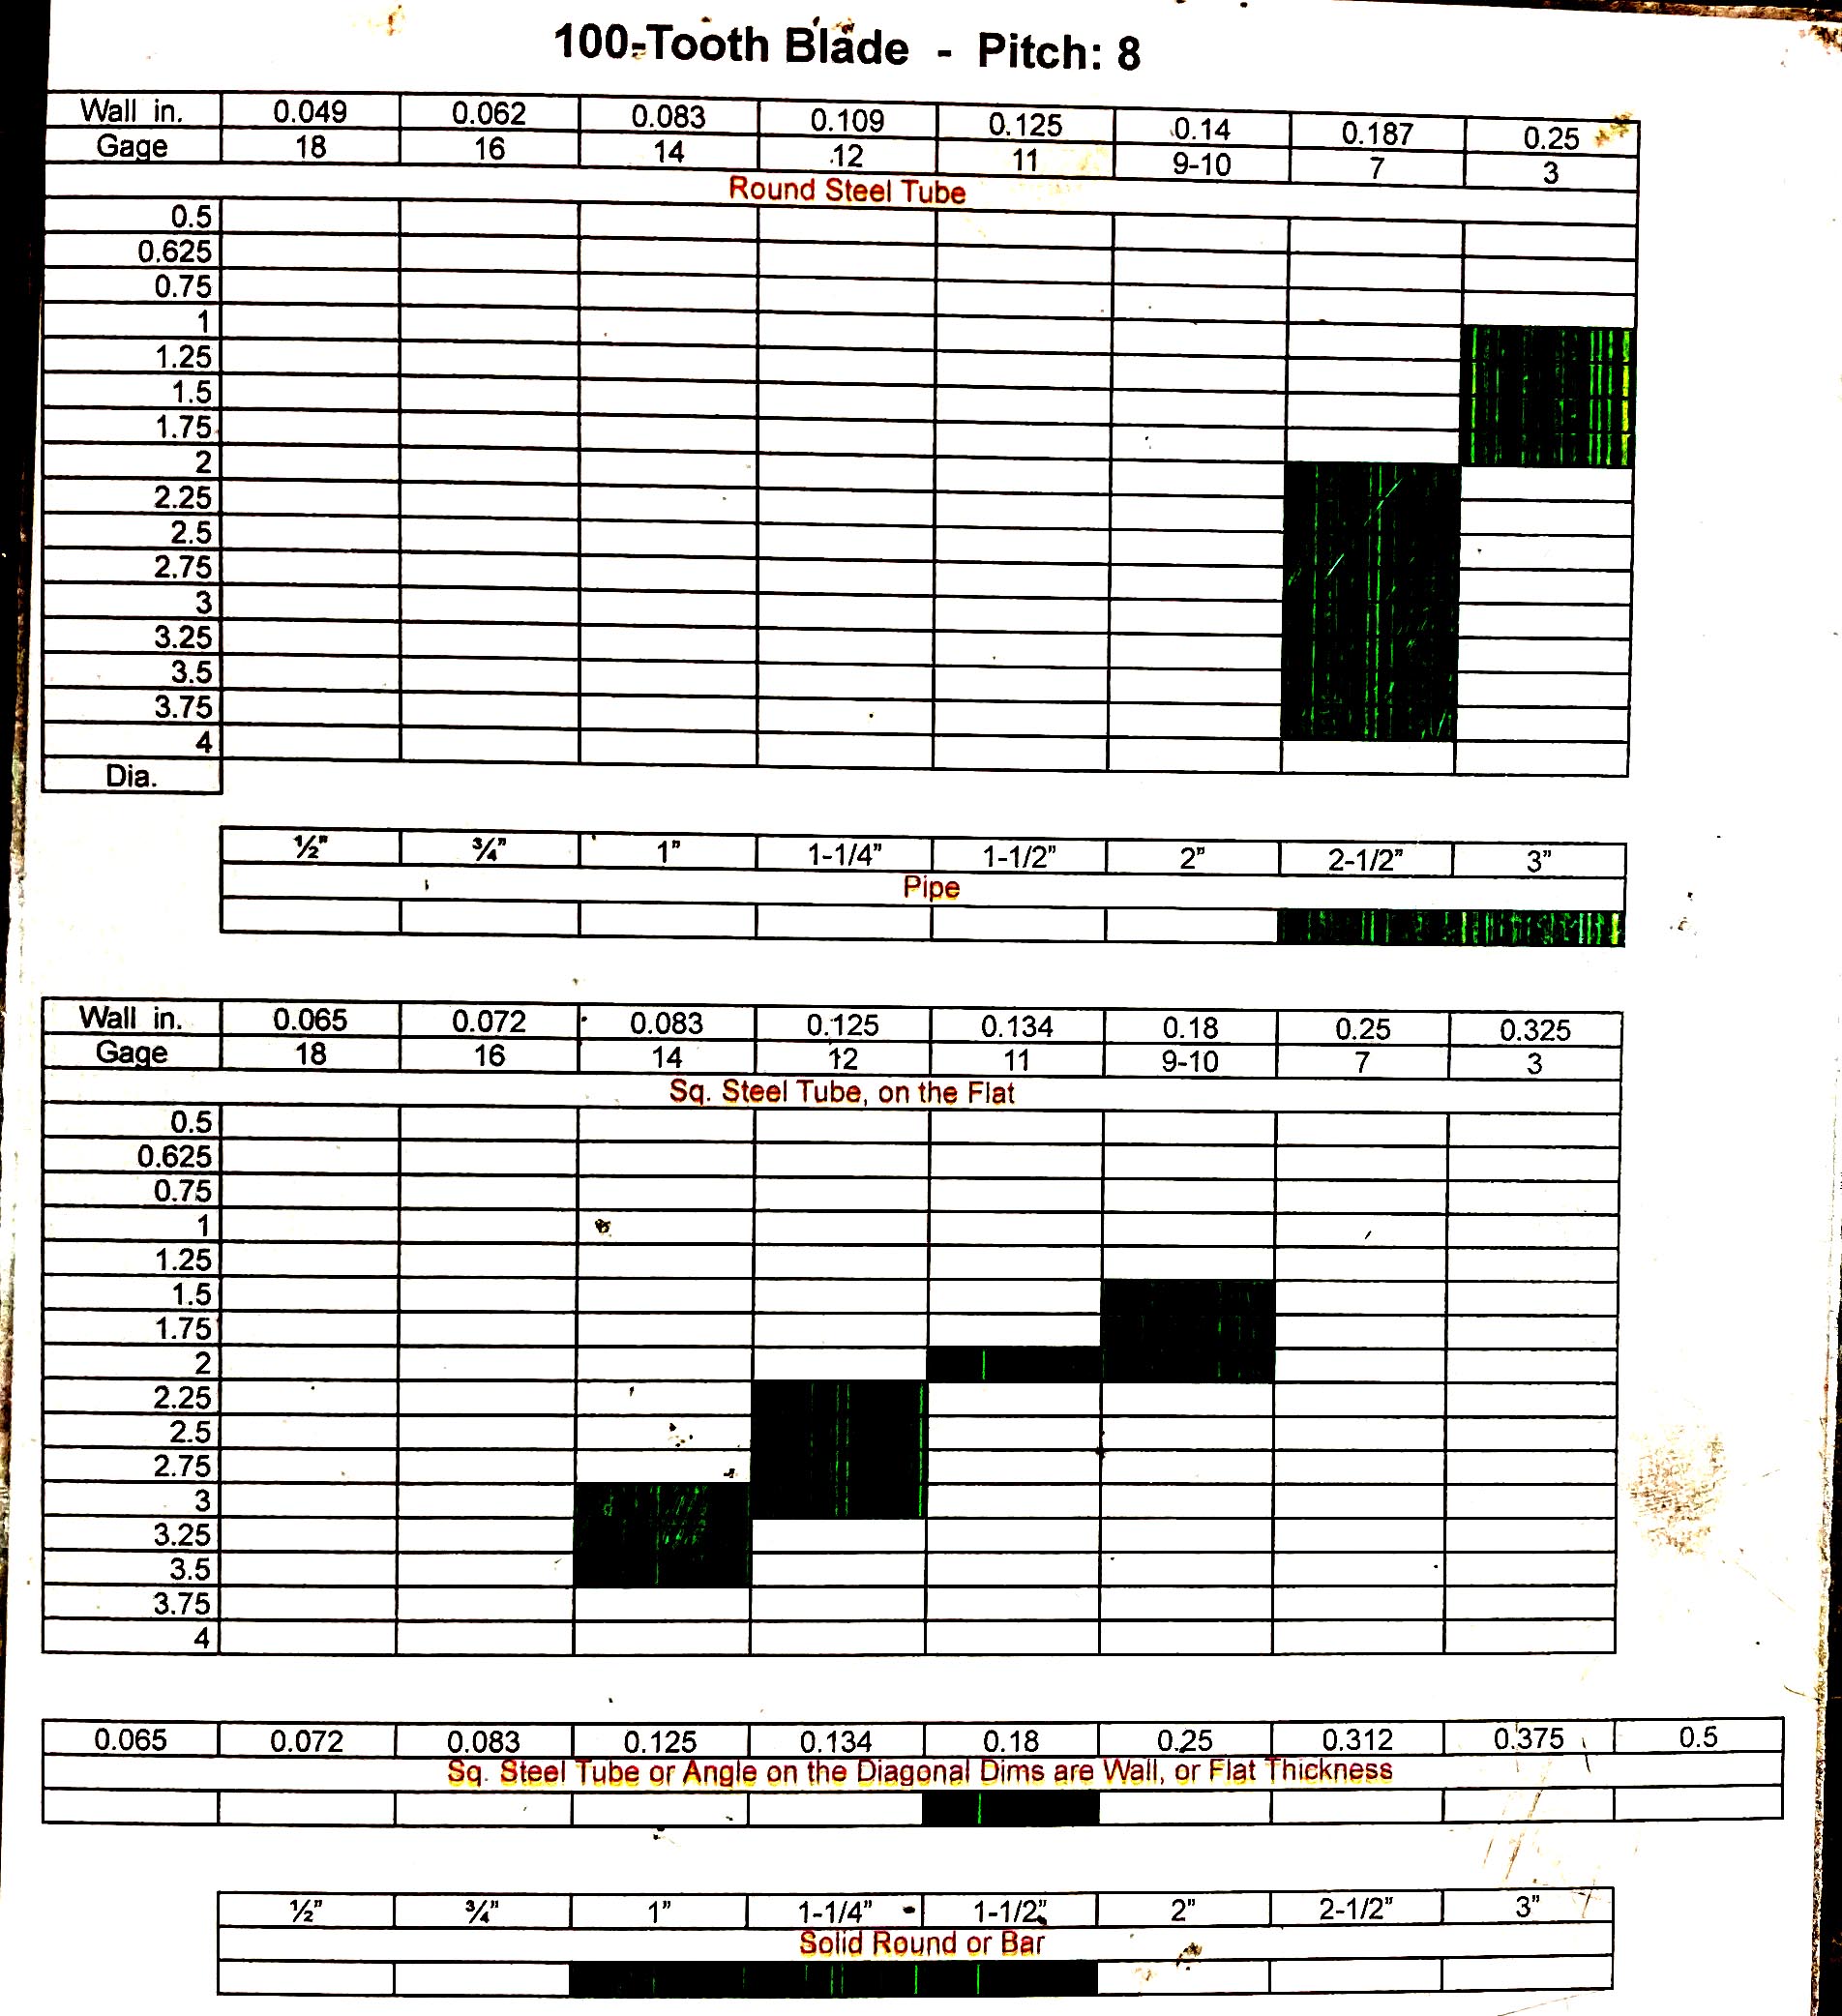
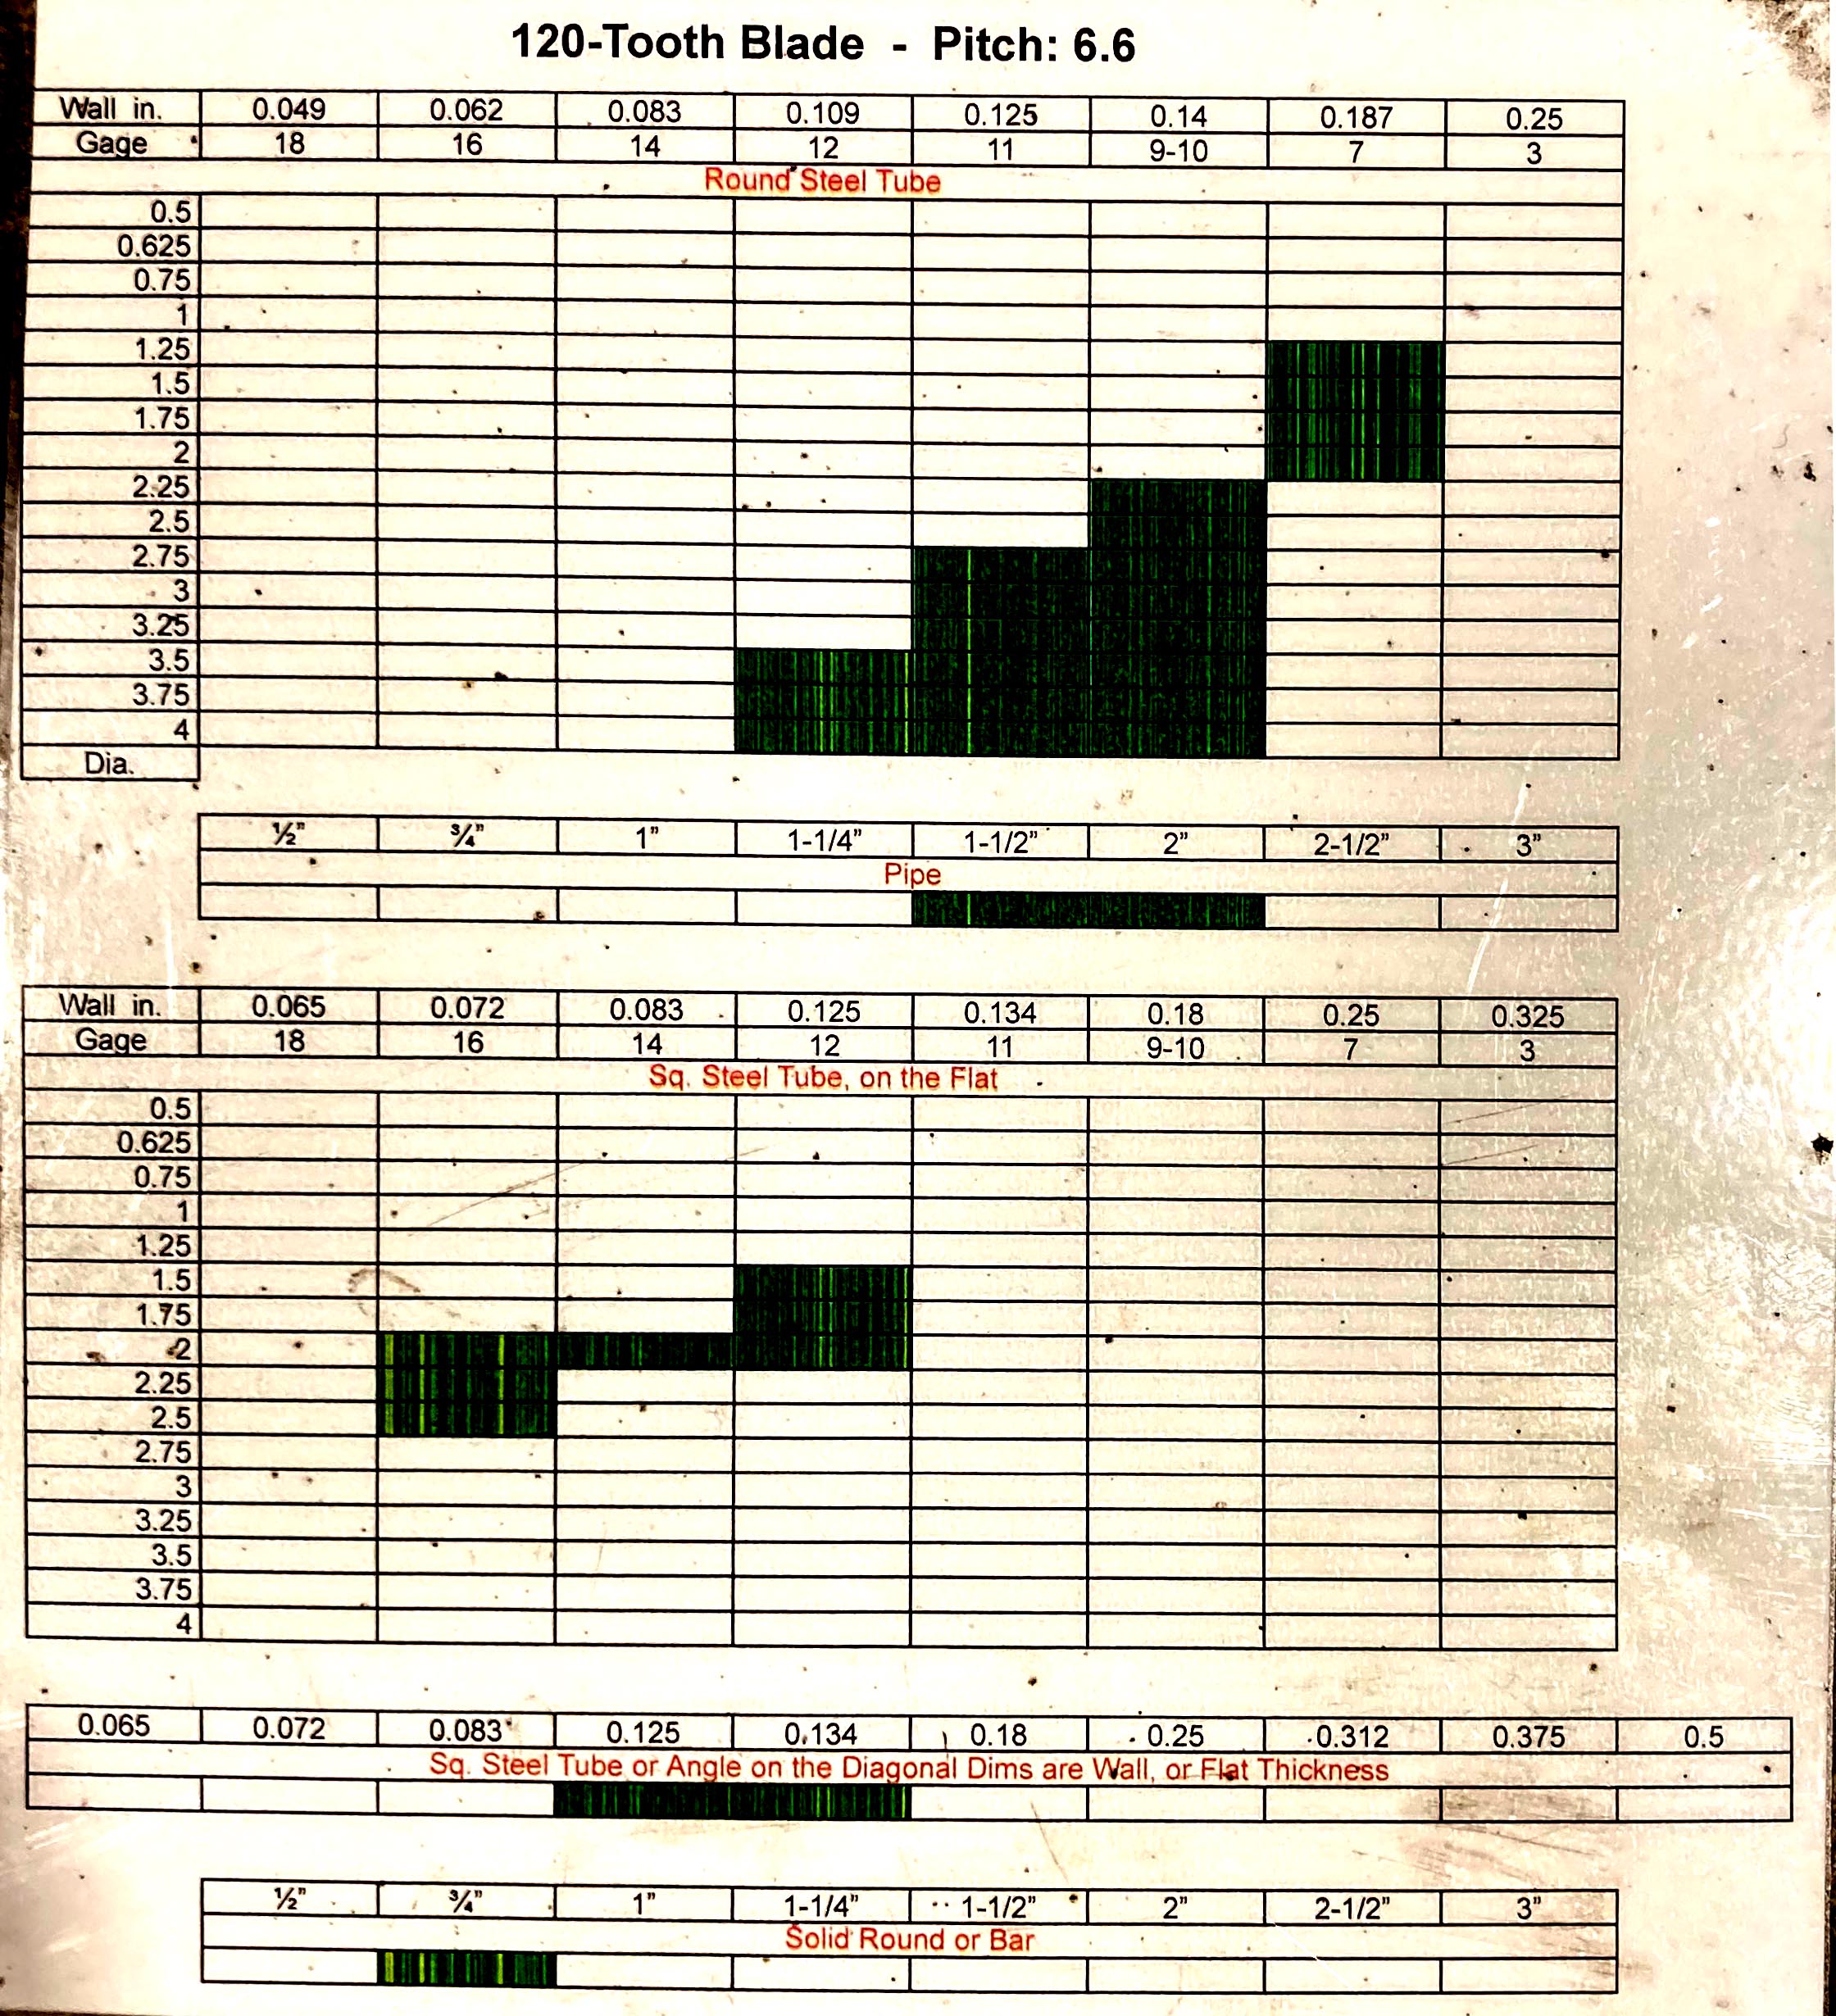
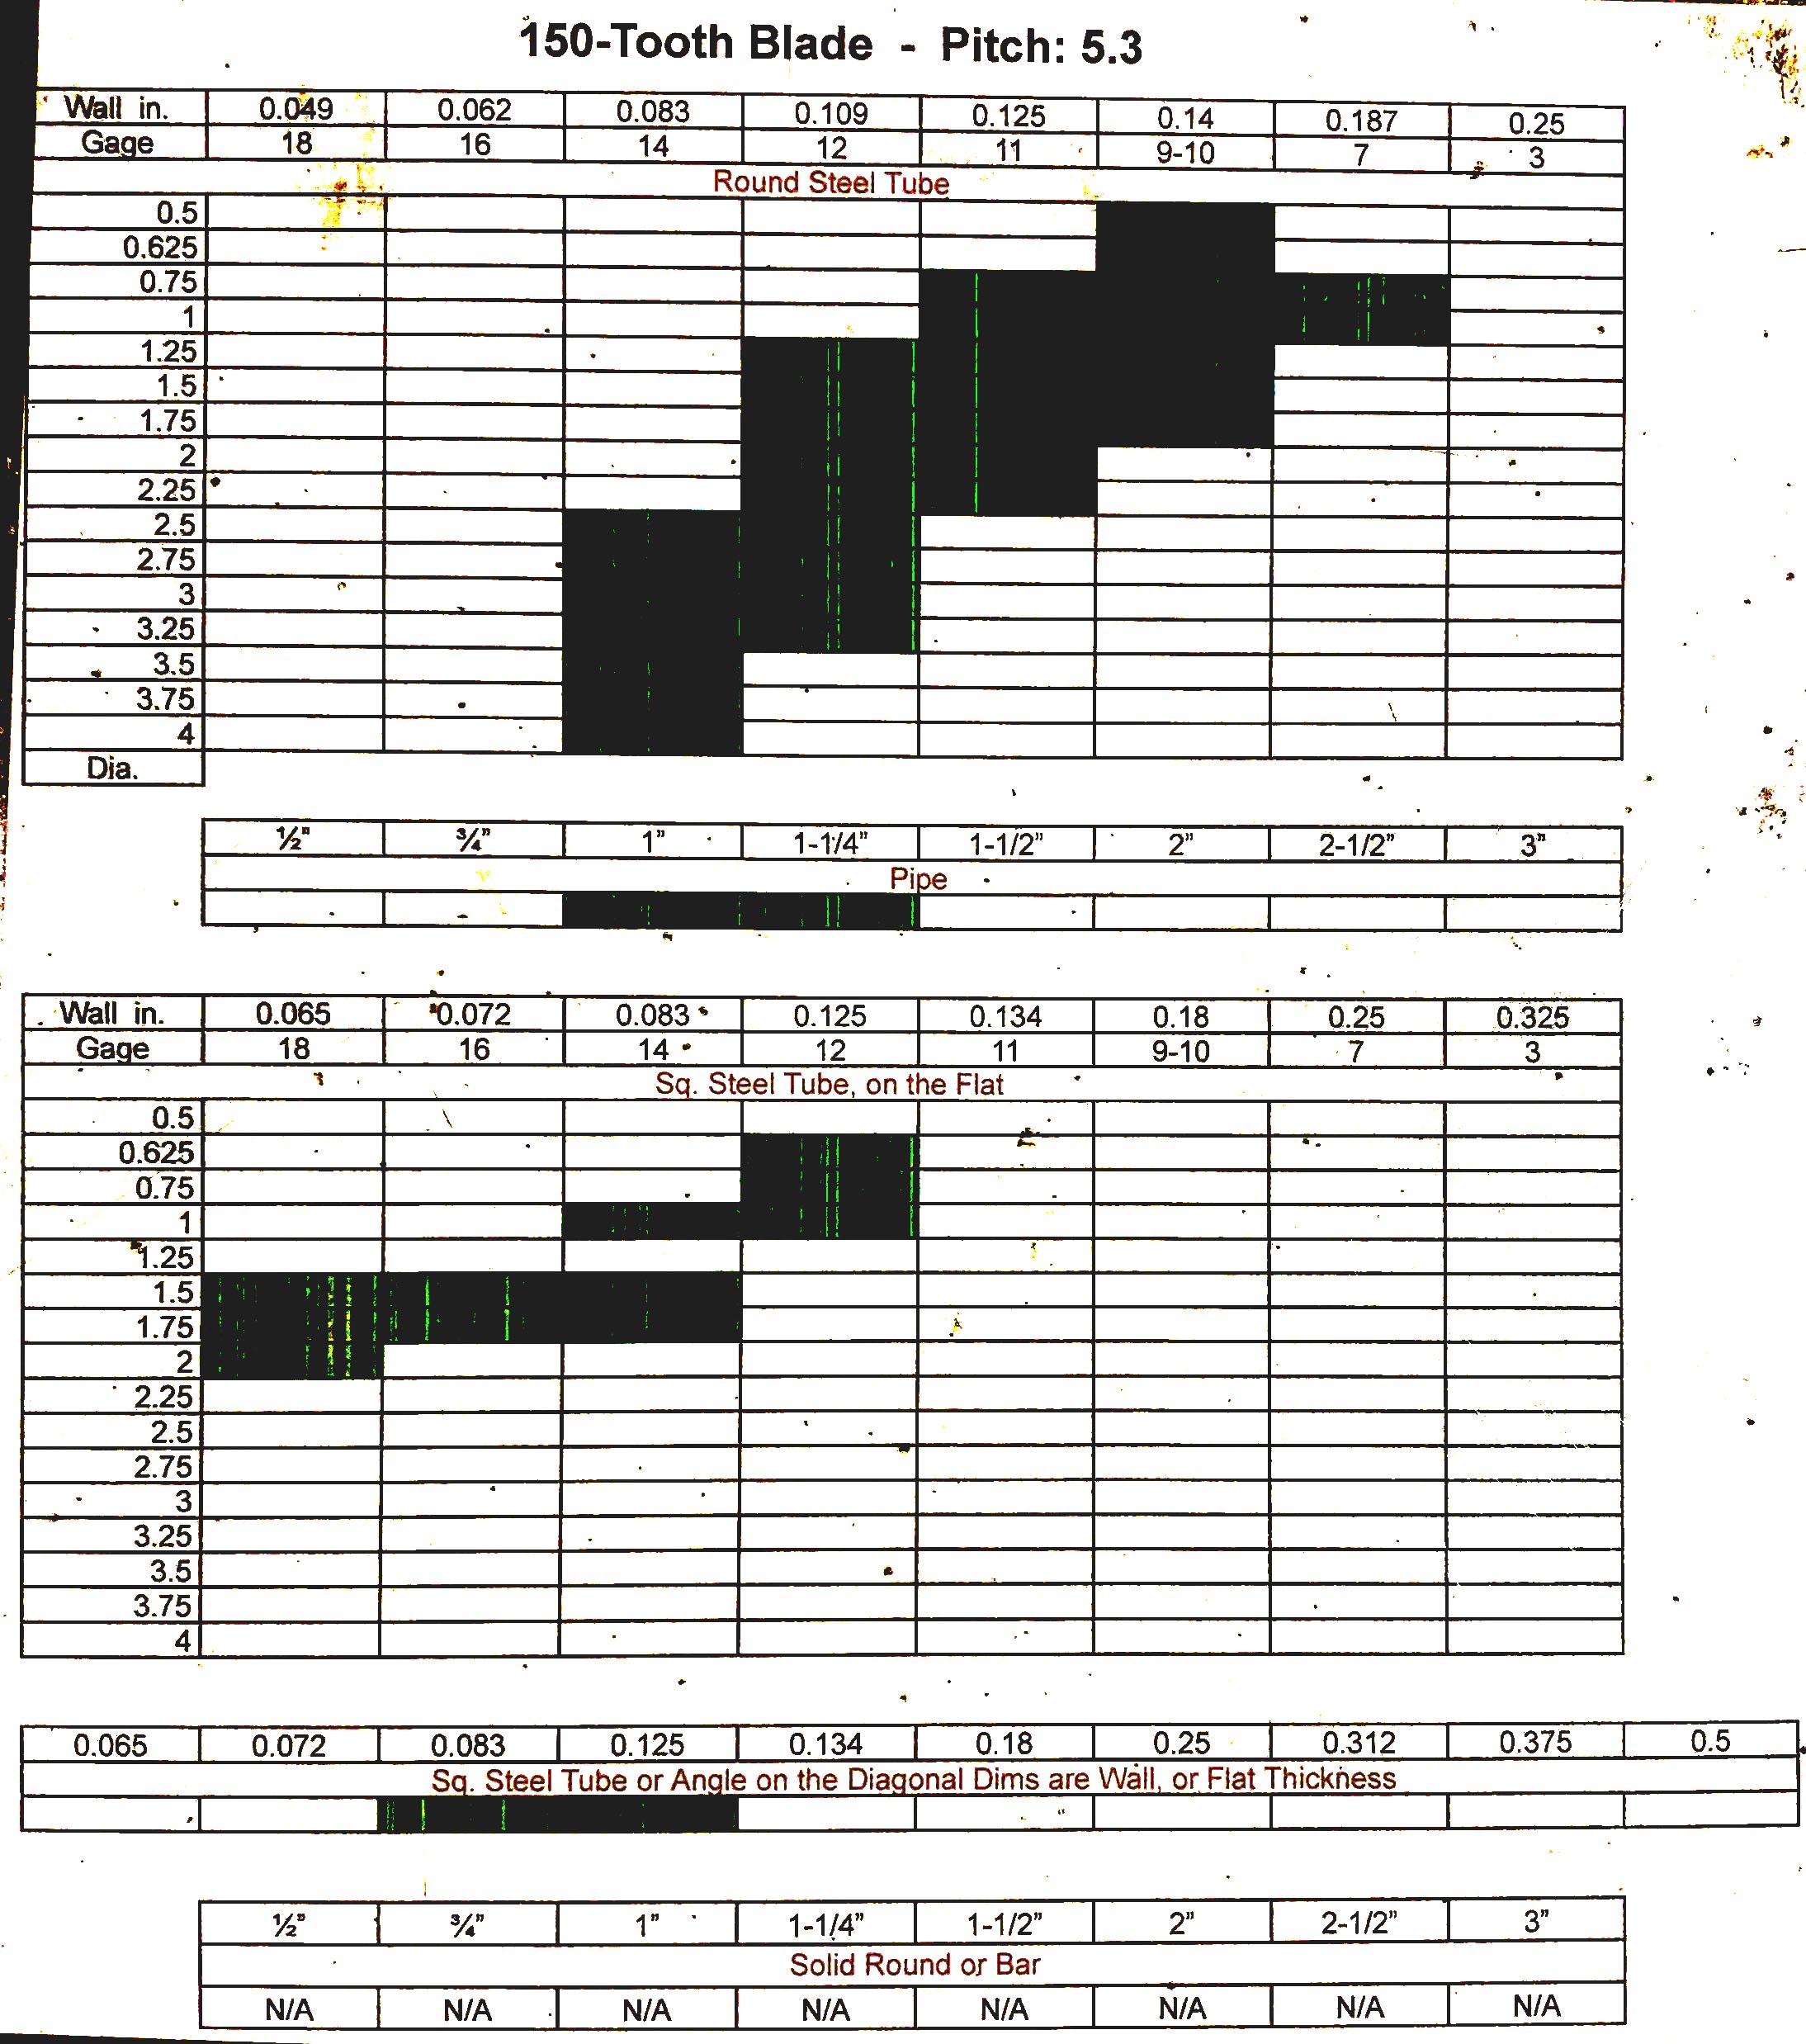
3. Select a blade. Blades vary by blade pitch and number of teeth per blade.-Use the charts associated with each blade to choose the blade appropriate for your workpiece.
4. Install the blade.
- Take note of the pin holes on the blade, choosing the pin hole size that best matches the pins on the Blade Flange (usually the smallest one.)
- Place the blade on the spindle with the teeth at the front of the blade pointed downward.
- Re-Install the Blade Flange, lining up the pin holes with the pins to secure the Blade.Note: It helps to use the Blade Bolt to align the pieces, and to jiggle the blade in.
- Loosen the blade guard bolt, close the Blade Guard, then re-tighten the Bolt.
- Test the Blade Guard. It should open as the blade is lowered into the vise.
- Check the blade’s cutting depth. Blade diameter can vary, and the blade can hit the base of the vise if not adjusted. Use the Cutting Depth Adjustment Knob on the back of the machine to limit cut depth.
5. Optional: Adjust the machine for miter cuts.
- Unlock the tension handle.
- Push the miter lock (located under the vise crank) and turn the saw to the desired angle. (The angle is marked on left side of vice, not at the center.)
- The saw rotates under the vise, can be set at any angle, and has stops at 90, 60, and 45 degrees.
6. Place the workpiece into the Adjustable Vise.
- If needed, adjust the four vise jaws with the supplied Hex Wrench (attached to the machine via a magnet).
- To make cuts more accurately, use the the vise jaws to suspend square and round stock slightly above the base of the vise. For square tube, the cutting process will also run smoother when the workpiece is clamped on the diagonal.
- For extra long workpieces, use support on the left or right of the machine as needed. The shop’s movable roller supports can be used on one or both sides.
- To prevent injury, pay attention to how long workpieces will be balanced (and might fall) after the cut. Place movable roller supports out past the new center(s) of balance on either (or both) sides of the cut.
7. Perform the cut(s).
- Pull the trigger to start the flow of coolant over the blade and pull down on the handle.
- Adjust coolant flow as necessary. Sufficient coolant MUST run over the blade. The coolant reservoir below occasionally needs topping off, and the coolant stored in the shop typically needs diluting. See manual page on mixing coolant.
- Cut with a smooth and even pressure equal to about the weight of a gallon of water (8 lbs). Pull on the handle with one hand. No chopping - this is not an axe.
- Vibration can loosen the vise. Keep other hand on the vise crank to keep the workpiece secure.
- Be aware that cutting speed is related to the amount of material being cut. Thicker pieces will take longer. If square tube is cut on the flat, the saw will proceed slowly at the top, speed up through the middle (where two vertical walls are being cut), and then slow down again at the bottom.
- Watch for coolant spills. Large amounts on the floor create a slip hazard. Coolant tends to drip out of tubing to the right of the machine, so place a drip bucket accordingly.
- Use a chip brush to keep the screen over the drain hole clear. The drain hole is located under the back of the saw.
8. Return the machine to its starting condition.
- Remove Blade and re-install the Blade Flange. Blade removal encourages the next user to choose a blade appropriate to his or her workpiece.
- Dry Blade and return it to the appropriate slot in the blade storage box.
- Clean excess metal chips off the machine.
- If necessary, return the orientation to a 90 degree cut.
- If necessary, clean the floor.
| |
|---|---|
| Appropriate stock sizes for the 100-tooth blade (Click on image to view at full scale) |
| |
|---|---|
| Appropriate stock sizes for the 120-tooth blade (Click on image to view at full scale) |
| |
|---|---|
| Appropriate stock sizes for the 150-tooth blade (Click on image to view at full scale) |
| |
|---|---|
| Appropriate stock sizes for the 180-tooth blade (Click on image to view at full scale) |
| |
|---|---|
| Appropriate stock sizes for the 240-tooth blade (Click on image to view at full scale) |
| |
|---|---|
| Appropriate stock sizes for the 300-tooth blade (Click on image to view at full scale) |
