Abrasive Blade Metal Chop Saw: Difference between revisions
(Created page with "Category:ToolsCategory:Metal Shop {{ToolBox |tool_title = Abrasive Blade Chop Saw |tool_subtitle = Abrasive Blade Chop Saw |image = Metal_shop_chop_saw_nolabels.png |caption = Dewalt D28710 Chop Saw |make = Dewalt |model = D28710 |serial = Unknown |manufacturer_specs = |manual = |location = Metal Shop |rubric = |training...") |
Acharlwood (talk | contribs) m (Added category) |
||
| (22 intermediate revisions by 2 users not shown) | |||
| Line 1: | Line 1: | ||
[[Category:Tools]][[Category:Metal Shop]] | [[Category:Tools]] | ||
Link to: [[:Category:Metal Shop | Metal Shop main page]] | |||
Link to: [[:Category:Metal Shop#Tools | Metal Shop tool list]] | |||
{{ToolBox | {{ToolBox | ||
| Line 10: | Line 14: | ||
|serial = Unknown | |serial = Unknown | ||
|manufacturer_specs = | |manufacturer_specs = | ||
|manual = | |manual = [https://drive.google.com/file/d/1FF84cBrJmlMCKuFLCtv9uAifaQwAm-u2/view?usp=drive_link Dewalt Chop Saw Manual] | ||
|location = Metal Shop | |location = Metal Shop | ||
|rubric = | |rubric = | ||
|training =[https://www.artisansasylum.com/class-catalog Tool classes] | |training =[https://www.artisansasylum.com/class-catalog Tool classes] | ||
|testing = [https://www.artisansasylum.com/tool-testing Tool testing], or [[:Category:Metal Shop#Tool Testing | |testing = [https://www.artisansasylum.com/tool-testing Tool testing], or [[:Category:Metal Shop#Tool Testing Night|come to the shop on Tool Testing Night]] | ||
Night|come to the shop on Tool Testing Night]] | |||
|restrictions = red | |restrictions = red | ||
|tool_categories = Metal Shop | |tool_categories = [[Category:Metal Shop]] [[Category:Saws]] [[Category:Abrasive_Cut-Off_Saws]] | ||
}} | }} | ||
==Description== | |||
This tool is a circular saw mounted to a mechanical arm that allows it to travel smoothly in the plane of the cut. It can tilt up and down to cut a metal workpiece. The workpiece is clamped firmly against a fence in the back of the machine and the saw cuts when it is tilted down. | |||
Superficially it resembles a [[:Bosch 12-inch Miter Saw | wood-cutting miter saw]] but operates much differently. This machine has many fewer adjustments and degrees of freedom than the miter saw. | |||
==Use for:== | ==Use for:== | ||
* Hardened Steel | |||
* Mild Steel | |||
==Do Not Use for:== | |||
* Aluminum | |||
* Copper, Brass, Bronze | |||
''Soft metals will gum up the abrasive cutting disk.'' | |||
* Zinc (or anything galvanized). | |||
* Titanium | |||
==Hazard Analysis== | ==Hazard Analysis== | ||
| Line 34: | Line 56: | ||
|} | |} | ||
* Tool | * '''Tool is very loud. Hearing protection required.''' | ||
* | * '''Flying pieces from broken abrasive discs/ blades. Eye protection required.''' | ||
* | * Prevent drawn-in injuries. '''No loose clothing or gloves.''' | ||
* | * Cuts/ scrapes from sharp cut edges of work | ||
* | * Burns from hot workpieces | ||
* Breathing particulates thrown into the air. Respiratory protection recommended. | |||
{{EyeWarning}} | |||
{| class="infobox" cellspacing="5" style="width: 22em; text-align: left; font-size: 100%; line-height: 1.5em;" | |||
! colspan="2" class="infobox-image" | [[File:Metal_shop_chop_saw_clutter.png|500px|chop saw clutter]] | |||
|- | |||
| colspan="2" | Dangerous clutter behind the Chop Saw | |||
|- | |||
|} | |||
==Basic Operation Instructions and Best Practices== | |||
'''1. Before operation, perform a quick safety check:''' | |||
* Never use a damaged cutting wheel — Inspect for cracks or flaws. '''Damaged wheels may break or shatter during saw operation.''' | |||
* Remove anything from behind the saw before operating. | |||
'''2. Secure work piece in the chop saw’s vise.''' | |||
* Work piece must fill vise to at least center of the vise’s back fence. | |||
* Prevent mishaps: Understand how the rotating blade will try to move your part in the vise and position / stabilize your workpiece accordingly. (See Clamping Tips below.) | |||
* Use the vise lever to fasten the workpiece, then tighten securely by turning the vise crank. (See features H and I.) | |||
'''3. Perform the cut.''' | |||
* Watch where you stand - avoid line of cutting wheel. Sparks and small pieces will tend to kick back toward wall, but can fly in any direction. | |||
{| class="infobox" cellspacing="5" style="width: 22em; text-align: left; font-size: 100%; line-height: 1.5em;" | {| class="infobox" cellspacing="5" style="width: 22em; text-align: left; font-size: 100%; line-height: 1.5em;" | ||
! colspan="2" class="infobox-image" | [[File:Metal_shop_chop_saw_rotation.png| | ! colspan="2" class="infobox-image" | [[File:Metal_shop_chop_saw_rotation.png|250px|chop saw rotation]] | ||
|- | |- | ||
| colspan="2" | Chop Saw clamping tips | | colspan="2" | Chop Saw clamping tips | ||
| Line 55: | Line 102: | ||
|} | |} | ||
== | |||
* Never start with cutting wheel inserted into or touching the workpiece. Press handle trigger to start the blade, then lower the blade. | |||
* Vary force and travel speed to match the shape of work – judge by ear and by the sparks produced. No quick chops. | |||
==Clamping Tips== | |||
'''Be aware of blade rotation.''' | |||
Angles are best cut with both legs facing down. This allows a safe cut, but is not optimal for miter cuts. | |||
Another option for Angles: L facing backward, into the rotation of the blade. | |||
Use square tube as a stabilizer. A spacer block slightly more narrow than the work piece can increase blade utilization. | |||
Long workpieces must be supported to remain level. The cut-off end should be free to fall in order to avoid wheel binding. | |||
{| class="infobox" cellspacing="5" style="width: 22em; text-align: left; font-size: 100%; line-height: 1.5em;" | |||
! colspan="2" class="infobox-image" | [[File:Metal_shop_chop_saw_capacity.png|550px|chop saw capacity]] | |||
|- | |||
| colspan="2" | Stock size limits for the Chop Saw | |||
|- | |||
|} | |||
{| class="infobox" cellspacing="5" style="width: 22em; text-align: left; font-size: 100%; line-height: 1.5em;" | |||
! colspan="2" class="infobox-image" | [[File:Metal_shop_chop_saw_labeled.png|750px|chop saw labels]] | |||
|- | |||
| colspan="2" | The parts of the Chop Saw | |||
|- | |||
|} | |||
Latest revision as of 15:56, 5 April 2025
Link to: Metal Shop main page
Link to: Metal Shop tool list
| Abrasive Blade Chop Saw | |
|---|---|
| General Info | |
| Make | Dewalt |
| Model | D28710 |
| Serial | Unknown |
| Specs | |
| Manual | Dewalt Chop Saw Manual |
| Asylum Info | |
| Location | Metal Shop |
| Rubric | |
| Training | Tool classes |
| Testing | Tool testing, or come to the shop on Tool Testing Night |
| Restrictions | red |
Description
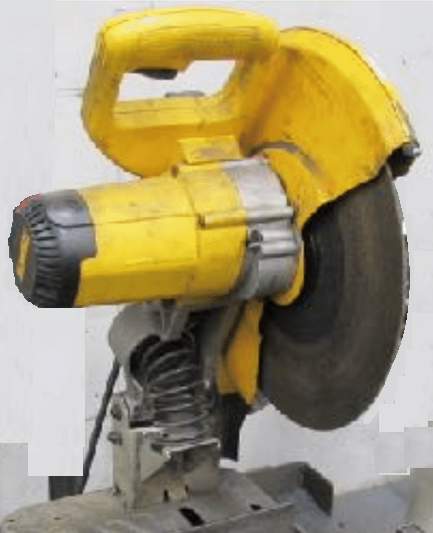
This tool is a circular saw mounted to a mechanical arm that allows it to travel smoothly in the plane of the cut. It can tilt up and down to cut a metal workpiece. The workpiece is clamped firmly against a fence in the back of the machine and the saw cuts when it is tilted down.
Superficially it resembles a wood-cutting miter saw but operates much differently. This machine has many fewer adjustments and degrees of freedom than the miter saw.
Use for:
- Hardened Steel
- Mild Steel
Do Not Use for:
- Aluminum
- Copper, Brass, Bronze
Soft metals will gum up the abrasive cutting disk.
- Zinc (or anything galvanized).
- Titanium
Hazard Analysis
| |
|---|---|
- Tool is very loud. Hearing protection required.
- Flying pieces from broken abrasive discs/ blades. Eye protection required.
- Prevent drawn-in injuries. No loose clothing or gloves.
- Cuts/ scrapes from sharp cut edges of work
- Burns from hot workpieces
- Breathing particulates thrown into the air. Respiratory protection recommended.
| Eye protection required! | ||
|---|---|---|
| |
|---|---|
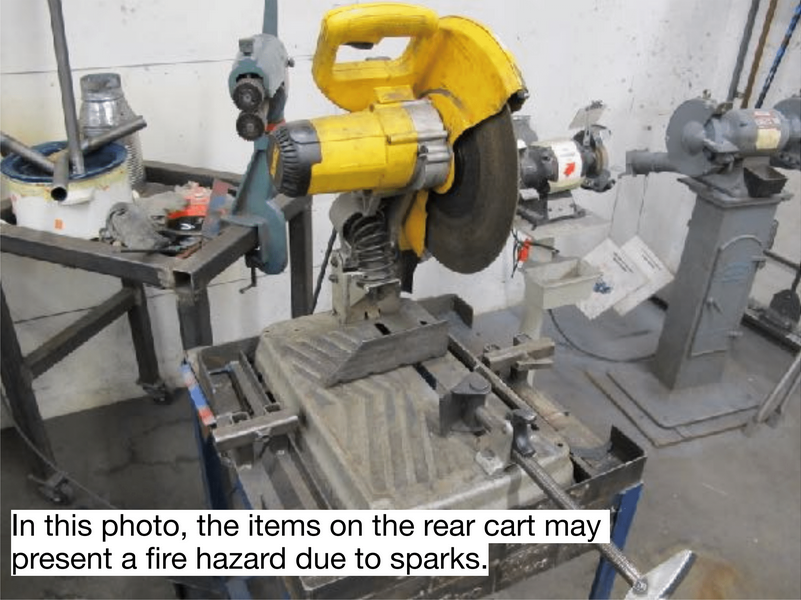
| Dangerous clutter behind the Chop Saw |
Basic Operation Instructions and Best Practices
1. Before operation, perform a quick safety check:
- Never use a damaged cutting wheel — Inspect for cracks or flaws. Damaged wheels may break or shatter during saw operation.
- Remove anything from behind the saw before operating.
2. Secure work piece in the chop saw’s vise.
- Work piece must fill vise to at least center of the vise’s back fence.
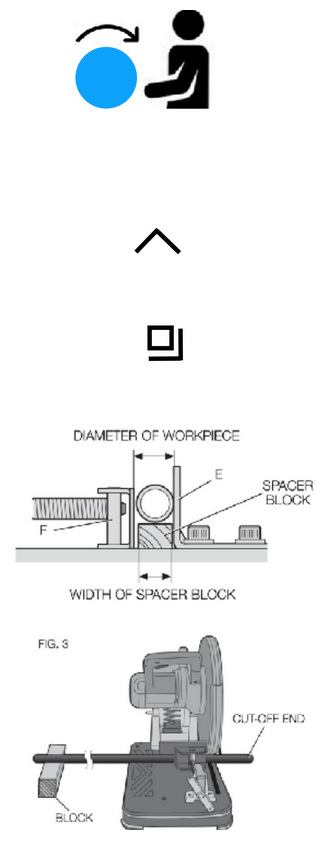
- Prevent mishaps: Understand how the rotating blade will try to move your part in the vise and position / stabilize your workpiece accordingly. (See Clamping Tips below.)
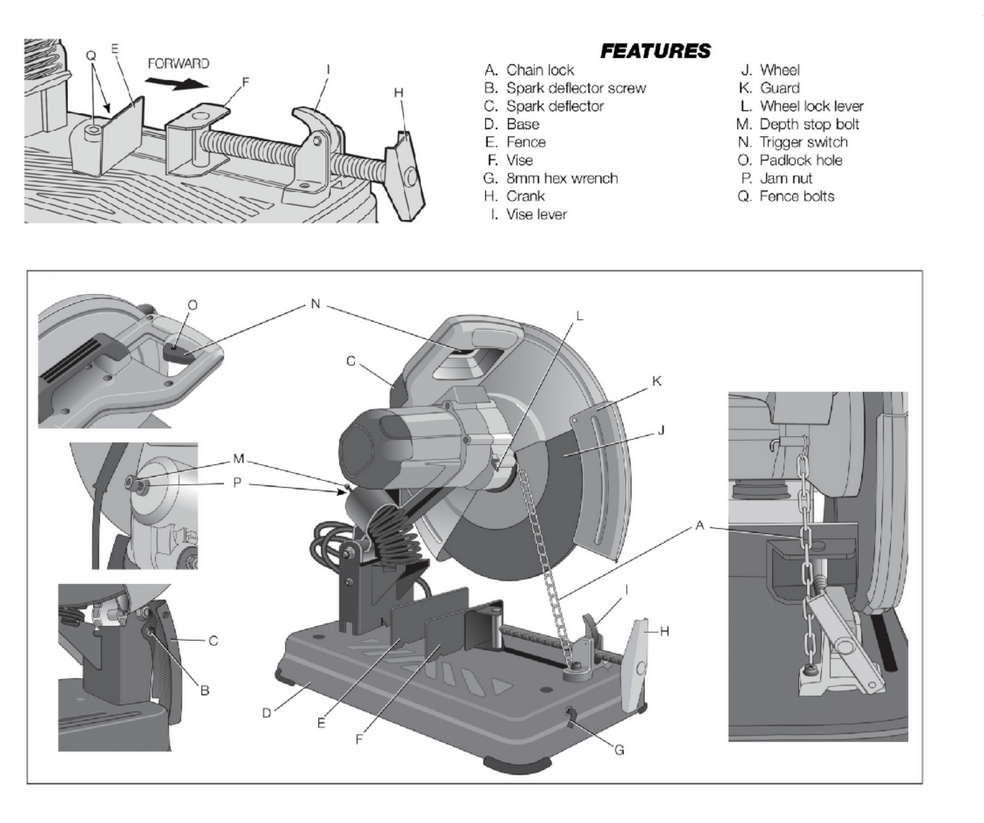
- Use the vise lever to fasten the workpiece, then tighten securely by turning the vise crank. (See features H and I.)
3. Perform the cut.
- Watch where you stand - avoid line of cutting wheel. Sparks and small pieces will tend to kick back toward wall, but can fly in any direction.
| |
|---|---|
| Chop Saw clamping tips |
- Never start with cutting wheel inserted into or touching the workpiece. Press handle trigger to start the blade, then lower the blade.
- Vary force and travel speed to match the shape of work – judge by ear and by the sparks produced. No quick chops.
Clamping Tips
Be aware of blade rotation.
Angles are best cut with both legs facing down. This allows a safe cut, but is not optimal for miter cuts.
Another option for Angles: L facing backward, into the rotation of the blade.
Use square tube as a stabilizer. A spacer block slightly more narrow than the work piece can increase blade utilization.
Long workpieces must be supported to remain level. The cut-off end should be free to fall in order to avoid wheel binding.
| |
|---|---|
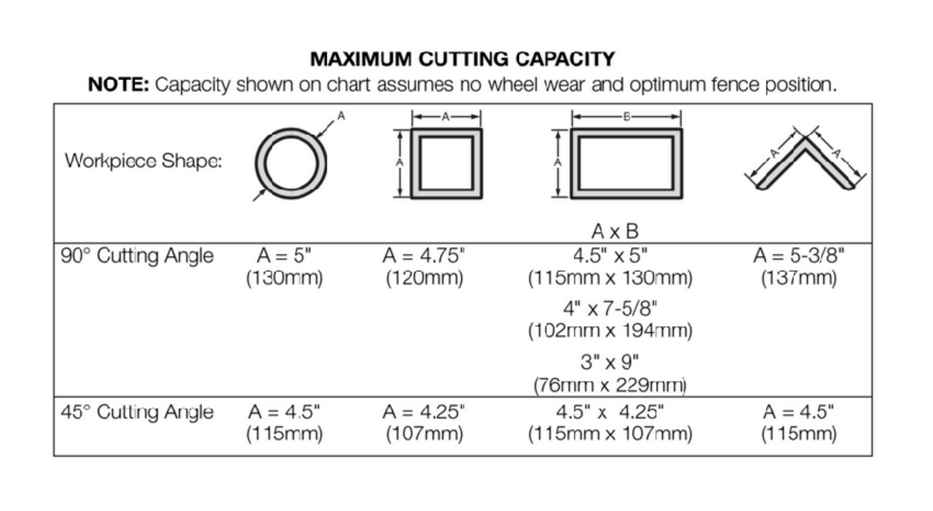
| Stock size limits for the Chop Saw |
| |
|---|---|
| The parts of the Chop Saw |
