Burr King Belt Sander: Difference between revisions
No edit summary |
Acharlwood (talk | contribs) m (Added category) |
||
| (27 intermediate revisions by one other user not shown) | |||
| Line 4: | Line 4: | ||
Link to: [[:Category:Metal Shop#Tools | Metal Shop tool list]] | Link to: [[:Category:Metal Shop#Tools | Metal Shop tool list]] | ||
Use of this tool is taught in {{:AAClass_MET_1}} | |||
{{ToolBox | {{ToolBox | ||
| Line 19: | Line 21: | ||
|manual= [https://drive.google.com/file/d/17dlYvfwkayPyTciZfODPw4VNSkVSiqpl/view?usp=drive_link Burr King 482 Manual] | |manual= [https://drive.google.com/file/d/17dlYvfwkayPyTciZfODPw4VNSkVSiqpl/view?usp=drive_link Burr King 482 Manual] | ||
|rubric=n/a | |rubric=n/a | ||
|tool_categories= | |tool_categories=[[Category:Sanders]] | ||
}} | }} | ||
| Line 27: | Line 29: | ||
This free-standing sanding machine drives a 2-inch wide abrasive belt vertically down behind a small table that supports the workpiece. A vertical backing plate presses back against the pressure on the workpiece. The machine has a variable-speed control and a dust collector. Its three-wheel architecture makes it easier to control the belt tension. | This free-standing sanding machine drives a 2-inch wide abrasive belt vertically down behind a small table that supports the workpiece. A vertical backing plate presses back against the pressure on the workpiece. The machine has a variable-speed control and a dust collector. Its three-wheel architecture makes it easier to control the belt tension. | ||
''Please Note:'' If you plan to use this tool extensively, you should probably buy your own belts. The supply in the Metal Shop is limited. One way to find them is to run a Google search for: "2x48 sanding belts". | |||
== Use for: == | == Use for: == | ||
| Line 32: | Line 36: | ||
Some plastics | Some plastics | ||
Small bits of wood | |||
== Do not use for: == | == Do not use for: == | ||
Toxic materials | Toxic or highly flammable materials | ||
Glass and ceramics | |||
Minerals | |||
Grinding off your fingertips | |||
== Safety Hazards == | == Safety Hazards == | ||
* '''ALWAYS WEAR EYE PROTECTION''' Face shield is recommended. | {| class="infobox" cellspacing="5" style="width: 12em; text-align: left; font-size: 100%; line-height: 1.5em;" | ||
! colspan="2" class="infobox-image" | [[File:Burr_King_dust_collector_switch.jpg|250px|dust collector on/off ]] | |||
|- | |||
| colspan="2" | To turn on the dust collector, pull the red lever up. Push down to turn off. | |||
|- | |||
|} | |||
* '''ALWAYS WEAR EYE PROTECTION!!''' Face shield is recommended. | |||
* Do not use the machine if you haven't been properly trained. | * Do not use the machine if you haven't been properly trained. | ||
* ALWAYS turn on the '''Dust Collector''' before operating the machine. | * ALWAYS turn on the [https://drive.google.com/file/d/1-Rc5vS-uFCAGgUfonfjKs8-yK4BwYX60/view?usp=drive_link '''Dust Collector'''] before operating the machine. | ||
* Keep fingers and hands away from the moving belt. | * Keep fingers and hands away from the moving belt. | ||
| Line 52: | Line 71: | ||
* Beware of sparks showering from the machine during grinding. | * Beware of sparks showering from the machine during grinding. | ||
* Do not allow piles of metal powder to accumulate inside the machine. Sparks can cause | * Do not allow piles of metal powder to accumulate inside the machine. Sparks can cause a fire. | ||
* Do not operate the machine if the gap between the belt and the support table exceeds 1/8". | |||
* Avoid mixing different metals on the same belt. Chemical reactions during grinding may cause a fire. | |||
* Do not run the belt sander motor in reverse. The workpiece may be kicked into your face. | |||
=Speed Control= | |||
{| class="infobox" cellspacing="5" style="width: 12em; text-align: left; font-size: 100%; line-height: 1.5em;" | |||
! colspan="2" class="infobox-image" | [[File:Burr_King_controller.png|150px|sander speed control ]] | |||
|- | |||
| colspan="2" | The VEVOR speed control mounted on the Burr King sander. | |||
|- | |||
|} | |||
Power for the Burr King sander is supplied with a toggle switch to the right of the controller. The speed control must be used to start and stop the motor, and the speed of the belt can be adjusted using it. | |||
DO NOT attempt to change the settings unless you have been properly trained, tool-tested and you have read the [https://drive.google.com/file/d/1XMXzkzpwMiFUSxIsxKXhjcZVtgY_yasT/view?usp=drive_link user manual] for the controller! | |||
The display on the controller reads the output frequency going to the motor, not the motor speed. Unless you have done a lot of homework, this number won't have any use to you. | |||
The motor can be started and stopped using the green and red buttons on the front panel. | |||
=Changing the Belt= | |||
{| class="infobox" cellspacing="5" style="width: 12em; text-align: left; font-size: 100%; line-height: 1.5em;" | |||
! colspan="2" class="infobox-image" | [[File:Burr_king_belt_tensioner.png|200px|belt tensioner ]] | |||
|- | |||
| colspan="2" | The belt tensioning handle inside the housing | |||
|- | |||
|} | |||
{| class="infobox" cellspacing="5" style="width: 12em; text-align: left; font-size: 100%; line-height: 1.5em;" | |||
! colspan="2" class="infobox-image" | [[File:Burr_king_side_door_open.png|187px|side door open ]] | |||
|- | |||
| colspan="2" | To access the belt, open the door on the right side of the machine. | |||
|- | |||
|} | |||
The process for tensioning the belt is described on page 10 of the [https://drive.google.com/file/d/17dlYvfwkayPyTciZfODPw4VNSkVSiqpl/view?usp=drive_link User Manual.] | |||
Open the door on the right side of the machine. | |||
Press the button in the center of the tensioning handle to release the ratchet. | |||
Move the handle down to free up the belt. | |||
Remove the old belt and replace. | |||
To tension, lift the handle up until the ratchet clicks several times. | |||
The belt is properly tensioned after the pawl has clicked between 3 and 8 times. | |||
Close the side door on the machine. | |||
Latest revision as of 15:52, 5 April 2025
Link to: Metal Shop main page
Link to: Metal Shop tool list
Use of this tool is taught in Metal Shop 101
| 2x48-Inch Three-Wheel Belt Sander | |
|---|---|
| General Info | |
| Make | Burr King |
| Model | 482 |
| Serial | Unknown |
| Specs | n/a |
| Manual | Burr King 482 Manual |
| Asylum Info | |
| Location | Metal Shop |
| Rubric | n/a |
| Training | Metal Shop 101 |
| Testing | Tool testing, or come to the shop on Tool Testing Night |
| Restrictions | red |
| Eye protection required! | ||
|---|---|---|
Description
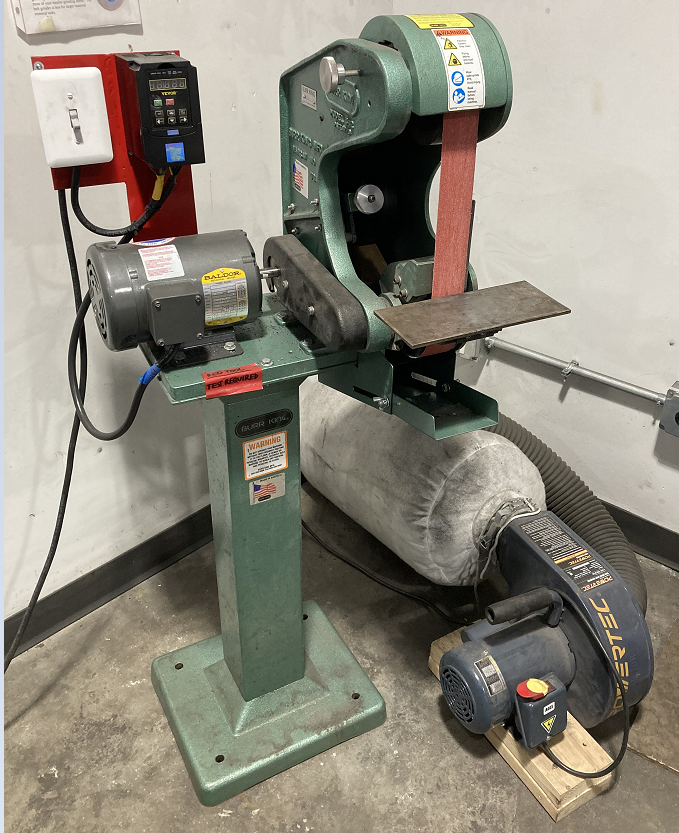
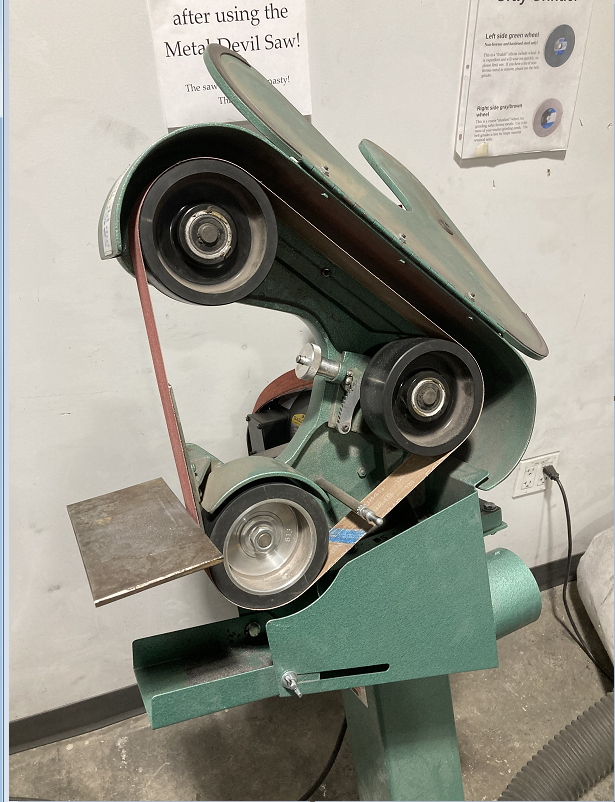
This free-standing sanding machine drives a 2-inch wide abrasive belt vertically down behind a small table that supports the workpiece. A vertical backing plate presses back against the pressure on the workpiece. The machine has a variable-speed control and a dust collector. Its three-wheel architecture makes it easier to control the belt tension.
Please Note: If you plan to use this tool extensively, you should probably buy your own belts. The supply in the Metal Shop is limited. One way to find them is to run a Google search for: "2x48 sanding belts".
Use for:
Hard and soft metals
Some plastics
Small bits of wood
Do not use for:
Toxic or highly flammable materials
Glass and ceramics
Minerals
Grinding off your fingertips
Safety Hazards
| |
|---|---|
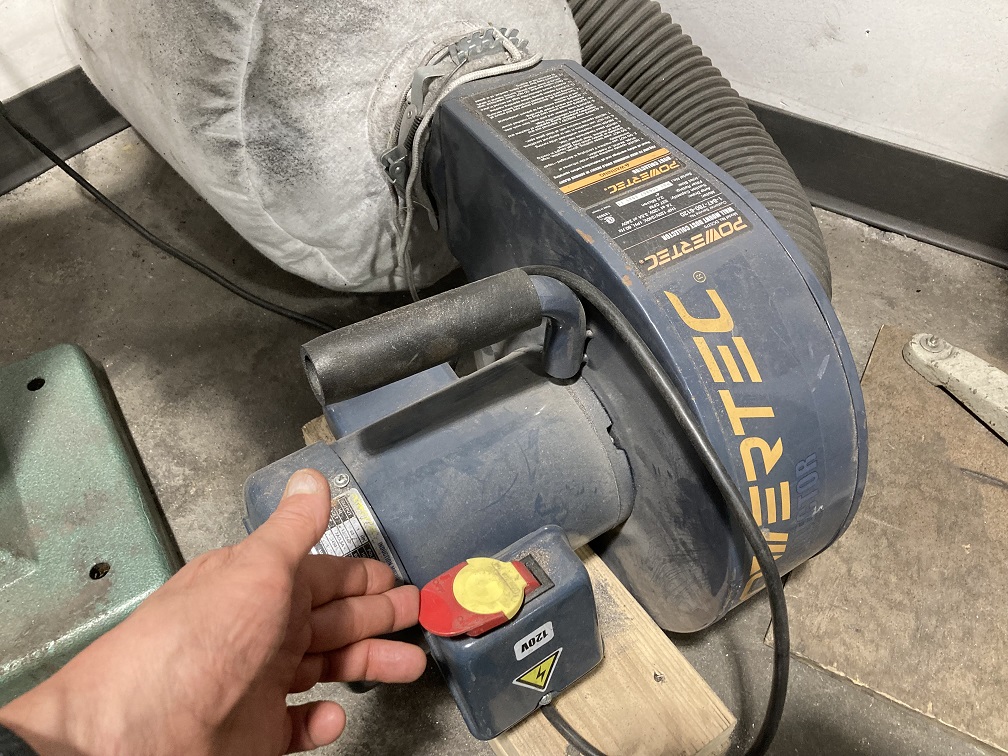
| To turn on the dust collector, pull the red lever up. Push down to turn off. |
- ALWAYS WEAR EYE PROTECTION!! Face shield is recommended.
- Do not use the machine if you haven't been properly trained.
- ALWAYS turn on the Dust Collector before operating the machine.
- Keep fingers and hands away from the moving belt.
- When possible, grip the workpiece with vise grips to protect the hands from abrasion and excessive heat.
- Do not wear gloves. Fabric gloves can be sucked into the machine by the moving belt, causing serious hand injury.
- Beware of sparks showering from the machine during grinding.
- Do not allow piles of metal powder to accumulate inside the machine. Sparks can cause a fire.
- Do not operate the machine if the gap between the belt and the support table exceeds 1/8".
- Avoid mixing different metals on the same belt. Chemical reactions during grinding may cause a fire.
- Do not run the belt sander motor in reverse. The workpiece may be kicked into your face.
Speed Control
| |
|---|---|
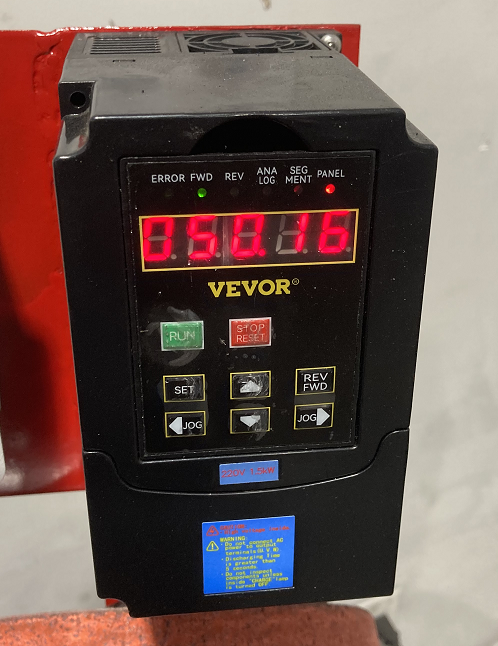
| The VEVOR speed control mounted on the Burr King sander. |
Power for the Burr King sander is supplied with a toggle switch to the right of the controller. The speed control must be used to start and stop the motor, and the speed of the belt can be adjusted using it.
DO NOT attempt to change the settings unless you have been properly trained, tool-tested and you have read the user manual for the controller!
The display on the controller reads the output frequency going to the motor, not the motor speed. Unless you have done a lot of homework, this number won't have any use to you.
The motor can be started and stopped using the green and red buttons on the front panel.
Changing the Belt
| |
|---|---|
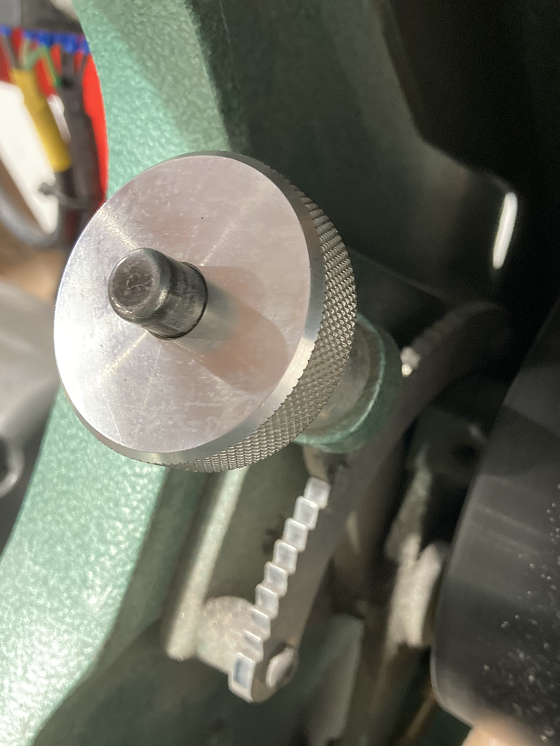
| The belt tensioning handle inside the housing |
| |
|---|---|
| To access the belt, open the door on the right side of the machine. |
The process for tensioning the belt is described on page 10 of the User Manual.
Open the door on the right side of the machine.
Press the button in the center of the tensioning handle to release the ratchet.
Move the handle down to free up the belt.
Remove the old belt and replace.
To tension, lift the handle up until the ratchet clicks several times.
The belt is properly tensioned after the pawl has clicked between 3 and 8 times.
Close the side door on the machine.
