Document a tool: Difference between revisions
From Artisans Asylum Wiki
Susanvaughn (talk | contribs) No edit summary |
Susanvaughn (talk | contribs) No edit summary |
||
| Line 1: | Line 1: | ||
'''Goal:''' This guide will walk you through documsenting a tool on the [[Main Page|Artisan Asylum Wiki]]. It is not too hard! You can’t break the wiki, so just give it a try! If you are already comfortable with mediawiki, you can use the Short Instructions. Otherwise, there are longer instructions – they are several pages long, but there are lots of helpful pictures. | '''Goal:''' This guide will walk you through documsenting a tool on the [[Main Page|Artisan Asylum Wiki]]. It is not too hard! You can’t break the wiki, so just give it a try! If you are already comfortable with mediawiki, you can use the Short Instructions. Otherwise, there are longer instructions –'''''[coming soon]''''' they are several pages long, but there are lots of helpful pictures. | ||
=== Short Instructions === | === Short Instructions === | ||
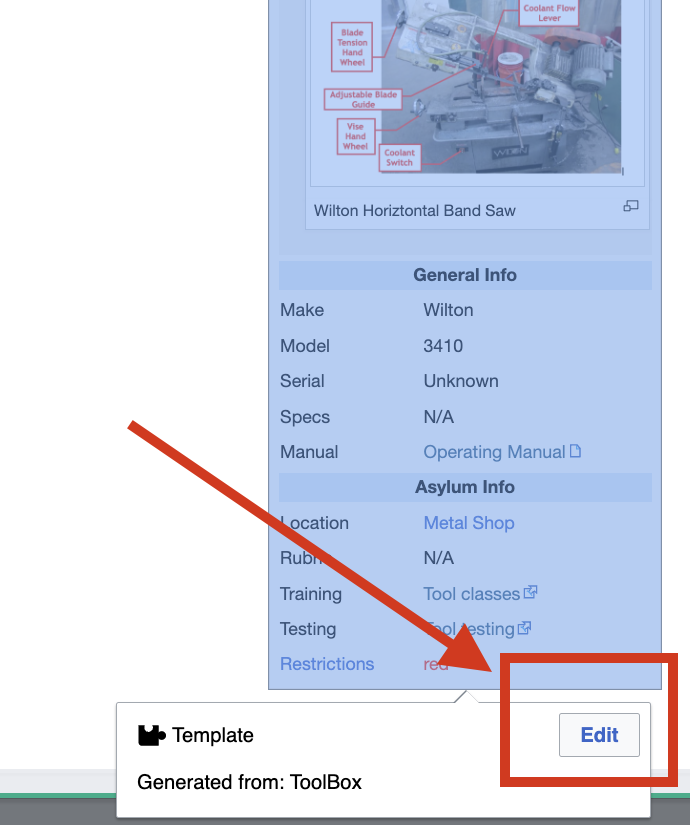
[[File:ToolBox Edit.png|thumb]] | [[File:ToolBox Edit.png|thumb]] | ||
Revision as of 19:37, 8 February 2024
Goal: This guide will walk you through documsenting a tool on the Artisan Asylum Wiki. It is not too hard! You can’t break the wiki, so just give it a try! If you are already comfortable with mediawiki, you can use the Short Instructions. Otherwise, there are longer instructions –[coming soon] they are several pages long, but there are lots of helpful pictures.
Short Instructions
If you are already very familiar with adding/editing content on any Mediawiki-powered wiki, use these instructions:
- Create a page for a new "Category" with the name of the tool:
- Copy and paste this line into the address bar of your web browser, replacing “Jet Horizontal Band Saw” with the name of your tool:: https://wiki.artisansasylum.com/index.php?title=Jet Horizontal Band Saw
- Click on the Create tab to create the pag Note: you need to be logged in to create a new page.
- You should now see an editing window that lets you add content to the page.
- Next, fill out the ToolBox Template:
- Click Insert, then choose Template.
- In the Template search window, type in “ToolBox”.
- Click Add, then Insert to add the ToolBox template to the page.
- Click on the gray box and choose Edit from the popup window to edit the template. (See Example)
- Fill the template out with the correct tool information.
- Use the editor to add information about your tool to the page. Here are some suggestions
- Safety Information
- Materials Information
- Operating Instructions, including videos, diagrams, or caution
- Maintenance
- Common problems and troubleshooting information
- Additional Tool Specific Categories, as needed
- To preview your changes, click Show preview.
- Continue editing and previewing the page until you’re satisfied.
- Click Save changes to save your changes.
Congratulations! You’ve made a tool page!
