Bosch 12-inch Miter Saw: Difference between revisions
From Artisans Asylum Wiki
No edit summary |
No edit summary |
||
| Line 82: | Line 82: | ||
* Use clamps to support the workpiece if possible. Keep hands at least 4 inches away from the path of the blade. | * Use clamps to support the workpiece if possible. Keep hands at least 4 inches away from the path of the blade. | ||
{| class="infobox" cellspacing="5" style="width: 22em; text-align: left; font-size: 100%; line-height: 1.5em;" | {| class="infobox" cellspacing="5" style="width: 22em; text-align: left; font-size: 100%; line-height: 1.5em;" | ||
| Line 93: | Line 89: | ||
|- | |- | ||
|} | |} | ||
* Keep the workpiece stationary and press or clamp it against both the rear fence and the table. | |||
* '''Do not feed the workpiece into the blade or cut "freehand" in any way.''' | |||
* '''Never cross your hand over the line of cutting, either in front of or behind the saw blade.''' | * '''Never cross your hand over the line of cutting, either in front of or behind the saw blade.''' | ||
| Line 111: | Line 111: | ||
==Starting the Saw== | ==Starting the Saw== | ||
{| class="infobox" cellspacing="5" style="width: 22em; text-align: left; font-size: 100%; line-height: 1.5em;" | |||
! colspan="2" class="infobox-image" | [[File:Miter_saw_power_switch.png|250px|Miter saw power switch]] | |||
|- | |||
| colspan="2" | Pwoer switch for the Miter Saw. | |||
|- | |||
|} | |||
1. Place the workpiece on the saw and hold firmly against the back fence and the table. '''Keep hand more than 4 inches from the line of the cut!''' | 1. Place the workpiece on the saw and hold firmly against the back fence and the table. '''Keep hand more than 4 inches from the line of the cut!''' | ||
| Line 117: | Line 124: | ||
3. Squeeze the handle to start the motor. | 3. Squeeze the handle to start the motor. | ||
4. Make the cut. | 4. Make the cut. | ||
Revision as of 13:13, 16 February 2024
| Bosch 12-in Miter Saw GCM12SD | |
|---|---|
| General Info | |
| Make | Bosch |
| Model | GCM12SD |
| Serial | Unknown |
| Specs | |
| Manual | Dewalt User Manual |
| Asylum Info | |
| Location | Wood Shop |
| Rubric | |
| Training | |
| Testing | |
| Restrictions | red |
Use For
- Dry, flat lumber
- Boards
Do Not Use For
- Sheet material
- Logs, carvings, or other irregular lumber
- Pressure-treated
- Wet lumber
- Plastic
- Metal or metal-coated
- Composites
- Carbon-filled materials
NOTE: This tool has a superficial resemblance to some saws in the Metal Shop. Those are for cutting metal, this is ONLY for cutting WOOD.
Tool Safety Notes
Personal Safety
| |
|---|---|
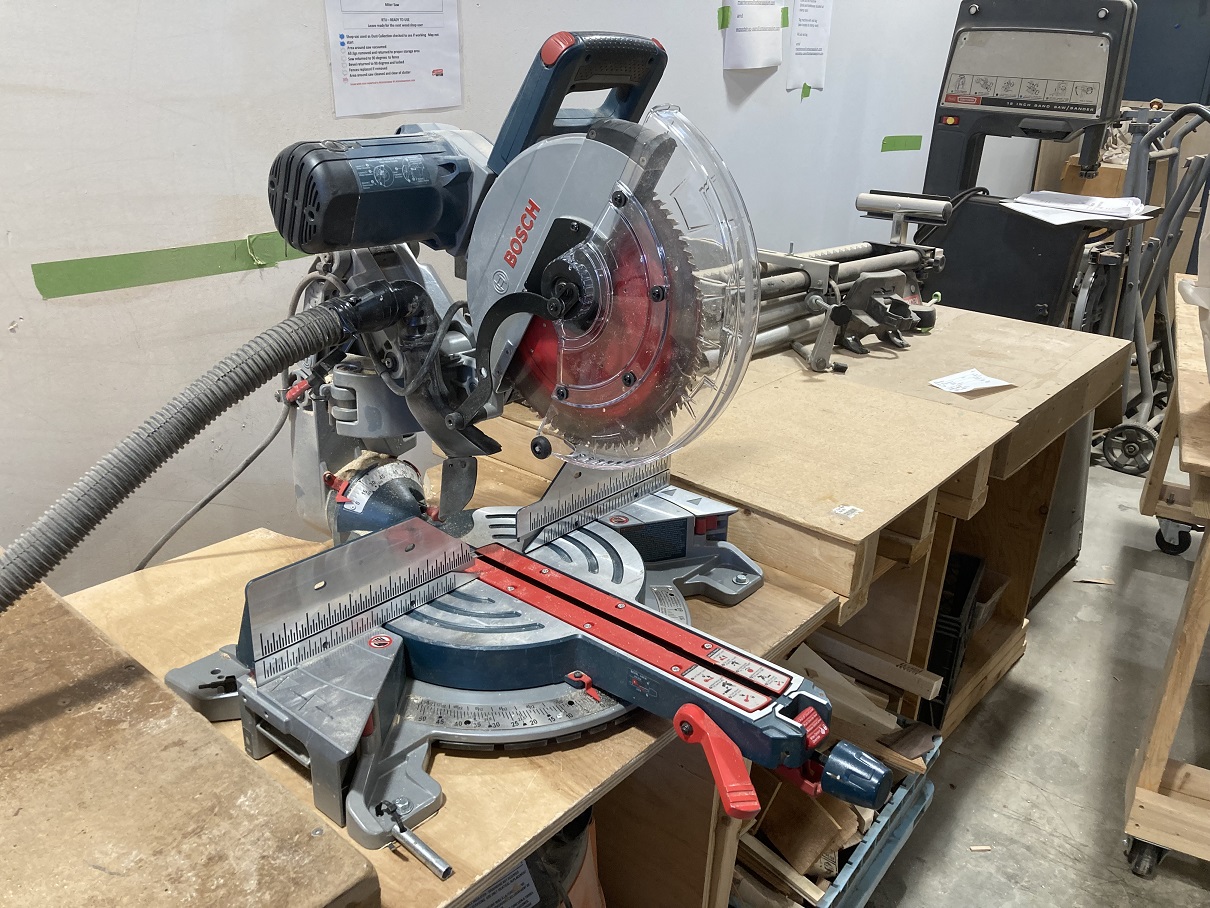
| The Bosch Miter saw with a portion of the worktable. |
- Always wear safety goggles. Eyeglasses are not safety goggles.
- This machine generates a lot of dust. Wear a dust mask if using it frequently.
| |
|---|---|
- Dust collection is required where present.
- No open-toed or floppy shoes.
- This tool is loud. Hearing protection recommended.
- Remove adjusting keys and wrenches before starting.
- Do not overreach. Keep proper footing and balance at all times
- Do not wear loose clothing or jewelry
Tool Safety
- Always treat this tool as a dangerous instrument, no matter how familiar you are with it. Don't become complacent or ignore safety rules.
- Use clamps to support the workpiece if possible. Keep hands at least 4 inches away from the path of the blade.
| |
|---|---|
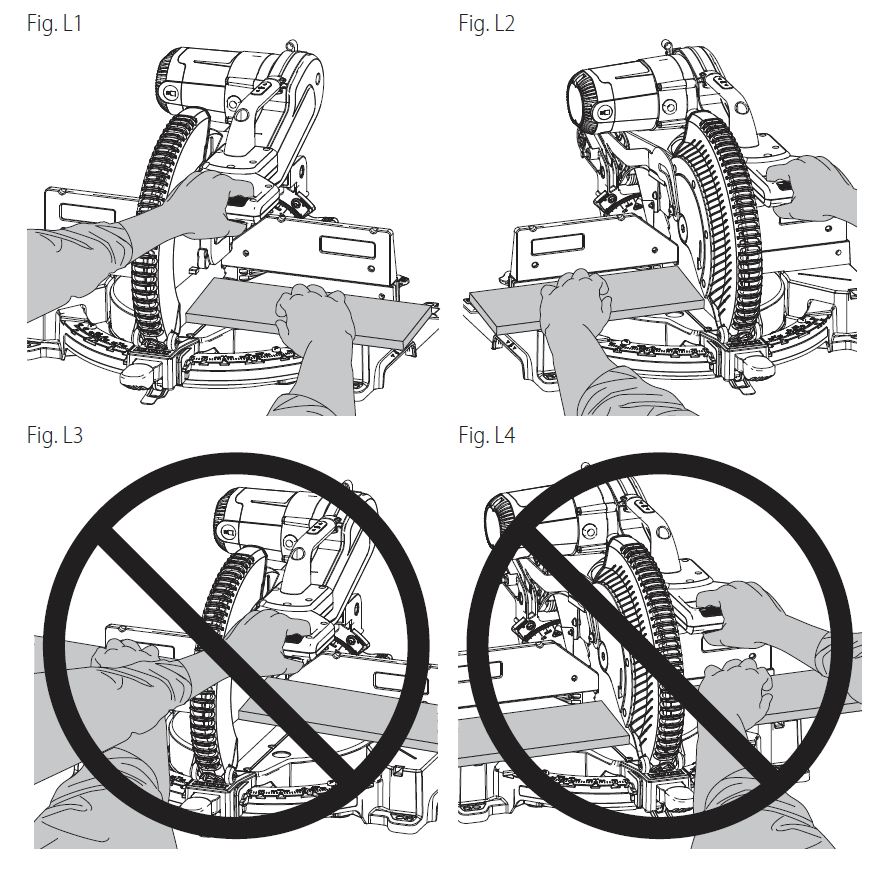
| Hand position for the miter saw. L1: Lefty, Good; L2: Righty, Good; L3: Lefty, Bad; L4: Righty, Bad. |
- Keep the workpiece stationary and press or clamp it against both the rear fence and the table.
- Do not feed the workpiece into the blade or cut "freehand" in any way.
- Never cross your hand over the line of cutting, either in front of or behind the saw blade.
- Inspect the workpiece. If it is bowed or warped, clamp it with the outside of the bow against the fence. Always make sure there is no gap between the workpiece, fence, and table along the line of the cut.
- No nails in the workpiece
- Cut only one piece at a time.
- Plan your cuts. Do not confine the workpiece in any way that may cause it to jam against the blade.
- When cutting a rod, reduce its tendency to roll under the spinning blade by clamping it or using a fixture.
- If the workpiece jams on the blade, turn the saw off and unplug it before reaching in to free up the piece.
- Do not stand on the tool.
Starting the Saw
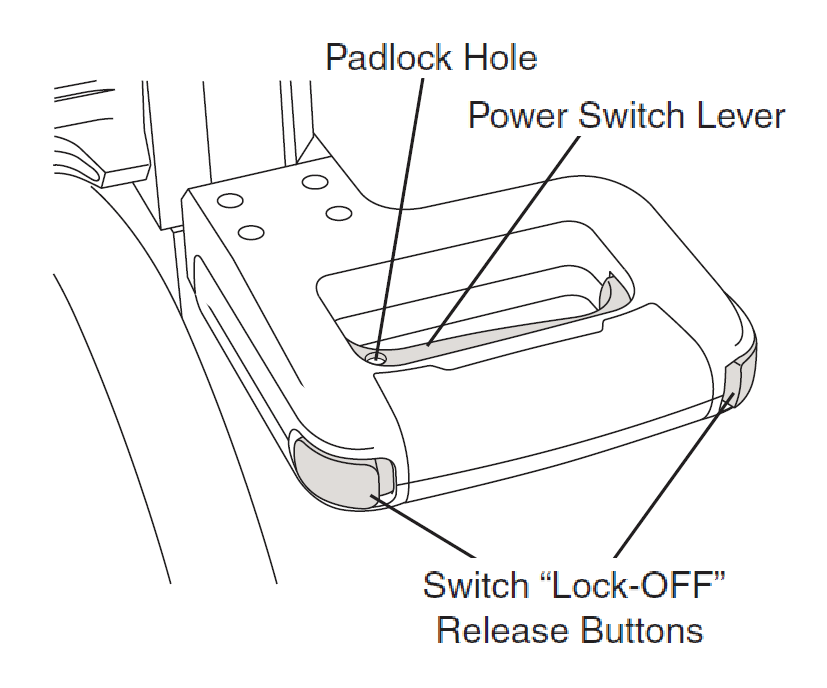
| |
|---|---|
| Pwoer switch for the Miter Saw. |
1. Place the workpiece on the saw and hold firmly against the back fence and the table. Keep hand more than 4 inches from the line of the cut!
2. Grasp the handle and press one of the "Lock-OFF" buttons with the thumb.
3. Squeeze the handle to start the motor.
4. Make the cut.
5. Release the handle. This will stop the motor and reset the "Lock-OFF" button.

| |
|---|---|
| Slide-action cutting on the Miter Saw. |
