PowerMax 30XP Handheld Plasma Cutter: Difference between revisions
No edit summary |
|||
| Line 220: | Line 220: | ||
If you need to start a cut in the interior of a sheet, hold the torch at about 30 degrees to the surface so the ejected metal clears the nozzle tip. Ignite the arc, and then slowly rotate the torch until it is perpendicular. The torch is only capable of piercing sheet up to about 1/4 inch. | If you need to start a cut in the interior of a sheet, hold the torch at about 30 degrees to the surface so the ejected metal clears the nozzle tip. Ignite the arc, and then slowly rotate the torch until it is perpendicular. The torch is only capable of piercing sheet up to about 1/4 inch. | ||
See the [https://drive.google.com/file/d/1WYgjqhZ6fDvo2xvt8kogXcW3tYmFdPD3/view?usp=drive_link PowerMax 30XP Manual] for more information on cutting technique and troubleshooting. | |||
==Operation notes== | ==Operation notes== | ||
Revision as of 20:21, 13 October 2024
Link to: Metal Shop main page
Link to: Metal Shop tool list
| Eye protection required! | ||
|---|---|---|
| Handheld Plasma Cutter | |
|---|---|
| General Info | |
| Make | Hypertherm |
| Model | PowerMax 30XP |
| Serial | |
| Specs | n/a |
| Manual | PowerMax 30XP Manual |
| Asylum Info | |
| Location | Metal Shop |
| Rubric | n/a |
| Training | |
| Testing | |
| Restrictions | red |
Description
Similar to an arc welder, a strong electric current is passed between an electrode and the workpiece. A conductive plasma forms in the gap between the two electrodes, reaching a temperature around 15,000 Kelvin (~25,000° F)
In a plasma cutter the arc is combined with a jet of air. The air jet clears molten metal from the workpiece, allowing the machine to make deep cuts in metal sheets. In some metals, especially steel, the air also contributes heat by oxidizing the metal under the arc.
Use For:
Cutting, piercing, or gouging metals
Mild or Hard steel
Stainless steel
Copper and alloys
Aluminum
Titanium
Cutting thickness up to 5/8 inch (16mm)
Piercing thickness up to 1/4 inch (6mm)
Do Not Use For:
Toxic metals (Lead, Zinc, etc)
Galvanized steel
Non-metals
Flammable materials
Safety Notes
- Plasma radiation and UV can damage eyesight. Shade 5 eye protection or darker required.
- Wear welding gloves, face protection, cotton clothing (no synthetics) and closed toe shoes.
- Ear protection recommended.
- Toxic fumes may be emitted, especially from chromium-containing alloys such as stainless steel and tool steels. Wear a respirator in those cases.
- Arc ignites immediately when torch trigger is pushed.
- It cuts quickly through gloves and skin. - Keep hands, clothes, and objects away from the torch tip. - Keep hands clear of the cutting path. - Never hold the workpiece. - Never point the torch toward yourself or others.
* Various safety links to keep you awake at night:
ANSI - General Safety in Welding and Cutting
Best Practices

| |
|---|---|
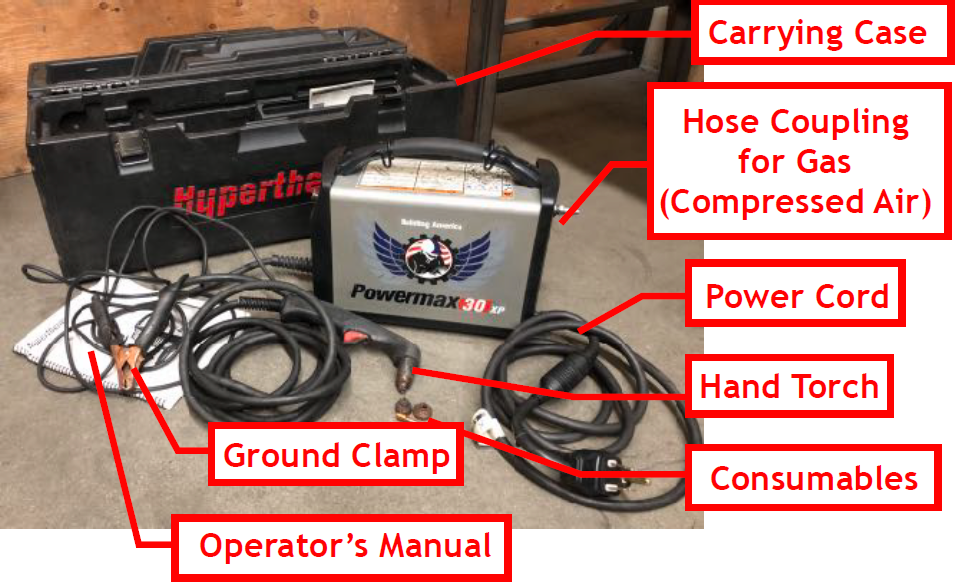
- A hard-copy of the Operator's Manual is stored in the carrying case.
- ALWAYS WEAR EYE PROTECTION! It is mandatory in the Metal Shop, even if you aren't doing anything but looking around.
- For the plasma cutter, wear Shade 5 goggles or better. The requirement is similar to that for the Oxy-Acetylene Torch.
- Instant-On Torch. Before plugging in, make sure the power switch is in the OFF (O) position. Hand Torch safety catch reduces accidental firing.
- Remove flammable objects and liquids from the work area.
- Note fire extinguisher location and use.
- Do not use a drum or other closed container as a cutting table.
Machine Set-Up
In general this device is pretty easy to use.
Unpacking
| |
|---|---|
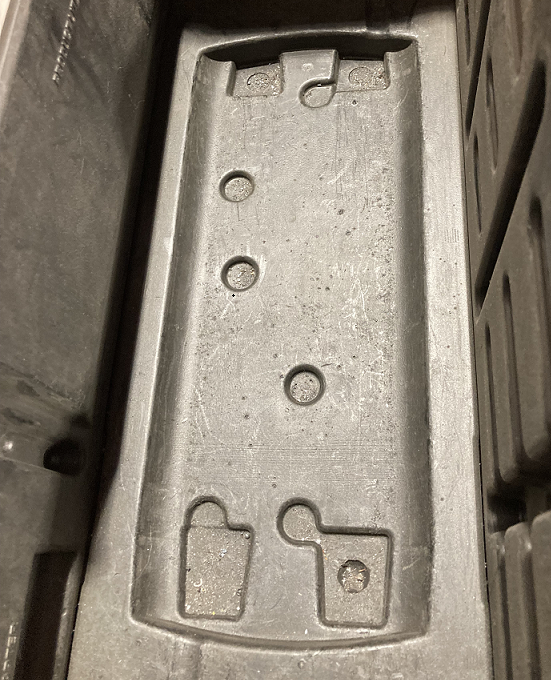
| The power supply only fits one way. |
| |
|---|---|
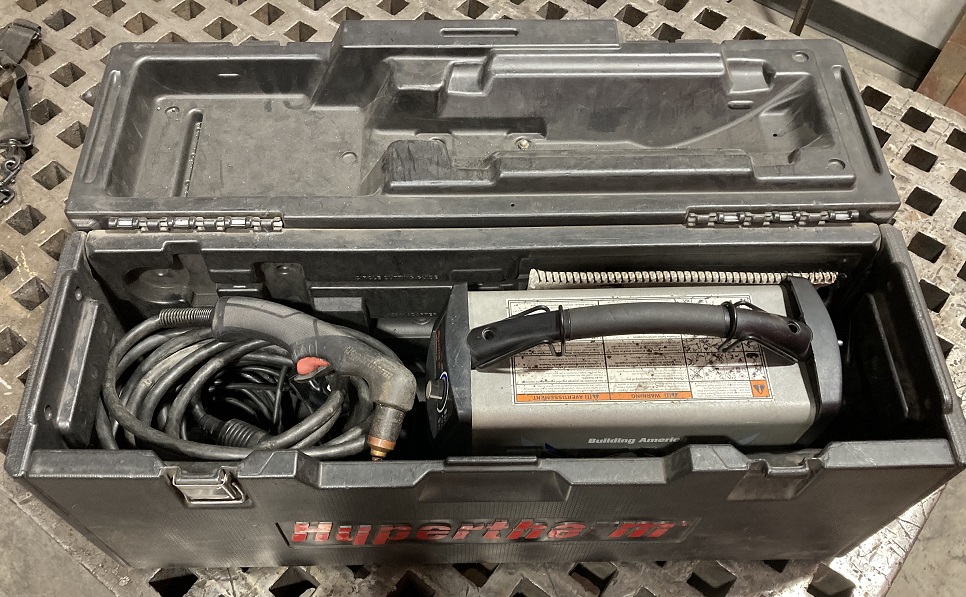
| Someone spent a lot of time designing this compact carrying case. |
Perhaps the most difficult part is unpacking the plasma cutter from the carrying case and replacing it when finished. The cables are coiled very tightly in the left side of the case and the power supply seats on the right.
Note the asymmetry in the recesses at the bottom of the case. The power supply only fits one way back into the case, with the faceplate pointing towards the coils of cables. If you try to fit it in the wrong way around you won't be able to latch the box top, and then you won't be able to carry it using the handle.
Connections
| |
|---|---|
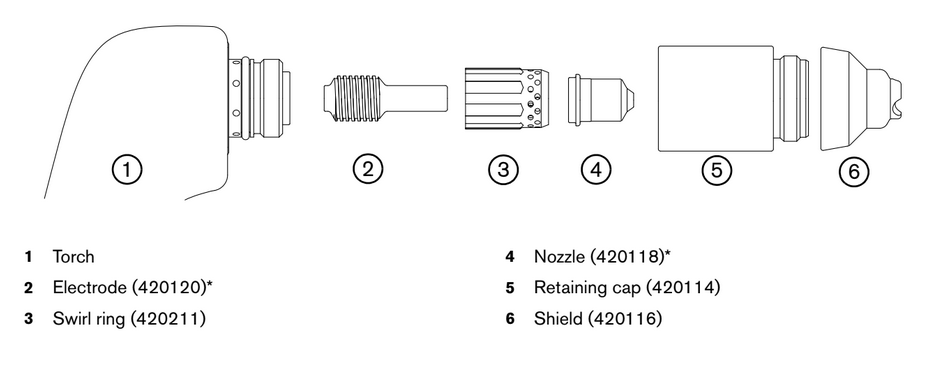
| Parts in the plasma cutter nozzle assembly. |
1. Before operation, perform a quick safety check.
- Check for damaged parts.
- Check that an appropriate, properly-matched consumable set is installed on the torch head.
- Check that the retaining cap isn't torn or frayed. There is a severe shock hazard if the nozzle becomes exposed.
2. Plug it in.
This machine has a 240 V cord that fits the same outlets as the arc welders.
| |
|---|---|
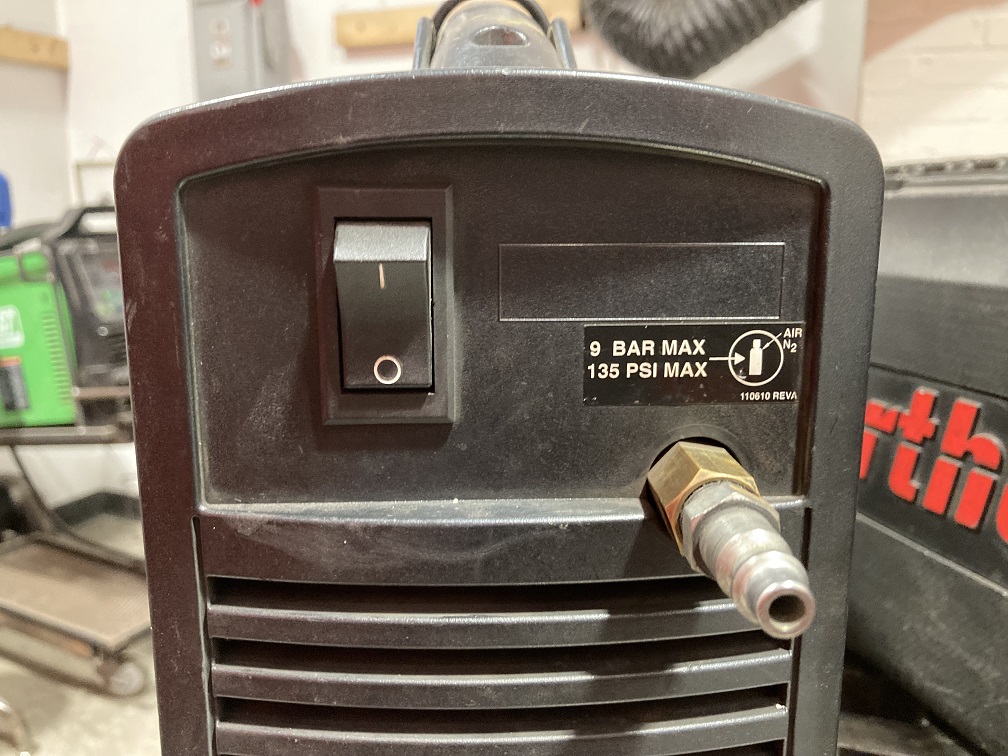
| View of the back of the power supply. |
3. Supply the machine with compressed air.
- Make sure the air compressor is turned on. The compressor is located in a closet adjacent to the Antwerp loading dock entry. Follow the instructions on the poster stuck to the compressor.
- Compressed air for the Metal Shop is presently supplied from a corner next to the entry to the Powder Coating facility. A long air hose should be coiled up and available there. The air pressure is usually around 100 psi.
- The nipple for attaching the air hose is located on the back of the power supply box, next to the power switch.
4. Attach the ground clamp to a part of the workpiece that won't get cut off.
Avoid slashing the acorn tables or the welding benches with the plasma cutter. Support the workpiece with some airspace beneath the region where you intend to cut.
Power it up
| |
|---|---|
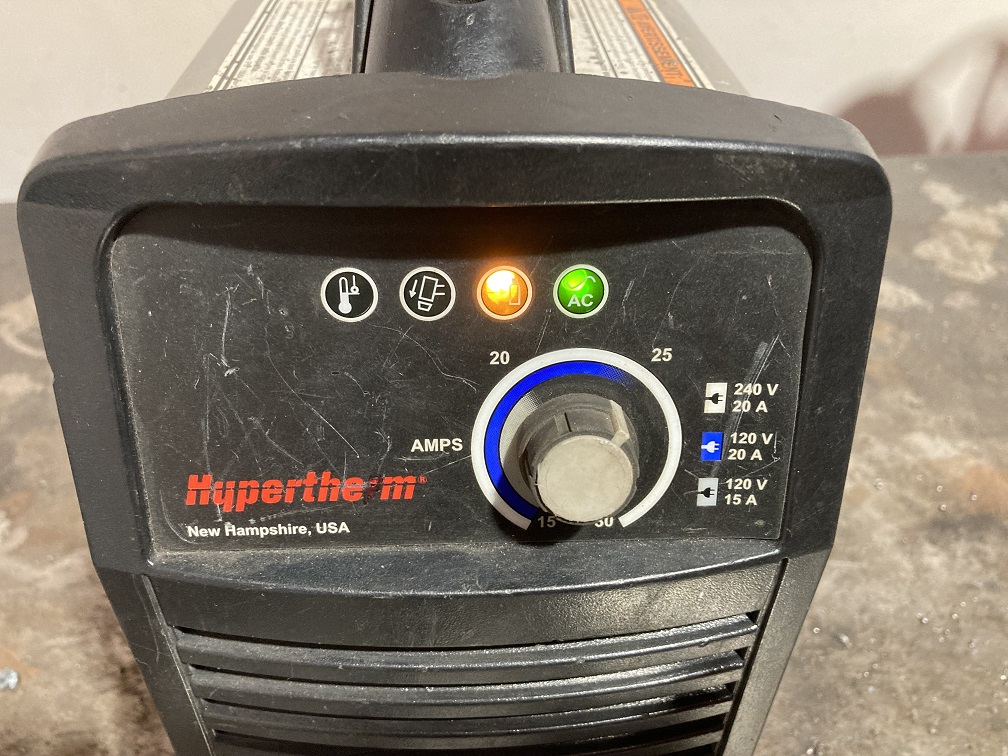
| The front panel of the plasma cutter, showing its yellow error light for no air supply. |
Turn on the power switch on the back panel of the supply.
Use the knob on the front to set the amperage.
Check the front panel lights for an error condition. Only the green light on the right should be lit.
In the picture shown, the yellow error light indicates no compressed air is hooked up.
The light to the left of the yellow one would indicate that the nozzle stack is improperly installed.
Making a Cut
| |
|---|---|
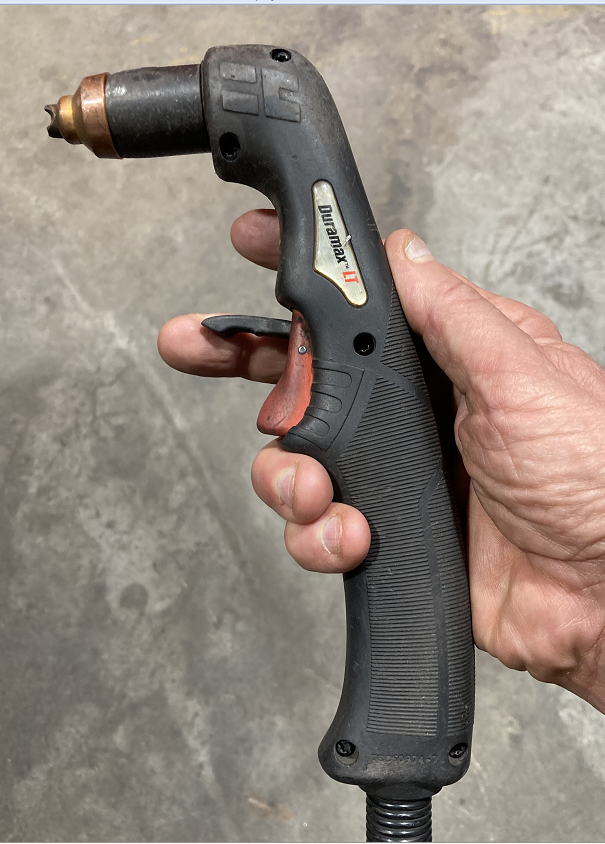
| Lift the safety catch before squeezing the trigger. |
It is easier to start a cut from the edge of a sheet than from the interior.
Hold the torch nozzle perpendicular to the sheet along one of its edges.
Lift the safety catch and squeeze the trigger to ignite the arc.
With thick plates, you may need to pause on the edge to allow the torch to fully penetrate the sheet.
Drag the torch tip lightly on the workpiece and maintain a steady cut speed. Sparks should exit from the bottom of the workpiece, lagging slightly behind the torch as you cut. Use the sparks to judge the cut speed. Sparks that spray at 15 to 20 degrees behind the cut means an appropriate cut speed.
Be careful not to let the power supply overheat. At 30 amps, you can only operate the torch for 3-1/2 minutes per ten-minute period. At 20 amps you can cut for six minutes per ten; and at 18 amps you can cut 100% of the time.
If you need to start a cut in the interior of a sheet, hold the torch at about 30 degrees to the surface so the ejected metal clears the nozzle tip. Ignite the arc, and then slowly rotate the torch until it is perpendicular. The torch is only capable of piercing sheet up to about 1/4 inch.
See the PowerMax 30XP Manual for more information on cutting technique and troubleshooting.
Operation notes
- The easiest direction to cut is pulling towards you.
- If sparks spray upward, the sheet isn't cutting all of the way through. Either reduce the speed or increase the current.
- For making straight cuts, use a cutting guide. Clamp a piece of angle to the workpiece to guide the torch along the line.
Consumables
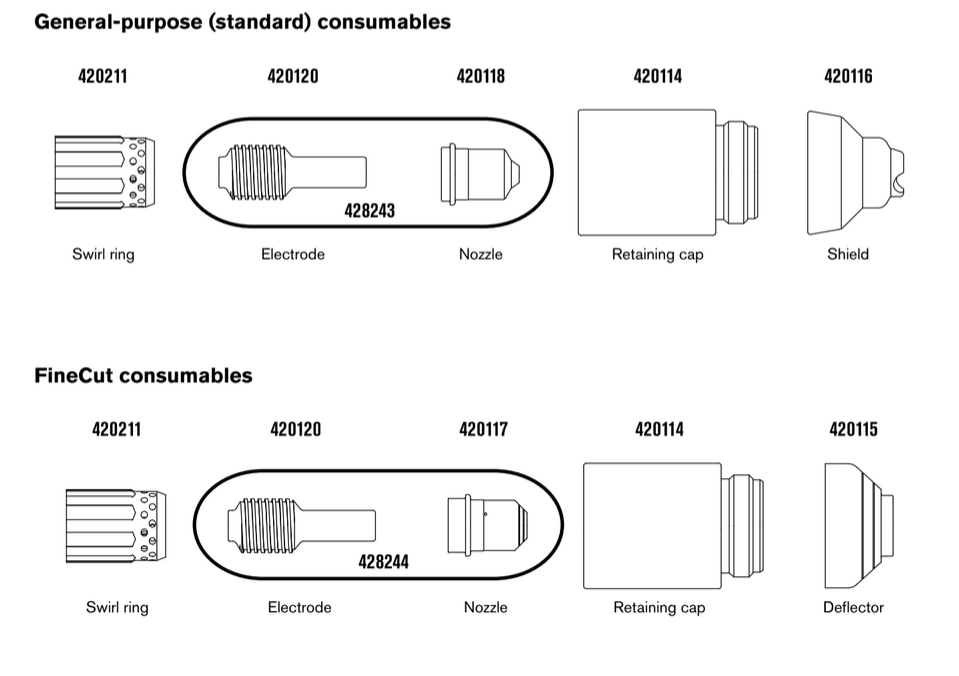
| |
|---|---|
| Note that the "Fine-cut" nozzle has grooves machined into the tip. |
The nozzles and electrodes will wear out after about an hour of arc time. They are cheap and easily found online. See the illustration for the part numbers.
Inspect the nozzle and electrode for signs of wear. If the nozzle orifice is no longer circular, replace it.
Superficially, these parts resemble the consumables on the CNC plasma cutter. They are not interchangeable.
