SolidWorks Tutorial 1b: Design of an Electronic Box, Continued
Link to: CAD Main Page
Link to: Tutorial 1a (prev)
Link to: Tutorial 1c
Introduction
This tutorial is the second in a series teaching basic SolidWorks CAD sketching and modeling tools.
In the previous tutorial, we designed a simple hollow box. In this tutorial we will add the features that will give it its function: A sample electronics enclosure that could be made on a 3D printer.
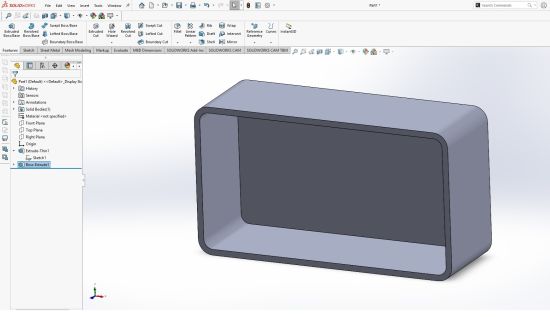
In this page we will explore more aspects of sketching, especially those that add features to the surfaces of an simpler model, and adding geometric constraints to features so that changes to the model's dimensions will carry through more smoothly.
The pace of this tutorial will be somewhat faster than the previous one because knowledge of tools already presented will be assumed.
Add Mounting Lugs
In this section we will cover adding new features to an existing part, and we will introduce the method for adding parametric constraints to the sketched features.
Sketch the Lug Outlines
The box from Tutorial 1a has several planar faces on it. Any of these faces can be used for making a new sketch.
Rotate the image to reveal the bottom of the box. (Click down on the MIDDLE mouse wheel and drag. If this is unfamiliar, please review the SolidWorks user interface introduction. )
Click the LEFT mouse button on the bottom face to select it. It should highlight in blue.
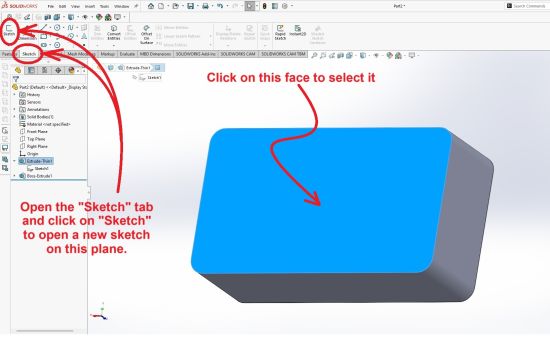
With this face highlighted, open the "Sketch" tab and click on the "Sketch" button in the upper-left corner of the window. This will open a new sketch.
The first thing to do is a little bit counter-intuitive. Sketch two rectangles that will become the lugs, but don't attach them to anything. Leave them floating off to the sides of the box, very roughly here they are supposed to go, and don't bother to dimension them yet.
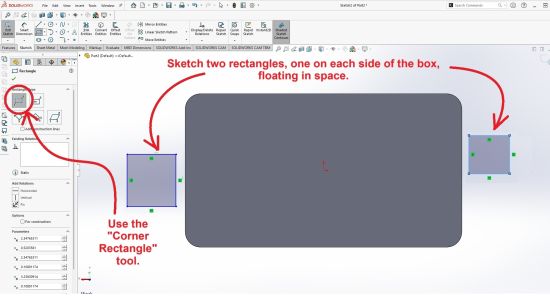
We could have snapped the rectangles to the box sides by dragging the rectangle tool up to the box edge, but our purpose here is to demonstrate the use of constraints in modeling.
Set Constraints
We will use the "Constraints" tool of SolidWorks to position these rectangles. This tool allows you to relate sketched features to each other and enforce a particular geometric property.
The first step is to select the two features that need to be related. We want to center the left-hand rectangle on the side of the box. To do this, you need to select two points: The center point of one of the vertical sides of the rectangle and the origin point.
To select the center-point of a rectangle edge, hover the cursor over the edge near the center of the line. The center-point should appear as a small box in the line. Click there.
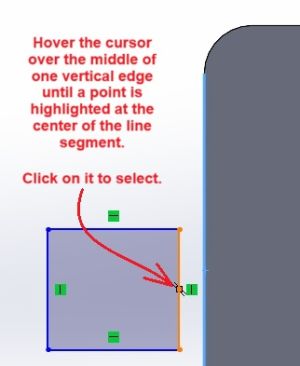
Next, press down on the -CTRL- key on the keyboard. This is a standard Windows method for selecting multiple objects, and SolidWorks uses the same convention. With the -CTRL- key depressed, select the origin point in the center of the box. This is the same point that you selected when you sketched the first rectangle in Tutorial 1a.
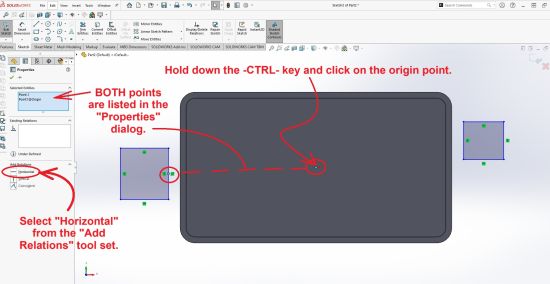
With both of these points selected, SolidWorks will open a "Properties" dialog in the left margin. Some options are given for constraints to be added. Select "Horizontal" to coerce the rectangle side so it is centered with respect to the origin.
Perform this same operation with the center point of the rectangle on the other side of the box.
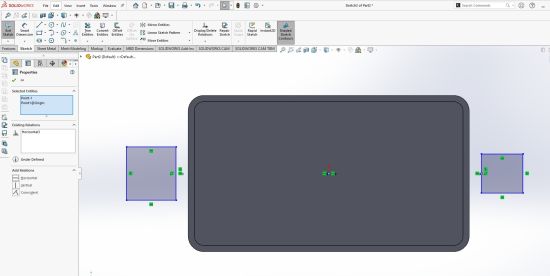
Both of these rectangles will be seen to move on center, flanking the box.
Next we constrain the rectangle edges to lie along the edges of the box. To do this, you select the EDGE of the rectangle (not its center point) and the leftmost edge of the box, while depressing the -CTRL- key.
Another "Properties" dialog will open with different constraints options, appropriate to lines. Select "Collinear" from the list. The rectangle will be seen to merge with the edge of the box.
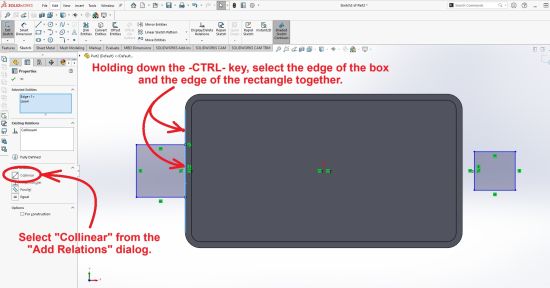
Perform the analogous operation with the rectangle on the right side.
This procedure has the advantage where if you change the dimensions of the box, the mounting lugs will remain attached and centered in their new locations.
Finish the Sketch
Next, dimension the lugs and add fillets to the outside corners as shown below
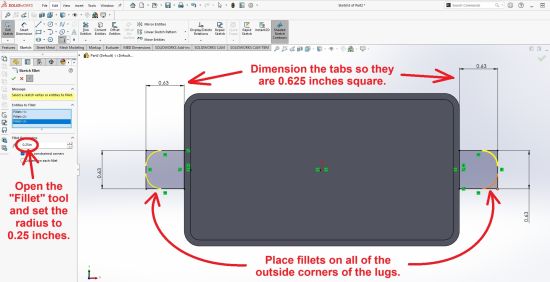
Finally, we need to add holes to the lugs for screws to pass through. These could be cut in later after the lugs are extruded into the 3rd dimension or they can be added right now, in the sketching stage. In this step we will add the features for the holes during the sketching stage.Inside the "Sketch" tab, select the "Circle" tool. The default should be the "Center" option. In this mode, the first LEFT mouse-click locates the circle center and then you drag the cursor over to set the circle radius.
If you hover the cursor near the center of the lug, a few blue dotted tie lines will appear, as illustrated below. If you click the LEFT mouse button when these lines are visible, the circle center will snap to the location at the intersection between the tie-lines. The center point doesn't get constrained to this spot, but it will be located there. It could be moved later if necessary, but there would be no reason to move it.
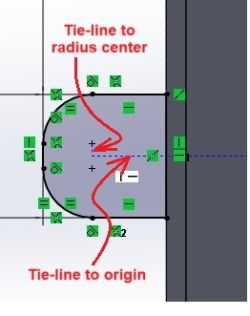
After clicking for the center point, drag the mouse away by a short distance and click again to create the circle. The circle will change from blue to orange to indicate that it is selected.
A dialog box will open in the left margin to set the parameters for the circle. The radius of the circle is at the bottom, and it should be selected for editing. You can type the radius you want. In this case we want a hole 3/16" in DIAMETER. You can type the decimal value of 3/32" (0.094) or you can type the text string "3/32" and SolidWorks will interpret it.
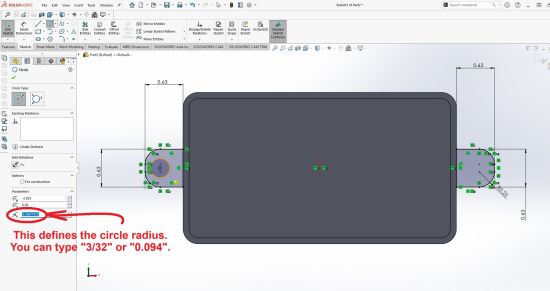
The circle should snap to the correct size when you hit the -ENTER- key. Click on the (![]() ) green check mark to accept.
) green check mark to accept.
Create another circle in the anlogous spot on the other lug. For variety, you can use "Smart Dimension" to set the hole diameter. Select the tool and click on the circle and then drag the dimension lines out a short distance. This tool will set the DIAMETER of the hole, which is 0.188 or 3/16.
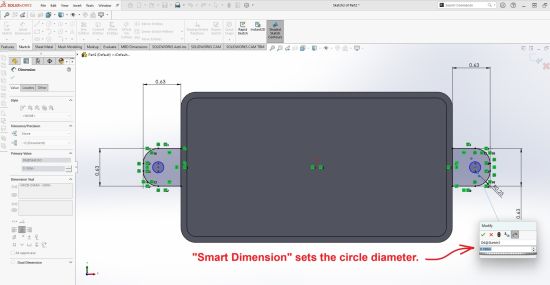
Click on "Exit Sketch" to close the sketch.
Extrude Into the Third Dimension
With the sketch selected (it will be the last entry on the history list) click on the "Features" tab and select the "Extruded Boss/Base" tool. The lugs should be shown as previews in yellow as seen below.
Notice that the lugs are extruded down away from the box bottom. You need to click on the (![]() ) button with opposing arrows to flip it.
) button with opposing arrows to flip it.
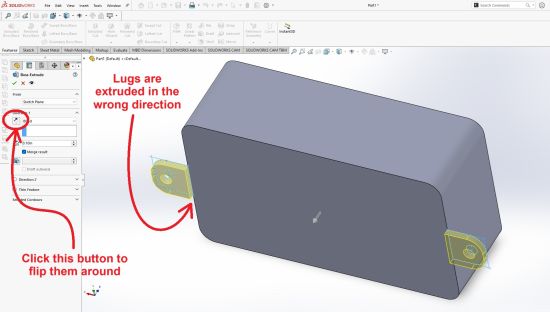
Click on the (![]() ) green check-mark to accept it.
) green check-mark to accept it.
Fillet the Lug Corners
3D prints are prone to breakage on inside sharp corners. Since these lugs are designed to withstand some stress, it is best to round out the inside corners where the lugs contact the box. These features weren't possible to make in the previous sketch because the box bottom wasn't a part of the sketch and the sketch fillet tool wouldn't have recognized them.
To finish the lugs, select the "Fillet" tool from under the "Features" tab. This is similar to the "Fillet" tool under the "Sketch" tab, but it works with 3D features.
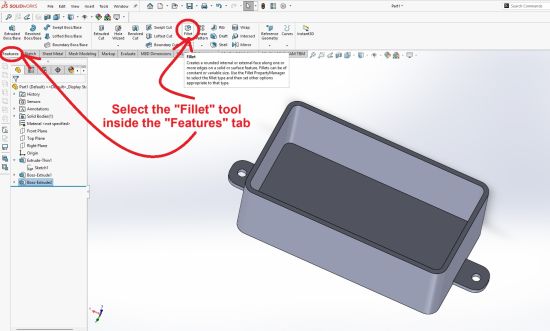
To use this tool you need to select an edge or a combination to place the fillet. This is a time when you will need to be facile with zooming and rotating the model. If you are unclear on these methods, please review the SolidWorks user interface introduction.
Move the cursor over an edge to select. Click the LEFT mouse button on the edge when it is highlighted. A reference to the edge should appear in the selection list in the left margin of the window.
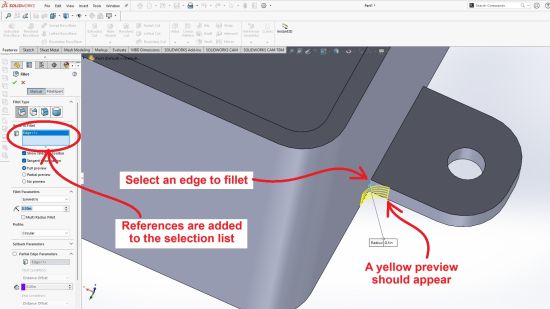
You will need to select the four inside corners where the lugs contact the box. To make the selections you will need to rotate the model around in a lot of different directions to be able to select the line segments. You should see yellow previews of all of the fillets.
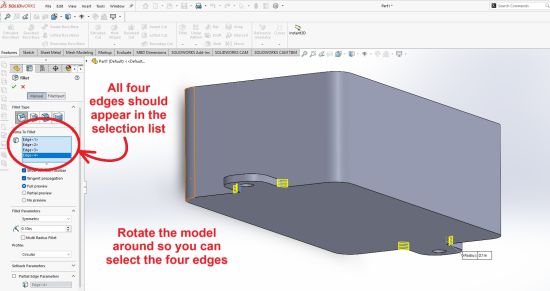
When they are correctly selected, hit the (![]() ) green check-mark to accept.
) green check-mark to accept.
Conclusion
This concludes SolidWorks Tutorial 1b. In the tutorial we covered some more sketching tools and introduced the concept of constraints on sketched features.
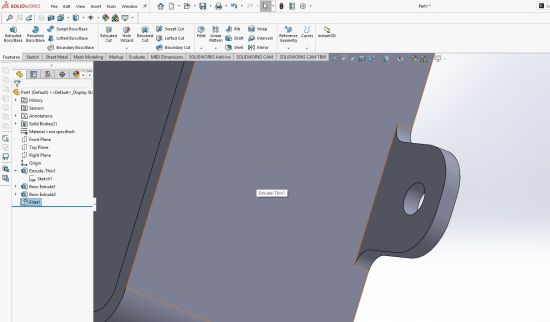
You have now learned nearly all of the most important SolidWorks tools for designing functional parts. We still need to finish the E-Box and this work will continue in Tutorial 1c. This is provided mostly for practice in the tools we have taught up to now, though there are a few details that will be new.
One important tool covered in the next tutorial is the "Extruded Cut" tool. It works similarly to the "Extruded Boss/Base" tool so it's not much of a lift, but it is a tool that gets used extremely often, so it will be covered.