SolidWorks Tutorial 1c: Design of an Electronic Box, Continued

From Artisans Asylum Wiki

Link to: CAD Main Page

Link to: Tutorial 1b (prev)

Introduction

This tutorial continues the sequence for designing a sample electronics box to demonstrate how to use SolidWorks.

In the previous tutorials, most of the basic tools have already been addressed. In the steps that follow, knowledge of these tools will be assumed. If you are unfamiliar with any of these tools, you may want to review the previous entries in this sequence.

In the previous tutorials in this sequence, a thin-walled box was designed with mounting lugs attached to the bottom face. The first step in this tutorial is to add some additional lugs around the top of the box that could be used to attach a lid to the box. The operations to do this are mostly the same as those used in the previous tutorial. Accordingly, we will move quickly through this first operation until we need to use some new functions.
pic33

Attach Lugs to the Box Edge

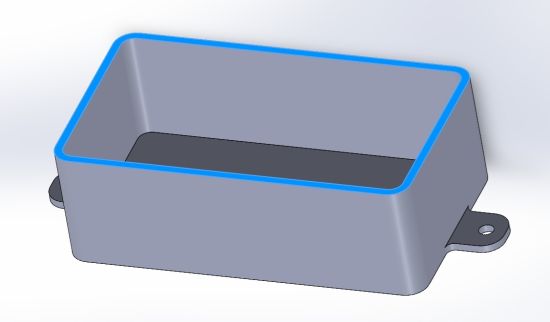
Select the flat surface at the top edge of the box, as shown in the figure above. Open a new sketch on that plane. Notice that you can open a sketch on any planar face, no matter how tiny.

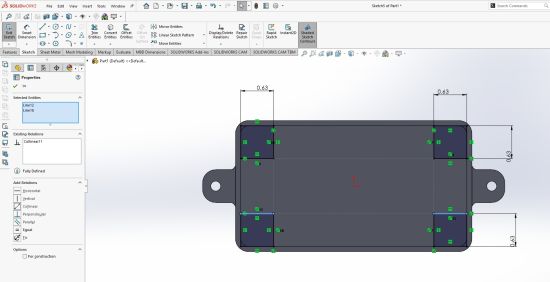
Sketch four squares in the four corners of the inside of the box. By snapping the edges of the squares onto the inside edges of the box top, the relations are set automatically that fix them to those edges.

Set the four dimensions as shown below. To fully define these four squares, manually set four "Collinear" relations between the remaining edges. Hopefully is is obvious to you where these should be. See the illustration below.
pic34

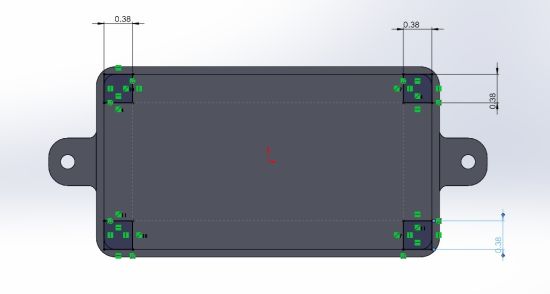
To check whether the relations are set correctly, change the four dimensions that are explicitly defined in the figure. In the example, the lugs were originally set to 5/8" square. Change them now to 3/8" square, which is more reasonable in the box design. All of the lugs should change to the correct size.

It should also be possible to change the outside dimensions of the box and have the lugs remain attached to the box corners. It is very rare that something like this is designed at its correct size from the first step. That is the strength of "parametric" design. At this stage however it is not possible to check. We need to finish the sketch first and then extrude the lugs into solid features.
pic35

Fillet the corners as shown below. You can use the default radius of 0.1 inches.

pic36

Exit the sketch. Select "Extruded Boss/Base" and project the sketch into the 3rd dimension. Make sure the lugs sit below the plane of the top of the box.

pic37

Make Screw Holes in the Lugs

We assume the box lid will be held on with screws. We need to cut holes in the lugs to accommodate them, and they should be designed parametrically so they move with the features if the dimensions are changed. The screw-holes could have been applied in the previous sketch, but this step is an opportunity to introduce the "Extruded Cut" tool from the "Features" tab.

The first step in cutting screw holes is to open a new sketch on the same plane as the previous sketch. We will set features to locate holes in the centers of two of the lugs in opposite corners. These are line segments that cross the lugs diagonally as shown below.

pic38

These segments will be used to locate circles in the sketch. The circles will form the contours of cuts through the solid tabs. Although the diagonal line segments are present in the sketch, we don't want them to affect the contours of the cuts, so they need to be marked "For Construction" in their "Properties" dialog. The midpoints of these line segments locate the centers of those lugs.

Add two more points onto the two lugs in the two remaining corners. Add the necessary relations to align these points with respect to the center points of the two diagonals in the previous step.

pic39

With these four points set on the lugs, sketch a set of circles with the four points as centers. Set the radius of one of the circles to some preferred value for a pilot hole, 0.03" is suggested. Hold down the -CTRL- button and click on all four circles to select them and open a "Properties" window in the left margin. Look at the selection list and make sure all four are there. Click on the "Equal" button to fix their sizes to the same values at that of the first circle.

pic40

Click on "Exit Sketch."

With the newly-drawn sketch selected, open the "Features" tab and select "Extruded Cut." The tool is very similar to the "Extruded Boss/Base." Since the lugs have the default thickness of 0.1 inches, this default depth will also create holes that penetrate the lugs.

pic41

Hit the (SW check icon-.png) green check-mark to accept.

Fillet the Lugs

These tabs aren't quite finished. Add fillets as shown below. This is the same process used in the previous tutorial.

pic42

Circuit Board Mounting Features

Arduino Due Hole Pattern
Overall Hole 1 Hole 2 Hole 3 Hole 4 Hole 5 Hole 6
X 4.00 0.55 2.60 3.80 0.60 2.60 3.55
Y 2.095 0.10 0.30 0.10 2.00 1.40 2.00