FreeCAD Tutorial 1a: Design of a 3D Printed Electronic Box
Link to: CAD Main Page
Link to: Tutorial 0 (prev)
Link to: Tutorial 1b (next)
Introduction
FreeCAD is a free, open-source CAD package that was under development for years; and recently it has produced a "release" version. By attracting developers from all over the design community, FreeCAD has assembled an impressive collection of features and add-ons.
This tutorial is an analog to the SolidWorks series that begins with SW Tut 1a. We will design an electronic box (E-Box) following the sequence there as closely as possible. It assumes no previous experience with CAD, though you may want to review another page that discusses the tools for navigating the design space.
To get started, please visit the FreeCAD download site if you haven't already done so.
You may also want to download the PDF user manual and look at it. It gives detailed instructions on how to install the package. You may also want to look at the navigation options on pp. 31-32 if you are used to a particular set of mouse actions to zoom, pan and rotate the view.
The modeling operations used in this tutorial are are described in the manual starting on page 80. Please note: This lesson is limited to only what is needed to get started designing relatively simple objects using parametric design. Many more tools are available than these, and you will be left to explore them for yourself.
Load FreeCAD and Open a Sketch
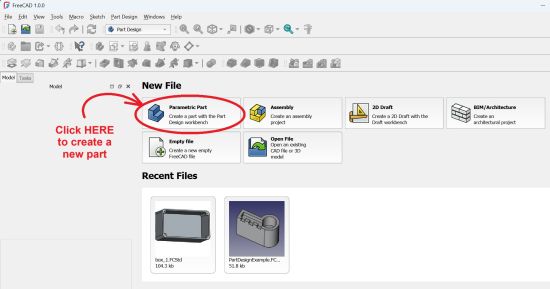
Double-click on the ![]() FreeCAD icon (or shortcut) on the desktop. The window will show a startup dialog as shown below. Click on New File - Parametric Part to create a new part.
FreeCAD icon (or shortcut) on the desktop. The window will show a startup dialog as shown below. Click on New File - Parametric Part to create a new part.
When you open new part, a blank window in the FreeCAD interface should appear.
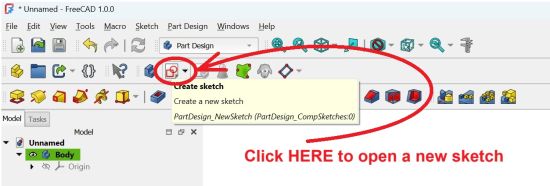
This interface is less verbose than SolidWorks tool bars in the interest of preserving real-estate on the screen. Tool "hints" exist and give you a text description if you hover the cursor over a tool icon.
Hit the (![]() ) sketch icon to open a new sketch.
) sketch icon to open a new sketch.
The first window displayed allows you to pick one of the three cardinal planes in the design space. Later you can add sketches to planes of the part under design, but you have to bootstrap off of something to get started. Click on one of the planes, it doesn't really matter which at this point.
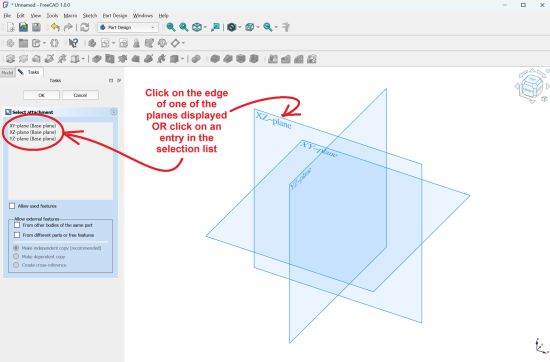
After selecting a plane, FreeCAD opens the "Sketcher Workbench" which is a member of the "Part Design Workbench." These take the place of the tabs in the SolidWorks toolbar.
Note: FreeCAD has an important architectural component. If you are designing a house, you probably want to ground it on the X-Y plane. There is a BIM workbench oriented towards architectural design. It should be the subject of a future tutorial.
Sketch a Framed Rounded-Corner Rectangle
You will see a large array of sketching tool icons, several of which will be used later in this tutorial sequence. For the first step, please select the (![]() ) "Rectangle" tool as shown below.
) "Rectangle" tool as shown below.
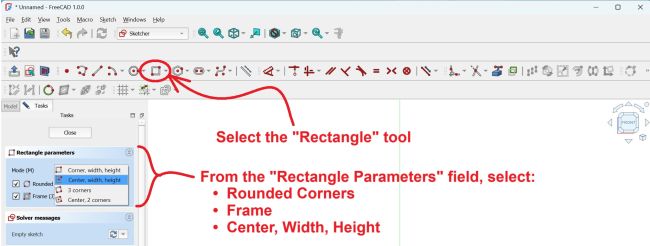
FreeCAD presents several options for drawing rectangles. For this example design, you will want to select a rounded, framed, centered rectangle.
With this tool selected, the appearance of the cursor will change as it moves around the window. Three appearances are shown below.

Part a shows the cursor when it is traveling around an open section of the window. It shows the X-Y location and a thumbnail of the type of rectangle being drawn.
Part b shows the cursor when it is traveling over one of the cardinal axes of the sketch plane. Besides the location and thumbnail of the rectangle type, it also shows a (![]() ) "Point On Object" icon to indicate that clicking the cursor there would cause the feature to "snap" to the axis.
) "Point On Object" icon to indicate that clicking the cursor there would cause the feature to "snap" to the axis.
Part c shows the cursor when it is traveling over the origin of the sketch plane. Besides the location and thumbnail, it also shows a (![]() ) "Point Coincidence" icon to indicate that clicking the cursor there would cause the feature to "snap" to the origin.
) "Point Coincidence" icon to indicate that clicking the cursor there would cause the feature to "snap" to the origin.
Click on the origin, as in part c above. Drag the mouse diagonally in some direction. You will see some edit boxes with dimension lines appear next to the growing rectangle. One of them will automatically be selected for editing.
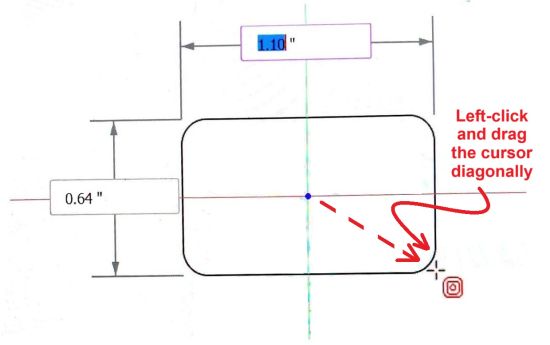
Without clicking the mouse again, type in sequence: 4.5" -ENTER- 2.5" -ENTER- 0.25" -ENTER- -0.1" -ENTER- The first number specifies the width and the second specifies the height of the rectangle. The third specifies the corner radius and the fourth specifies the frame thickness. A minus sign in the last parameter tells the system the offset rectangle is moved inwards from the original.
No other work is needed to complete the desired rectangle. We could have manually dimensioned these after clicking the rectangle into place, but this is easier. We will learn how to explicitly dimension features later in this sequence.
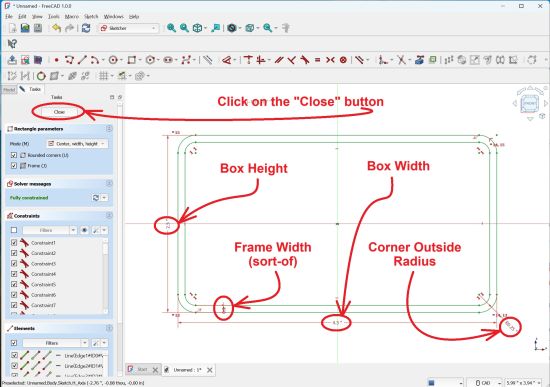
Double-click on one of the indicated dimensions and change the value around to see how to manipulate the edit boxes. You can also drag the dimension labels around to make their location more appealing. Drag the label for the frame thickness away from the edge of the rectangle to make it more legible
Click on the "Close" button in the upper left to close the sketch.
Extrude the Box Sides
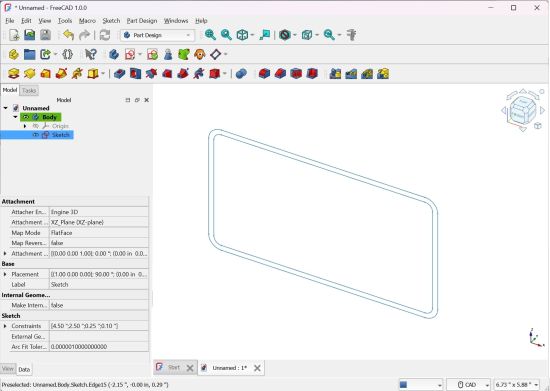
When you close the sketch, the system exits the Sketcher and returns to the Part Design Workbench.
The part design tools will be displayed in a row of colorful icons across the top of the window and there is an outline of the design history in the left margin. At the bottom of the list there is a reference to the sketch we have just produced.
The sketch should be selected so the entry is highlighted in blue and a table of data is displayed.
To raise the sides of the box into the third dimension, we use the (![]() ) "Pad" tool located on the extreme left of the tool bar. When you click on that tool icon, the display shows a preview of the shape with a default value for the extrusion length. Set the length (i.e. height) of the box sides to 1.5 inches.
) "Pad" tool located on the extreme left of the tool bar. When you click on that tool icon, the display shows a preview of the shape with a default value for the extrusion length. Set the length (i.e. height) of the box sides to 1.5 inches.
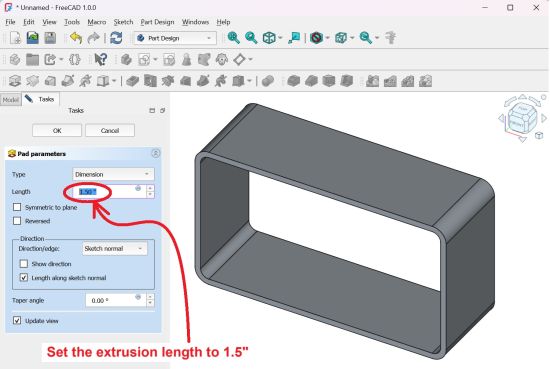
Click "Okay" to exit the tool.
Design the Box Bottom
Now that a 3D feature exists, we can use one of its planes for a new sketch. To select a plane, click the mouse on some point in the view shown on the plane you want.
To create the box bottom, you will need to select the narrow path around the bottom of the box sides. It may be necessary to zoom in on the plane in order to select it. The cursor prefers to snap to the linear edges.
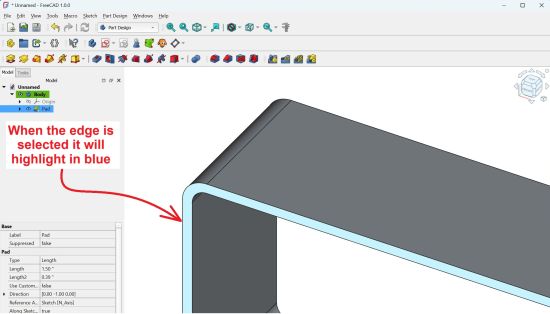
With the planar surface selected, hit the (![]() ) sketch icon.
) sketch icon.
We wish to design a box bottom that conforms to the edges of the box. FreeCAD doesn't automatically include geometric features from other sketches, so they must be incorporated manually. To do this we use the (![]() ) "External Geometry" tool.
) "External Geometry" tool.
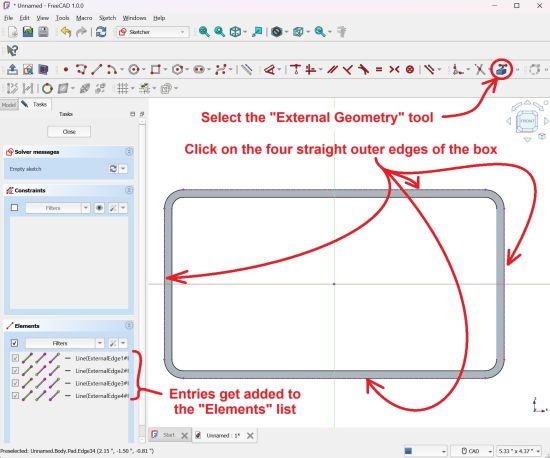
Use this tool to select the four straight outer edges of the box. You will need references to all four to make the new sketch line up with them. As you select each edge, references to them will appear in the "Elements" selection box on the lower left.
Select the (![]() ) rectangle tool from the Sketcher tool bar. This time the rectangle needs to have rounded corners, but no other special properties. Draw a rectangle somewhere in the window. It doesn't need to line up with the edges.
) rectangle tool from the Sketcher tool bar. This time the rectangle needs to have rounded corners, but no other special properties. Draw a rectangle somewhere in the window. It doesn't need to line up with the edges.
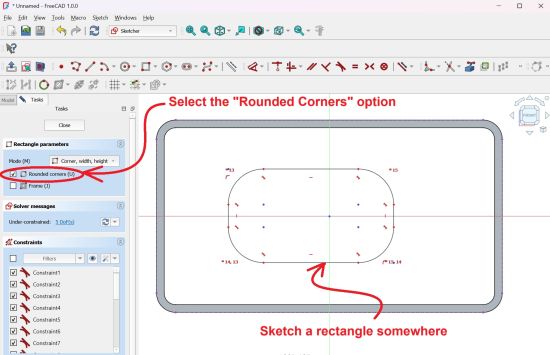
We will apply some constraints that make the rectangle coincide with the edges of the box.
Geometric Constraints
Consrtraints are the same things that SolidWorks calls "Relations". To make the newest rectangle conform to the shape of the box, we will make the corner points coincide.
We select pairs of points and apply the (![]() ) "Coincident" constraint to them. To select the points, hold down the -CTRL- or -SHIFT- key and click on the two points.
) "Coincident" constraint to them. To select the points, hold down the -CTRL- or -SHIFT- key and click on the two points.
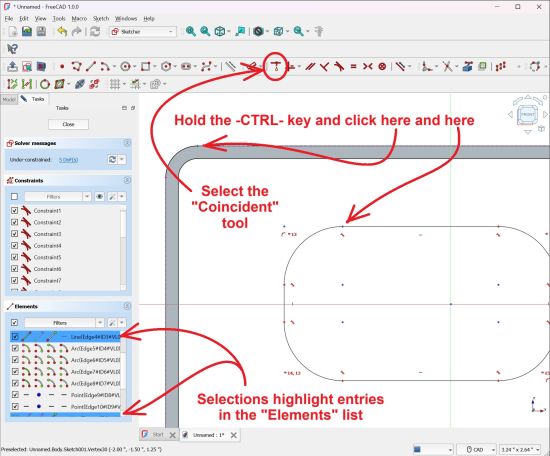
FreeCAD draws the points very small on the screen, so it is a challenge to see the points selected.

There is a change in color in the points. In part a above, un-selected points are colored red. In part b above, selected points are colored dark green.
When you click on the (![]() ) "Coincident" constraint the selected point on the previous rectangle stays in place because that rectangle is fully defined. The coinciding point on the new rectangle jumps to it.
) "Coincident" constraint the selected point on the previous rectangle stays in place because that rectangle is fully defined. The coinciding point on the new rectangle jumps to it.
You may notice a long list of entries in the "Constraints" list on the left margin. They aren't differentiated too well, so it's often quite difficult to see what each one refers to. Luckily when something is dimensioned the numerical value of the dimension is listed with the constraint.
You will need to select one pair of points on each side of the rectangle to fully define the new sketch. Hit the "Close" button when you have done that.
Form the Box Bottom
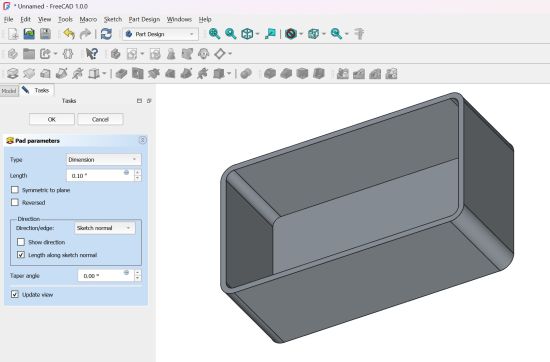
With the new sketch selected, click on the (![]() ) "Pad" tool as you did previously to form the box sides. Choose a length of 0.1 inches to match the thickness of the box sides.
) "Pad" tool as you did previously to form the box sides. Choose a length of 0.1 inches to match the thickness of the box sides.
Conclusion
This is the end of FreeCAD Tutorial 1a.
In this tutorial we have designed a somewhat featureless hollow box. While this could be exported to a 3D printer and fabricated, it lacks essential features necessary for it to function.
To add more features, we need to use more FreeCAD modeling tools. These will be presented in the next tutorial, Tutorial 1b.