Fusion Tutorial 1a: Design of a 3D Printed Electronic Box
ink to: CAD Main Page
Link to: Tutorial 0 (prev)
Link to: Tutorial 1b (next)
Introduction
Autodesk Fusion is a popular and widely-used CAD application, formerly known as Fusion360. Like SolidWorks, it is closed-source and available by subscription. A free version is available.
This tutorial is an analog to the SolidWorks series that begins with SW Tut 1a. We will design an electronic box (E-Box) using a sequence designed to show how facile the application can be. It assumes no previous experience with CAD, though you may want to review another page that discusses the tools for navigating the design space.
To get started, please visit the Fusion download site if you haven't already done so. You will be taken to a page that allows you to choose between a commercial and a noncommercial (personal-use) version of the application.
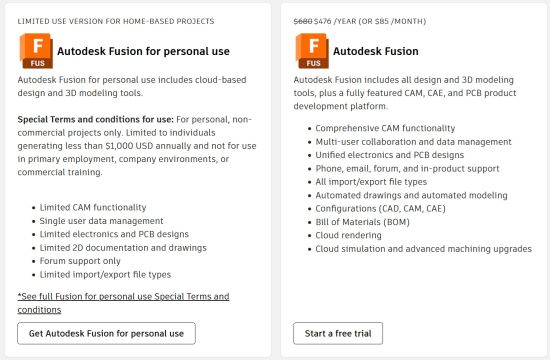
For this tutorial we use the noncommercial version that is available for free so long as the user agrees not to earn more than $1000 in its use. If revenue exceeds this limit, then users must subscribe to the commercial version.
Open a New Sketch
Like most CAD applications, Fusion allows you to design 3D components by first making a 2D sketch on a plane and then extruding profiles from the sketch into the third dimension. Accordingly, the first step is to create a new sketch.
After downloading and registering with Autodesk, open the Fusion application. First you will be shown a window that provides links to recent projects. If this is your first use of the program, there won't be any recent options.
Select the pull-down menu that says "New" and select "Design."

This will open a blank design page within the "Design" workspace. Across the top of the screen you will find a toolbar with several sections labeled "Create" "Modify" "Assemble" and so on. The first step is to create a new sketch. Hit the (![]() ) "Sketch" icon at the leftmost end of the tool-bar. Alternatively you can pull down the "Create" menu and select "Sketch" from there.
) "Sketch" icon at the leftmost end of the tool-bar. Alternatively you can pull down the "Create" menu and select "Sketch" from there.
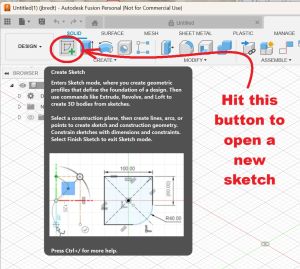

Notice that when you hover the cursor over the icon for a tool a window pops up with a description of the tool.
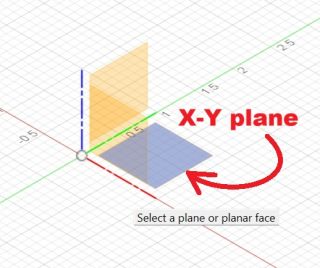
When you select the "Sketch" tool without a particular plane selected, the application opens a window to select a plane. The choices are the three cardinal planes: X-Y, X-Z, and Y-Z. The planes aren't labeled, so you may need to think a little bit about where to click. Select the X-Y (horizontal) plane with a single click of the LEFT mouse button.
The application will open a blank sketch window, as shown below.

Besides the toolbar along the top edge, there is a list in the upper left of the features that comprise the project. In the right margin there is a dialog box for customizing the interface. At the bottom of this box there is a button that exits the sketch and saves it into the feature list.
Along the bottom of the window are various display tools. The most frequently used tools are the (![]() ) "Zoom" tool; the (
) "Zoom" tool; the (![]() ) "Pan" tool; and the (
) "Pan" tool; and the (![]() ) "Rotate" tool.
) "Rotate" tool.
Sketch a Rectangle
To start the E-box design, select the (![]() ) "Rectangle" tool. You can click on the icon or you can pick it off the "Create" menu. The application gives you three choices: (
) "Rectangle" tool. You can click on the icon or you can pick it off the "Create" menu. The application gives you three choices: (![]() ) a "Corner" rectangle; a (
) a "Corner" rectangle; a (![]() ) "3-point" rectangle; and a (
) "3-point" rectangle; and a (![]() ) "Center" rectangle. These three choices are displayed in a banner at the top of the sketch tool feature selection box at the right margin of the window. Pick the "Corner" rectangle.
) "Center" rectangle. These three choices are displayed in a banner at the top of the sketch tool feature selection box at the right margin of the window. Pick the "Corner" rectangle.

This option allows you to pick the center point of the rectangle, and drag the mouse to any corner. The rectangle remains fixed at the chosen center point and it is constrained to be horizontal. As you drag the cursor around the window you will notice a replica of the (![]() ) "Center" rectangle icon attached to it. You should also notice the cursor "snapping" to intersection points in the grid.
) "Center" rectangle icon attached to it. You should also notice the cursor "snapping" to intersection points in the grid.
Move the cursor to the origin and click there once. Drag the cursor a short distance but DO NOT click again.
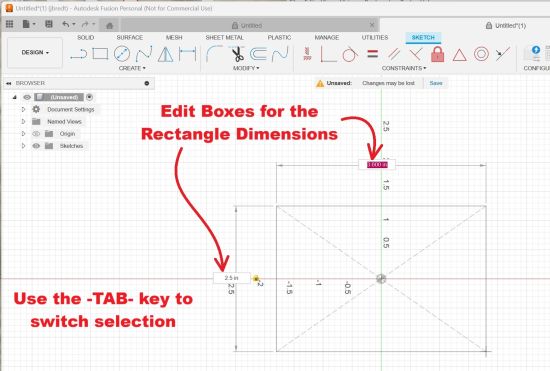
Some edit boxes will appear with suggestions for the rectangle dimensions. One of these will be selected, and you can cycle through the boxes with the -TAB- key. The dimensions in this tutorial are somewhat arbitrary, but please choose 2.5 inches for the rectangle height and 4.5 inches for the rectangle width. Hit the -ENTER- key once you have set these values.
Fillet the Corners
Since this E-box is designed to be made on a 3D printer, we round off the corners of the rectangle to make the box as sturdy as possible. In the "Modify" portion of the tool-bar, select the (![]() ) "Fillet" tool. You can also pick it off the "Modify" pull-down menu.
) "Fillet" tool. You can also pick it off the "Modify" pull-down menu.
To use this tool you must select pairs of adjacent edges in the sketch. The tool fills the corner at the intersection with a circular curve. The first time you do this the application takes a guess at the radial distance and opens an edit box. You can type the actual radius that you want. For this design, use 0.25 inches for the radius.

DO NOT hit the -ENTER- key after doing this. Continue around the rectangle to make fillets on all four corners. They will all be set to the same radius as the first one.
Please note: The fillet tool is a bit finnicky when handling multiple selections. After the selections are complete, you MUST hit the -ENTER- key, but before that point you MUST NOT hit the -ENTER- key.
When you are done, hit the -ENTER- key. If you define all four fillets in this way at the same time there should only be a single reference for the radial size. If you double-click on this dimension, it will re-open the edit box and you can change it. Try it and you should see all four fillets change to the same radius.
Hit the "Finish Sketch" button at the bottom of the tool properties box on the right margin to accept the sketch and incorporate it into the design.

Congratulations! You have made your first sketch in Fusion. This rounded-corner rectangle will form the template for both the walls and the bottom of the box.
Extrude the Box Walls
When you exit the sketch the application returns to window to its 3D view. The rounded-corner rectangle will be rendered on the projected X-Y plane and a reference to it will appear in the history list in the upper-left corner.
Notice that when you move into the 3D design workspace the appearance of the toolbar changes. The categories are partly the same: "Create"; "Modify"; etc, but there are some different categories and members of the tools sets are different, with different icons representing them.

Now that you have a design feature in the project, you should save it. Fusion doesn't use the standard Windows menu bar. Instead there are several icons along the very top of the window. To save the file click on the (![]() ) "Save" icon and choose a file name for the project.
) "Save" icon and choose a file name for the project.
To raise the 2D sketch into the third dimension, select the (![]() ) "Extrude" tool from the "Create" group, or select "Extrude" from the pull-down menu under "Create".
) "Extrude" tool from the "Create" group, or select "Extrude" from the pull-down menu under "Create".
A control dialog box will appear in the right margin of the window. There are two options presented at the top: (![]() ) "Extrude" which extrudes a solid from the contour, and (
) "Extrude" which extrudes a solid from the contour, and (![]() ) "Thin Extrude" which takes the contour and extrudes a thin wall from it. Select "Thin Extrude."
) "Thin Extrude" which takes the contour and extrudes a thin wall from it. Select "Thin Extrude."
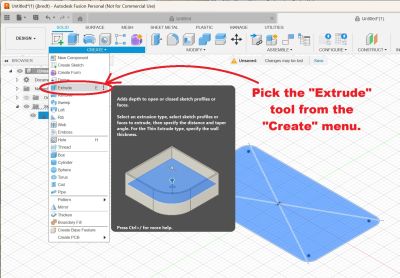
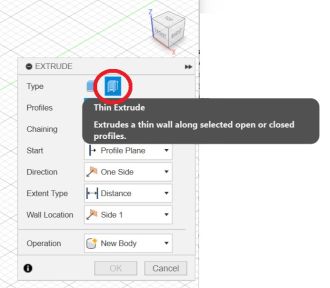

You will need to select one or more contours to extrude. Since there is only one, just click the mouse somewhere inside the area of the rectangle.

There are several parameters that appear in the dialog. The box height is termed "Distance" and the wall thickness is called just that.
The box height should be 1.5 inches and the wall thickness should be 0.1 inches.
A preview of the box should appear in the window. Check to make sure the box walls are set on the inside of the rectangle contour. This will be important when we add the box bottom in the next section.

Click the "OK" button to incorporate the extruded feature into the part design.
Add the Box Bottom
We repeat the the design process to make a sketch on a plane and then extrude it. We will reuse the first sketch and add a second solid feature to the design: A thin bottom for the E-box.
Using the (![]() ) "Zoom" tool and the (
) "Zoom" tool and the (![]() ) "Rotate" tool turn the view so the bottom surface of the box is visible. This isn't strictly necessary here, but it is good to practice. A rendering of the first sketch should be visible. If it isn't visible, navigate through the history list and click on the (
) "Rotate" tool turn the view so the bottom surface of the box is visible. This isn't strictly necessary here, but it is good to practice. A rendering of the first sketch should be visible. If it isn't visible, navigate through the history list and click on the (![]() ) "Visible/Invisible" icon to render the sketch visible.
) "Visible/Invisible" icon to render the sketch visible.
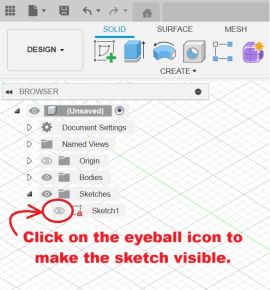


Select the "Extrude" tool from the "Create" menu. This time you will want to use the simple (![]() ) "Extrude" feature.
) "Extrude" feature.
You will need to select the contour from the first sketch. Click anywhere inside the rectangle to select it.
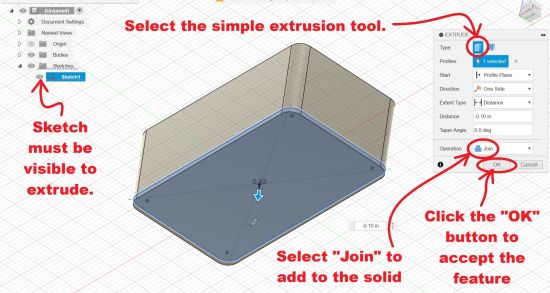
At the bottom of the dialog box, make sure the "Operation" field says "Join". There are several different options of you pull down the menu. This choice causes the box bottom to be merged with the walls as a single solid. If the box bottom wasn't mated to the box walls along an area, Fusion would find it impossible to join the features and it would define them as separate solids. This would cause problems later.
Set the thickness of the box bottom to 0.1 inches. It doesn't matter too much whether the plate extends past the bottom of the walls or not. Click on the "OK" button to exit.
Conclusion
This is the end of Fusion Tutorial 1a.
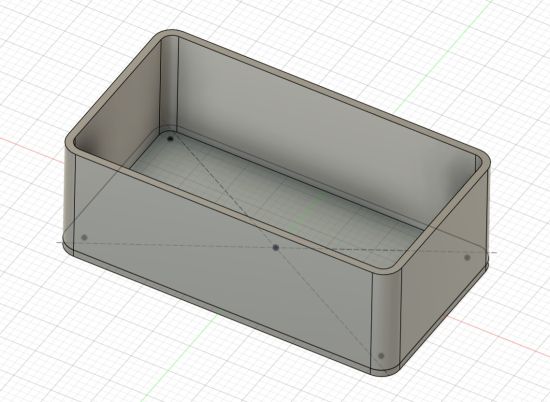
In this tutorial we have seen the basic sequence of sketching followed by extrusion to design a somewhat featureless hollow box. While this could be exported to a 3D printer and fabricated, it lacks essential features necessary for it to function.
To add more features, we need to use more Fusion modeling tools. These will be presented in the next tutorial in the series, Tutorial 1b.