FreeCAD Tutorial 1b: Design of an Electronic Box, Continued
Link to: CAD Main Page
Link to: Tutorial 1a (prev)
Link to: Tutorial 1c (next)
Introduction
This tutorial is the second in a series teaching basic CAD sketching and modeling tools using the open-source package FreeCAD.
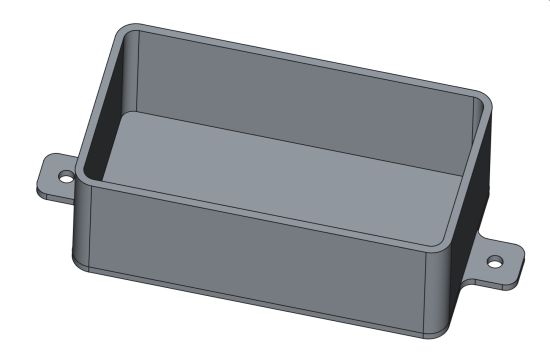
In the previous tutorial, we designed a simple hollow box. In this tutorial we will start to add the features that will give it its function: A sample electronics enclosure that could be made on a 3D printer.

In this page we will explore more aspects of sketching (especially those that add features to the surfaces of a simple model) and the management of geometric constraints (relations) between features so that changes to the model's dimensions will carry through more smoothly.
The pace of this tutorial will be somewhat faster than the previous one because knowledge of tools already presented will be assumed.
Add Mounting Lugs
The box will need to be mounted to a surface, so the first feature we will add will be a pair of mounting lugs on the bottom of the box.
Open a New Sketch on the Bottom Surface
With the box displayed as it was at the end of the previous tutorial, rotate the view so the box bottom is visible. To do this, use the (![]() ) orientation icon in the upper-right corner of the window.
) orientation icon in the upper-right corner of the window.
Click on the box bottom to select the plane, and hit the (![]() ) sketch icon to open a new sketch.
) sketch icon to open a new sketch.
If you are unfamiliar with this operation, please review the previous tutorial.
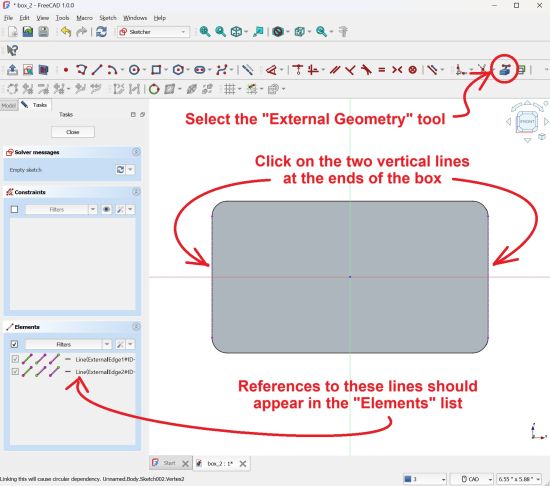
To prepare the sketch for input, you will need to incorporate some geometric elements from the existing part. Click on the (![]() ) "External Geometry" selection tool and use it to select the two vertical edges on the left and right sides of the box bottom. The cursor should appear as illustrated below. The two endpoints should appear in purple and the line should get a nearly invisible purple dashed highlight.
) "External Geometry" selection tool and use it to select the two vertical edges on the left and right sides of the box bottom. The cursor should appear as illustrated below. The two endpoints should appear in purple and the line should get a nearly invisible purple dashed highlight.

References to these lines should appear in the "Elements" list of the sketch, listed as "External."
Sketch the Mounting Lugs
Select the (![]() ) rectangle tool and choose the "Centered Rectangle" option.
) rectangle tool and choose the "Centered Rectangle" option.
As you hover the cursor over the X-Axis, the cursor should acquire a (![]() ) "Point-On-Object" icon to indicate that clicking there will cause the rectangle center point to "snap" to the axis. Drag the mouse diagonally over to the box edge and again the "Point-On-Object" icon should appear so you can attach the rectangle edge to the box edge.
) "Point-On-Object" icon to indicate that clicking there will cause the rectangle center point to "snap" to the axis. Drag the mouse diagonally over to the box edge and again the "Point-On-Object" icon should appear so you can attach the rectangle edge to the box edge.

Make rectangles like this on both sides of the box.

Add Fillets to the Lugs
Now that the retangles have been created, we need to round the corners. Select the (![]() ) "Fillet" tool.
) "Fillet" tool.

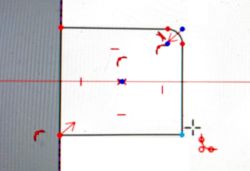
Move the cursor over the four external corners and click on them in sequence. When you hover the cursor near the corner point it should highlight blue. As you click on each corner point, the square corner should be replaced by an arc with a default radius.
After creating the four fillets, expand the (![]() ) "Dimension" tool popup menu by clicking on the (
) "Dimension" tool popup menu by clicking on the (![]() ) "Expand" icon adjacent to it. Move down the menu and select the "Constrain Radius" tool.
) "Expand" icon adjacent to it. Move down the menu and select the "Constrain Radius" tool.

With this tool selected, click on one of the four fillets. An edit box should pop up that allows you to specify the radius. Type in 0.15" into the field to set the radius. Hit -ENTER- to exit the edit box. Hit the -ESC- key once to exit this tool.

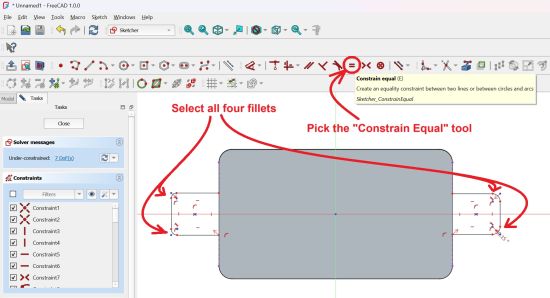
Now we set all of the fillets to match this dimension. Hold down the -CTRL- key and click on all four fillets to select them. It can be challenging to make a proper selection in this case, and it is worth practicing a little bit. To see the fillets clearly, you may want to zoom in to the areas around them. Make sure you are pressing the -CTRL- key when you click on each arc. Check the "Elements" list in the left margin to make sure there are four entities selected.
After selecting them, pick the (![]() ) "Constrain Equal" tool to coerce the three non-dimensioned fillets to the same radius as the one you dimensioned.
) "Constrain Equal" tool to coerce the three non-dimensioned fillets to the same radius as the one you dimensioned.
Dimension the Mounting Lugs
Select the (![]() ) "Dimension" tool. There are a few methods for setting dimensions with this tool. In this case, click on a pair of parallel lines where you wish to set the separation distance. Drag the dimension bracket away from the feature and click the mouse again. An edit box will open that allows you to set the dimension. Type 5/8" and hit -ENTER-. Do this for the horizontal and vertical size of the lug on one side of the box.
) "Dimension" tool. There are a few methods for setting dimensions with this tool. In this case, click on a pair of parallel lines where you wish to set the separation distance. Drag the dimension bracket away from the feature and click the mouse again. An edit box will open that allows you to set the dimension. Type 5/8" and hit -ENTER-. Do this for the horizontal and vertical size of the lug on one side of the box.

Now we telegraph these dimensions to the lug on the other side by setting constraints. Hold down the -CTRL- or the -SHIFT- key and click on the top horizontal segments of each rectangular lug. The entries in the "Elements" list should be highlighted.
Select the (![]() ) "Constrain Collinear" tool. The line that hasn't been dimensioned should snap to the same vertical location as the other one. Since this is a "Centered" rectangle, the lower line should automatically snap to the same vertical location as the lower line on the other side. Hit the -ESC- key once to exit the tool.
) "Constrain Collinear" tool. The line that hasn't been dimensioned should snap to the same vertical location as the other one. Since this is a "Centered" rectangle, the lower line should automatically snap to the same vertical location as the lower line on the other side. Hit the -ESC- key once to exit the tool.

Now, select the same pair of line segments and pick the (![]() ) "Equal" tool. This will fix the width of the opposite lug to the same size as the dimensioned one. The two lugs should turn green to indicate they are fully constrained.
) "Equal" tool. This will fix the width of the opposite lug to the same size as the dimensioned one. The two lugs should turn green to indicate they are fully constrained.
Try changing the two dimensions and the radius that you set for the lugs. The two lugs should change in synch with each other.
Add Screw Holes to the Lugs
Select the (![]() ) "Circle" tool and hover the cursor near the center point of one of the lugs. Once the cursor is close enough to "snap" to the center point, the cursor should display the (
) "Circle" tool and hover the cursor near the center point of one of the lugs. Once the cursor is close enough to "snap" to the center point, the cursor should display the (![]() ) "Point Coincidence" icon.
) "Point Coincidence" icon.

Click there on the center-point and then type "3/16" into the edit box that opens up.
Move the cursor over to the center point of the other lug and click there, but don't set the dimension. Hit the -ESC- button once to exit the tool.
Hold down the -CTRL- key and select the two circles. Pick the (![]() ) "Equal" tool to set their diameters the same.
) "Equal" tool to set their diameters the same.
Extrude the Lugs in 3D
You may now hit the "Close" button in the upper left of the window to close the sketch and return to the "Part Design" workbench.
With the new sketch selected, hit the (![]() ) "Pad" tool.
) "Pad" tool.
FreeCAD will refuse to display extruded sketches that aren't connected to the solid. If the 3D pads are invisible, it means they are extruded in the wrong direction and they only make contact on a line segment. Hit the "Reversed" check box to extrude in the opposite direction and hopefully the pads should become visible.
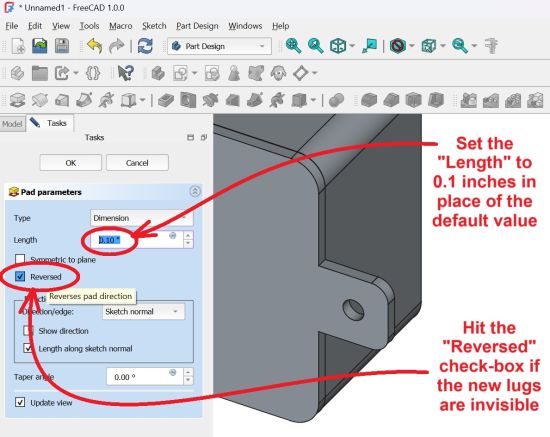
Click "Okay" to accept.
Add 3D Fillets to the Lugs
FreeCAD allowed us to add the screw holes to the sketch of the lugs. It wouldn't allow us to add fillets to the corners where the lugs merge with the box bottom. For cases like this, FreeCAD provides a (![]() ) 3D filleting tool. Select it.
) 3D filleting tool. Select it.
You will have the opportunity to pick the line segments you want to have filleted. There are four corners that need it, and one is shown below. When you click on one of the segments, it will highlight purple. If you pick a wrong one, you can delete it from the selection list in the left margin.
You may need to zoom in on the part in order to correctly make the selections. You will definitely need to rotate the part around.

FreeCAD gives you the option to preview the fillets in a selection with a "Preview" button. You can't select more segments when you are previewing.
Navigate around the design space and select the four line segments analogous to the one shown above. Set the radius to 0.15 inches so it matches the fillets on the outside of the lugs. Hit "OK" to accept.
Conclusion
