FreeCAD Tutorial 1c: Design of an Electronic Box, Continued
Link to: CAD Main Page
Link to: Tutorial 1b (prev)
Link to: Tutorial 1d (next)
Introduction
This tutorial continues the sequence for designing a sample electronics box to demonstrate how to use FreeCAD.
In the previous tutorials, most of the basic tools have already been addressed. In the steps that follow, knowledge of these tools will be assumed. If you are unfamiliar with any of these tools, you may want to review the previous entries in this sequence.
In the previous tutorials a thin-walled box was designed with mounting lugs attached to the bottom face. The first step in this tutorial is to add some additional lugs around the top of the box that could be used to attach a lid to the box. The operations to do this are mostly the same as those used in the previous tutorial. Accordingly, we will move quickly through this first operation until we need to use some new functions.
Open a New Sketch on the Top Edge of the Box
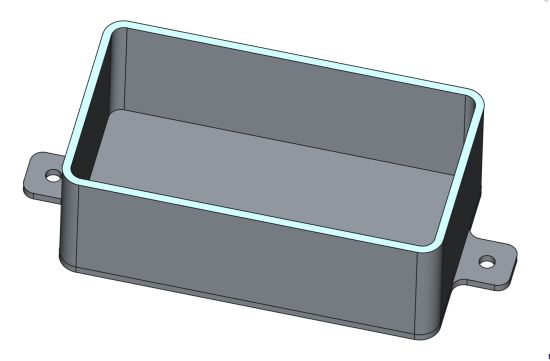
Rotate the box so the top face is visible. Click on that edge to select it. FreeCAD may prefer to "snap" the cursor to one of the edges of the face. If this happens, zoom in on the face until clicking on it causes it to become highlighted as shown above.
The box is shown with the plane of the top edge selected, click on the (![]() ) "Sketch" tool to open a new sketch on that plane.
) "Sketch" tool to open a new sketch on that plane.
Attach Lugs to the Box Edge
Using the (![]() ) "External Geometry" selection tool select the four inside edges of the box. These are needed in this sketch to locate the rectangular features we will add.
) "External Geometry" selection tool select the four inside edges of the box. These are needed in this sketch to locate the rectangular features we will add.
If you are unsure of how to do this, please review the previous tutorial.
Select the (![]() ) "rectangle" tool and draw an ordinary rectangle attached to a corner of the box. Hover the cursor over the box inside edge until the (
) "rectangle" tool and draw an ordinary rectangle attached to a corner of the box. Hover the cursor over the box inside edge until the (![]() ) "Point-On-Object" symbol is visible. Click and drag diagonally to the other edge and "snap" it to the edge.
) "Point-On-Object" symbol is visible. Click and drag diagonally to the other edge and "snap" it to the edge.
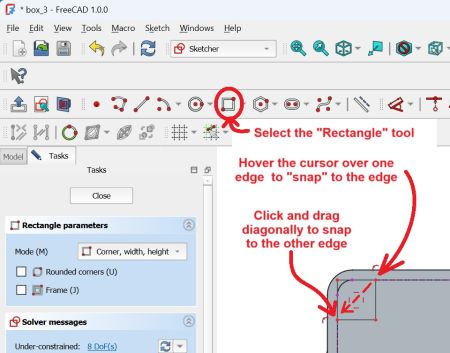
Repeat this operation in the other three corners. When you have done this, hit the -ESC- key once to exit the tool. If you hit the -ESC- key more than once, the sketch will exit. You will need to reopen the sketch to continue working.
Use the (![]() ) "Fillet" tool to sketch fillets in the free corners of the four rectangles.
) "Fillet" tool to sketch fillets in the free corners of the four rectangles.
Use the (![]() ) "Dimension" tool to set the width of one of the rectangles to 0.375 inches. Because of the presence of the fillet, you must dimension the distance between two parallel edges as you did with the mounting lugs in the previous segment of the tutorial.
) "Dimension" tool to set the width of one of the rectangles to 0.375 inches. Because of the presence of the fillet, you must dimension the distance between two parallel edges as you did with the mounting lugs in the previous segment of the tutorial.
Also set the radius of one of the fillets to 0.15 inches. Hit the -ESC- key once to exit the tool.

Now, holding down the -CTRL- key, select the four fillets on the four hanging corners. Use the (![]() ) "Equal" tool to set the radii of all four fillets equal to each other. Making this selection accurately is a little bit tricky, so it is useful now to practice it.
) "Equal" tool to set the radii of all four fillets equal to each other. Making this selection accurately is a little bit tricky, so it is useful now to practice it.
Now, select the eight hanging straight edges of the lugs. These are the ones that touch the fillets you just dimensioned. The length of one of these edges has been set previously. With all eight selected, click on the (![]() ) "Equal" tool to fix them all to the same length.
) "Equal" tool to fix them all to the same length.
Click on the "OK" button to exit the sketch.
With the sketch selected, use the (![]() ) "Pad" tool to expand the sketch into solid lugs 0.1 inches thick. Note: If you select the "Pad" tool and the rendering disappears, you will need to click on the "Reversed" checkbox to make the image reappear with the new lugs attached.
) "Pad" tool to expand the sketch into solid lugs 0.1 inches thick. Note: If you select the "Pad" tool and the rendering disappears, you will need to click on the "Reversed" checkbox to make the image reappear with the new lugs attached.
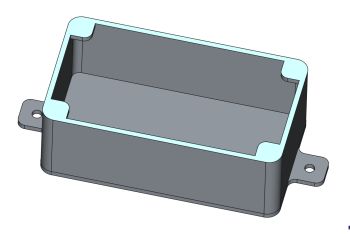
The part is shown above with the top plane selected to open a new sketch. We could have added the upcoming features to the original sketch for the lugs, but the next step will show some new features of FreeCAD.
Cut Screw Holes in the Lugs
Open a new (![]() ) sketch on the top surface. Use the (
) sketch on the top surface. Use the (![]() ) "External Geometry" tool to select the two opposite corners of one of the lugs. The points should be highlighted purple when selected.
) "External Geometry" tool to select the two opposite corners of one of the lugs. The points should be highlighted purple when selected.

Click on the (![]() ) "Construction" toggle tool. This tool places the Sketcher into a mode where new sketched features are marked as "Construction" features. They will be rendered as dotted lines and won't be extruded into 3D with the "Pad" or "Pocket" tools.
) "Construction" toggle tool. This tool places the Sketcher into a mode where new sketched features are marked as "Construction" features. They will be rendered as dotted lines and won't be extruded into 3D with the "Pad" or "Pocket" tools.
Pick the (![]() ) "Line" tool and sketch a diagonal line between the two corner points of the lug you selected. The line should appear dotted as a construction line.
) "Line" tool and sketch a diagonal line between the two corner points of the lug you selected. The line should appear dotted as a construction line.
Now, pick the (![]() ) "Point" tool. Hover the cursor close to the center of the construction line until the (
) "Point" tool. Hover the cursor close to the center of the construction line until the (![]() ) "Constrain Symmetric" icon appears next to the cursor. Click the mouse to place a point on the midpoint of the diagonal construction line. Repeat this action for the lug in the diagonally opposite corner of the box.
) "Constrain Symmetric" icon appears next to the cursor. Click the mouse to place a point on the midpoint of the diagonal construction line. Repeat this action for the lug in the diagonally opposite corner of the box.

Click on the (![]() ) "Construction" toggle tool again to return the Sketcher to normal drawing mode.
) "Construction" toggle tool again to return the Sketcher to normal drawing mode.
Select the (![]() ) "Circle" tool and place circles in each of the four pads. Place the circles on pads with the construction lines centered on the points you just placed. The circles should render in solid color to indicate that they aren't for construction. Dimension one of the circles to be 0.060" in diameter. Hit the -ESC- key once to exit the tool.
) "Circle" tool and place circles in each of the four pads. Place the circles on pads with the construction lines centered on the points you just placed. The circles should render in solid color to indicate that they aren't for construction. Dimension one of the circles to be 0.060" in diameter. Hit the -ESC- key once to exit the tool.
Hold down the -CTRL- key and select all four of the circles. Hit the (![]() ) "Equal" tool to make all of the circles the same diameter.
) "Equal" tool to make all of the circles the same diameter.
Select the (![]() ) "Constrain Horizontal/Vertical" tool. You click on pairs of points to align features. The tool decides whether the selected features are closer to being horizontal or vertical, and aligns them in that way. Pick the circle centers in pairs between adjacent corners to align the unconstrained circles with the ones located on the construction lines.
) "Constrain Horizontal/Vertical" tool. You click on pairs of points to align features. The tool decides whether the selected features are closer to being horizontal or vertical, and aligns them in that way. Pick the circle centers in pairs between adjacent corners to align the unconstrained circles with the ones located on the construction lines.
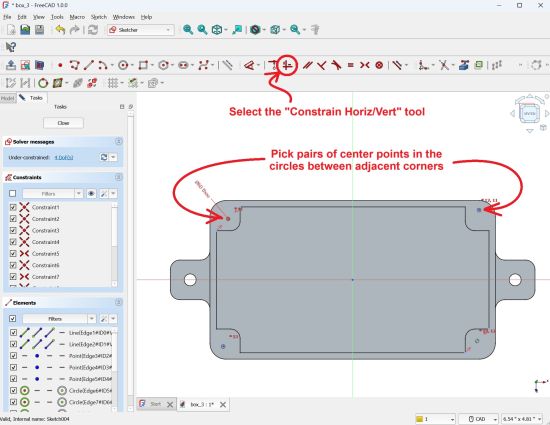
Hit the "Close" button to exit the Sketcher.
With the new sketch selected, pick the (![]() ) "Pocket" tool. There are several options under on the "Type" pull-down menu. A few of them will do the right thing. The most reliable is to pick "To First" which projects the cut to the first surface crossed below the sketch.
) "Pocket" tool. There are several options under on the "Type" pull-down menu. A few of them will do the right thing. The most reliable is to pick "To First" which projects the cut to the first surface crossed below the sketch.

Go back to the sketch where the lugs were originally designed at the top of this page. Change the width of the lug from 0.375" to 0.25". Make sure the features all change to the same size and move to the correct new locations. This process isn't completely bug-free. If the features fail to synch between the changes to different sketches, it may be necessary to re-create the "Pocket" operation to make the changes propagate smoothly.
Add fillets to the inside corners at the sides of the lugs. Make the fillet radii equal to 0.15 inches to match the others. If you are unsure how to make fillets, please look at the example in the earlier tutorial.
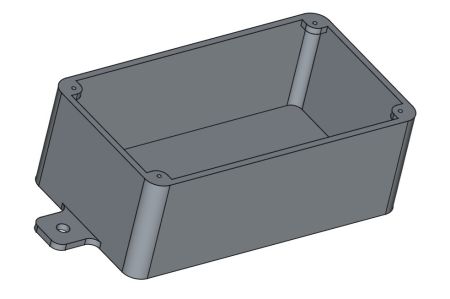
Circuit Board Mounting Features
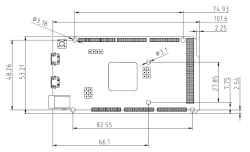
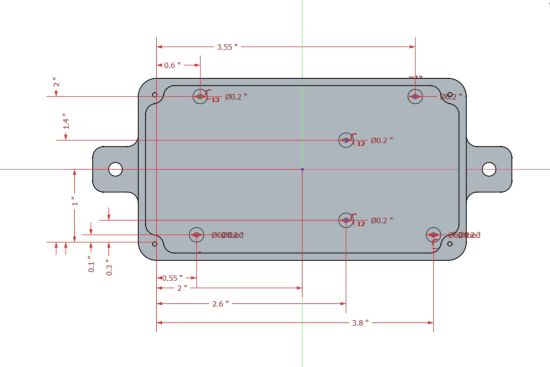
In this section we will create a set of columns to support a circuit board. For an example, we will use an Arduino Due circuit board.
| Overall | Hole 1 | Hole 2 | Hole 3 | Hole 4 | Hole 5 | Hole 6 | |
|---|---|---|---|---|---|---|---|
| X | 4.00 | 0.55 | 2.60 | 3.80 | 0.60 | 2.60 | 3.55 |
| Y | 2.095 | 0.10 | 0.30 | 0.10 | 2.00 | 1.40 | 2.00 |
| |
|---|---|
| Arduino Due dimensions |
Set the Screw Location Points
Open a new sketch on the inside bottom surface of the box. To set the locations of these six screws you will need to place seven points. Select the (![]() ) "Point" tool and click in seven locations inside the box. One of the points will be the origin point for the circuit board.
) "Point" tool and click in seven locations inside the box. One of the points will be the origin point for the circuit board.
Use the (![]() ) "Dimension" tool to set the location of the board origin to a location 2" across and 1" down from the box center. Continuing with the "Dimension" tool, set the locations of the other six points relative to the location of the origin point. Some coordinates are duplicated. You can use the (
) "Dimension" tool to set the location of the board origin to a location 2" across and 1" down from the box center. Continuing with the "Dimension" tool, set the locations of the other six points relative to the location of the origin point. Some coordinates are duplicated. You can use the (![]() ) "Constrain Horizontal/Vertical" tool to set the locations of points that share a coordinate.
) "Constrain Horizontal/Vertical" tool to set the locations of points that share a coordinate.
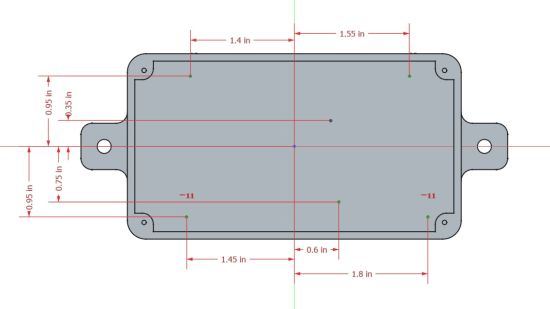
You can shift the location of the whole array by changing the dimensions locating the board origin.
Design the Standoffs
For some reason the following procedure needs to be done with the view zoomed in close to each location point. It may be a bug with the "snap" function. If the view is zoomed out too far, the sketcher may throw a "Solver Failed to Converge" error.
Select the (![]() ) "Circle" tool and hover the cursor over one of the set of location points until the (
) "Circle" tool and hover the cursor over one of the set of location points until the (![]() ) "Point Coincidence" icon attaches to the cursor.
) "Point Coincidence" icon attaches to the cursor.
Click the mouse there but DO NOT move the cursor. Type "0.2 in" when the edit box appears. Hit the -ENTER- key.
Click the "Circle" tool again on the same point, don't move the cursor, and type "0.06 in" into the edit box. Hit the -ENTER- key.
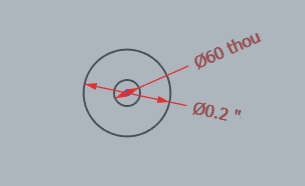
Repeat this process for the other five location points and then hit the -ESC- key once to exit the circle tool.
Note: In FreeCAD it is possible to select the two circles and a central point and copy them onto the clipboard to be pasted as a group. They will paste onto the same location where they were when they were copied. To move, you can use the (![]() ) "Point Coincidence" tool to place them at the preferred locations. While this process may sound easier than what we just did, it is actually quite challenging to set up and do. For simplicity, these instructions have defaulted to the easier method that has a few more steps. You might try doing this if you need to paste ten or more copies of something with more than two features.
) "Point Coincidence" tool to place them at the preferred locations. While this process may sound easier than what we just did, it is actually quite challenging to set up and do. For simplicity, these instructions have defaulted to the easier method that has a few more steps. You might try doing this if you need to paste ten or more copies of something with more than two features.
Hit the "Close" button to exit the Sketcher.
Extrude the Standoffs
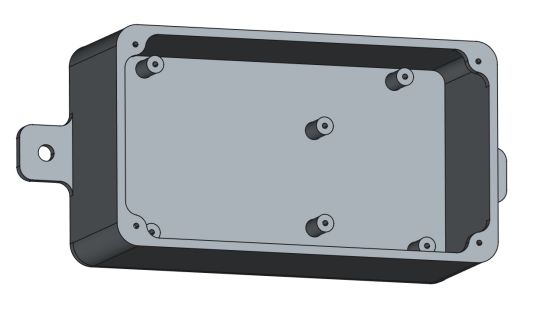
With the new sketch selected, pick the (![]() ) "Pad" tool.
) "Pad" tool.
We wish the circuit board to be lower than the box center, which is 3/4" up from the bottom. Accordingly, make the pads 3/8" tall. Hit the "OK" button to accept.
Conclusion
This concludes Tutorial 1c in the FreeCAD series.
In this tutorial we got more practice with setting dimensional constraints and we used the (![]() ) "Pocket" tool to make extruded cuts in a solid. Several other sketching tools were also introduced, including points and lines. We also touched on how to define sketched elements as construction features.
) "Pocket" tool to make extruded cuts in a solid. Several other sketching tools were also introduced, including points and lines. We also touched on how to define sketched elements as construction features.
FreeCAD proved to have a robust set of modeling tools that work well to make simple parts with parametric associations among the features.
The chief problem we have encountered with Version 1.0.0 is difficulty in setting complex selection states. Features to click on are very small and difficult to see. The highlight colors are sometimes indistinct. The "Elements" list which tabulates the selections has confusing labels that are hard to associate with the features they represent.
The E-Box is almost finished. This will be done in the last installment: Tutorial 1d.