Fusion Tutorial 1c: Design of an Electronic Box, Continued
Link to: CAD Main Page
Link to: Tutorial 1b (prev)
Link to: Tutorial 1d (next)
Introduction
This tutorial is the third in a series teaching basic Fusion CAD sketching and modeling tools.
In the previous tutorial, we took the design a simple hollow box and added mounting features to it, using some parametric design tools available in Fusion. In this tutorial we will continue to add the features that will give the box its function: A sample electronics enclosure that could be made on a 3D printer.

In this tutorial we will add some more mounting features for attaching a lid to the box, and for mounting a circuit board inside the box. For the most part the tools used will be the same as those used in the previous tutorial, except we will introduce cutting of the solid using the (![]() ) "Extrude" tool, as well as copying and pasting sketch features in multiple places.
) "Extrude" tool, as well as copying and pasting sketch features in multiple places.
This tutorial is paced somewhat faster than the previous ones because it is assumed you've had some practice with the sketching and modeling tools in Fusion.
Design Mounting Lugs for a Lid
This operation is comprised of tasks that have been covered previously. These are features needed in the design, but it is presented as a sort of warm-up exercise.
Sketch the Lugs
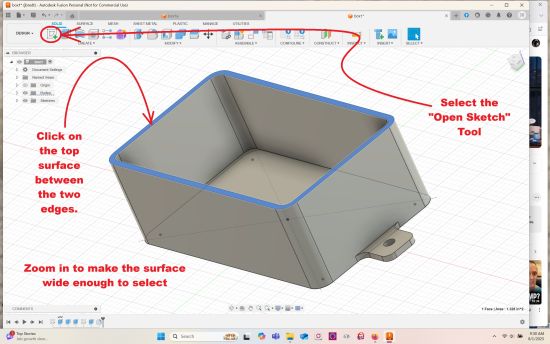
Lugs to hold a lid onto the top of the box are flush with the upper edge of the box. To draw on that plane, select the flat narrow upper surface of the edge of the box.
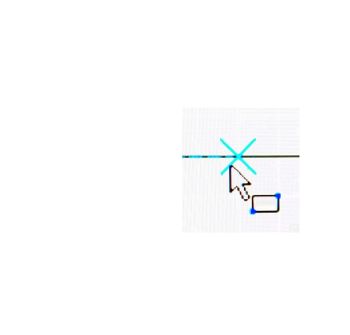
Select the (![]() ) "Corner Rectangle" tool. If you hover the cursor over the inside edge of the box, the cursor should "snap" onto the edge. Click and drag the cursor from one edge around the corner to the adjacent edge. Make sure the endpoints are both attached to the edges. When you hover the cursor over the edge of the box wall, it should show a big blue "X" as shown below. When you click the corner point will be attached to the line. Don't worry about the dimensions at this point.
) "Corner Rectangle" tool. If you hover the cursor over the inside edge of the box, the cursor should "snap" onto the edge. Click and drag the cursor from one edge around the corner to the adjacent edge. Make sure the endpoints are both attached to the edges. When you hover the cursor over the edge of the box wall, it should show a big blue "X" as shown below. When you click the corner point will be attached to the line. Don't worry about the dimensions at this point.
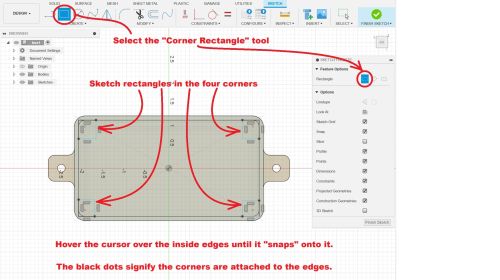

If the points are attached, they should be indicated by large black dots after they have been set in place.
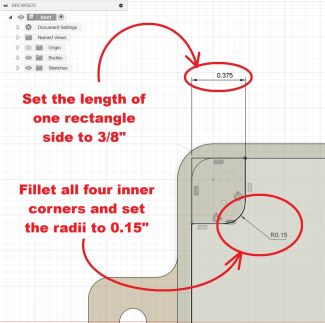
Select the (![]() ) "Sketch Dimension" tool from the "Create" menu. Set ONE dimension of one of the rectangles to 3/8" (0.375"). Select the (
) "Sketch Dimension" tool from the "Create" menu. Set ONE dimension of one of the rectangles to 3/8" (0.375"). Select the (![]() ) "Equal" tool and set the lengths of the other seven external rectangle edges to the same value. You will need to pick line segments in pairs, rather than selecting all of the segments at once. The edges to set are the ones that are collinear with the four edges of the box inner wall. You may want to review the section in the previous tutorial where this is done.
) "Equal" tool and set the lengths of the other seven external rectangle edges to the same value. You will need to pick line segments in pairs, rather than selecting all of the segments at once. The edges to set are the ones that are collinear with the four edges of the box inner wall. You may want to review the section in the previous tutorial where this is done.
Select the (![]() ) "Fillet" tool from the "Modify" group and fillet all four inside corners to a radius of 0.15". If you are unclear how to sketch these fillets, please refer to the earlier tutorial.
) "Fillet" tool from the "Modify" group and fillet all four inside corners to a radius of 0.15". If you are unclear how to sketch these fillets, please refer to the earlier tutorial.
Check the Constraints
This is a good opportunity to check the design to make sure all of the constraints are set correctly.
First, change the width dimension from 0.375 to 0.25. This is a more reasonable size for the design. All of the square features should change size at the same time and remain attached to the box corners.
Hit the "Finish Sketch" button to close the sketch.
Now reopen the first sketch in the set from the history list. The original 2.5" x 4.5" rounded-corner rectangle should appear with dimension bars. Double-click on each of these bars in turn and change the length and the width of the rectangle by an inch or so. Close the sketch and look at the result.
In the sketch you made most recently, the square features at the corners should still be attached to the corners of the box, even though the box has changed in size.
IF any of these features fails to move in the expected way, you will need to select some constraints to establish the correct relationships.
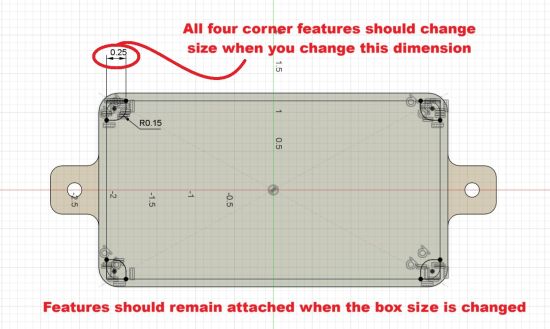
Restore the first sketch to its original dimensions because this size will be required soon.
Extrude the Lugs
The next step, in the normal sequence, is to take features in the most recent sketch and extrude them into the third dimension.
Make sure the most recent sketch is visible, as indicated by the (![]() ) eyeball in the margin of the list of sketches.
) eyeball in the margin of the list of sketches.
Select the (![]() ) "Extrude" tool from the "Create" group in the toolbar.
) "Extrude" tool from the "Create" group in the toolbar.
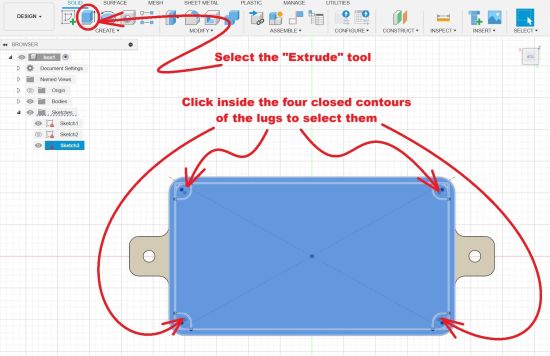
A dialog box will open and ask you to select the required contours. Click the mouse inside the four closed contours that will form the lugs.
We wish the new features to have a depth of 0.1 inches. If you type exactly that number into the edit field for the dimension, you will see the features previewed in the window.
In this case the default direction for extrusion is the POSITIVE X direction. This would project the new features above the plane of the edge of the box, causing them to only be joined by an edge. If you accept this, the lugs will be incorporated into the design as separate bodies, detached from the main one.
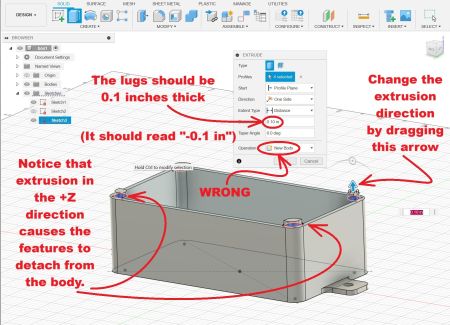
You can correct this error in a few ways. You can click and drag the fat blue arrow until it points down. Alternatively, you can set the "Distance" parameter in the dialog box to -0.1 inches. Either way, you should see the lugs join with the edge of the box in the correct way, and the "Operation" field in the dialog box should read "Join".
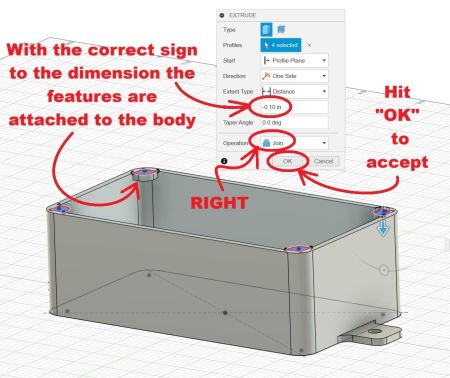
Unfortunately, Fusion doesn't seem to allow you to go back later and correct the orientation or thickness of the features if you accept them and incorporate them into the design. You must be careful at this point to assign the correct orientation and thickness. If you fail, you will have to either use the "UNDO" (CTRL-Z) feature IMMEDIATELY or cut out the features and start over extruding from the sketch.
Make sure you are satisfied with the features and hit "OK" to accept them and add them to the design.
Cut Holes for Mounting Screws
In the previous tutorial, we designed mounting lugs with screw holes defined by circles within the same sketch. For this operation we will cut the holes as a separate task, to show how it is done.
Click on the uppers surface of the box and open the sketch. This is the same plane that we just selected previously.
First we need to define the locations of the centers of the screw-holes. This could be done with the (![]() ) "Sketch Dimension" tool, but it is better to define the location geometrically, using construction lines.
) "Sketch Dimension" tool, but it is better to define the location geometrically, using construction lines.
Select the (![]() ) "Line" tool from the "Create" group in the toolbar. The use of it should be obvious. Sketch a line segment between the two corners of one of the lugs.
) "Line" tool from the "Create" group in the toolbar. The use of it should be obvious. Sketch a line segment between the two corners of one of the lugs.
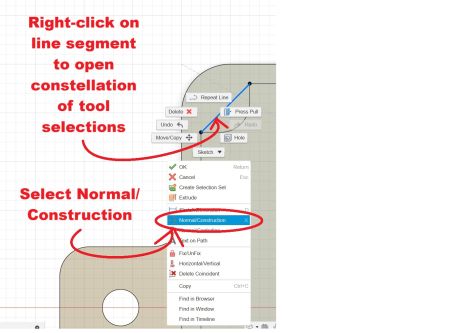
Right-click on the new segment. A collection of tool options will open up, both as a pull-down menu and as a constellation of soft buttons surrounding the cursor. Select (![]() ) "Normal/Construction". This will tell the application that this line segment shouldn't be considered part of a sketch contour. If not, the application will object to the presence of an "Open" contour in the sketch when it is closed.
) "Normal/Construction". This will tell the application that this line segment shouldn't be considered part of a sketch contour. If not, the application will object to the presence of an "Open" contour in the sketch when it is closed.
You should see the line segment become dashed.
Now, select the (![]() ) "Circle" tool from the "Create" menu. If you hover the cursor near the middle of the construction line, you should see a (
) "Circle" tool from the "Create" menu. If you hover the cursor near the middle of the construction line, you should see a (![]() ) triangular "Midpoint" icon appear next to the cursor. Click on the line when you see that appear. Drag the mouse away from the point to make a circle with a significant diameter. Don't worry about setting it exactly.
) triangular "Midpoint" icon appear next to the cursor. Click on the line when you see that appear. Drag the mouse away from the point to make a circle with a significant diameter. Don't worry about setting it exactly.
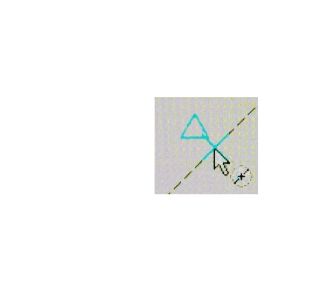


Select the (![]() ) "Equal" tool from the "Constraints" group and use it to set all the circles to the same size.
) "Equal" tool from the "Constraints" group and use it to set all the circles to the same size.

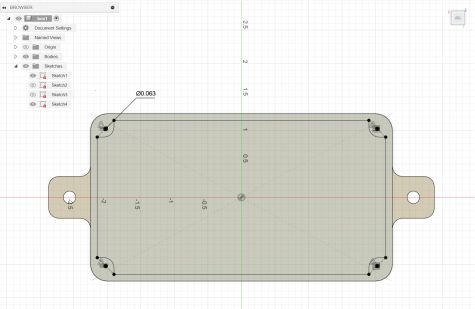

Hit the "Finish Sketch" button to accept the sketch and add it to the project.
With the latest sketch visible, as indicated by the (![]() ) "Eyeball" icon, select the (
) "Eyeball" icon, select the (![]() ) "Extrude" tool from the "Create" group.
) "Extrude" tool from the "Create" group.
A dialog box will open, and select the four small circles in the corners. They are very small, so you may need to use the (![]() ) "Zoom" and (
) "Zoom" and (![]() ) "Pan" tools to navigate and make the selections.
) "Pan" tools to navigate and make the selections.
The tool defaults to adding a solid extrusion, but you can click on the "Operation" pull-down menu and select (![]() ) "Cut". You will probably also need to reverse the direction of the cut so it penetrates the lugs in the corners. Hit the "OK" button to accept the cut.
) "Cut". You will probably also need to reverse the direction of the cut so it penetrates the lugs in the corners. Hit the "OK" button to accept the cut.
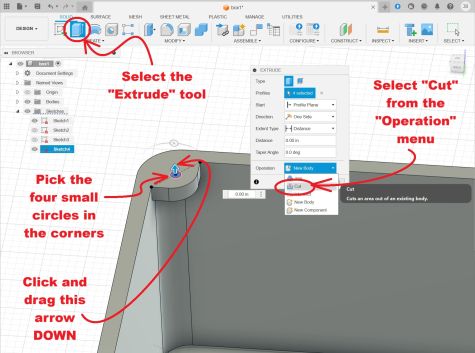
Since these features were created from a sketch, you can reopen the sketch and change the hole diameters to suit whatever size of screw (or threaded insert) you wish to use.
Add Circuit Board Standoffs
The E-box is intended to hold an electronic circuit board. Normally circuit boards include screw holes to hold them down, and screws typically thread into posts to hold them off the floor of the box.
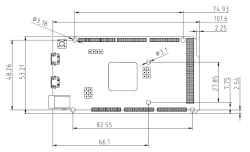
For an example, we will use an Arduino Due circuit board. Although the spec sheet gives the hole locations in millimeters, we will ocnvert them to inches for the tutorial.
| Overall | Hole 1 | Hole 2 | Hole 3 | Hole 4 | Hole 5 | Hole 6 | |
|---|---|---|---|---|---|---|---|
| X | 4.00 | 0.55 | 2.60 | 3.80 | 0.60 | 2.60 | 3.55 |
| Y | 2.095 | 0.10 | 0.30 | 0.10 | 2.00 | 1.40 | 2.00 |
| |
|---|---|
| Arduino Due dimensions (in mm) |