Fusion Tutorial 1d: Design of an Electronic Box, Continued
Link to: CAD Main Page
Link to: Tutorial 1c (prev)
Introduction
This tutorial concludes a series teaching basic Fusion CAD sketching and modeling tools.
In the previous tutorial, we took the design a simple hollow box and added mounting features to it, using some parametric design tools available in Fusion. In this tutorial we will finish the design: A sample electronics enclosure that could be made on a 3D printer.
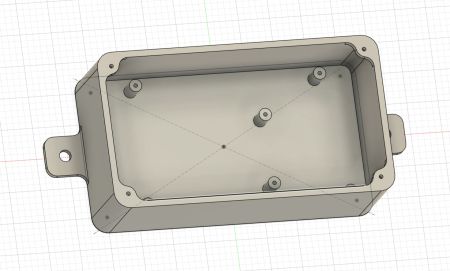
If you have finished the other tutorials in this series, you should have no problem adding the last features in this design.
We will add a sleeve to allow a wire bundle to pass into the E-box. Finally we will add a label in raised text on the side of the box. In a future tutorial this simple feature may be replaced by a threaded fitting with a nut and a strain-relieving insert.
Design the Wire Pass-Through
Select one of the wide side-walls of the box and open a new sketch. Sketch two concentric circles a little above the middle of the box side, and set their diameters to some desired size. If you want to be precise about the locations and diameters, you can use the (![]() ) "Sketch Dimension" tool.
) "Sketch Dimension" tool.
Hit the "Finish Sketch" dimension to exit the sketch.
With the new sketch visible, indicated by the (![]() ) "Eyeball" icon, select the (
) "Eyeball" icon, select the (![]() ) "Extrude" tool.
) "Extrude" tool.
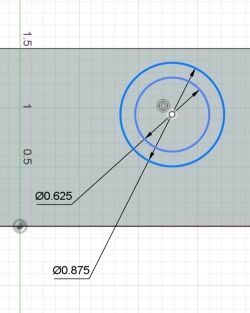
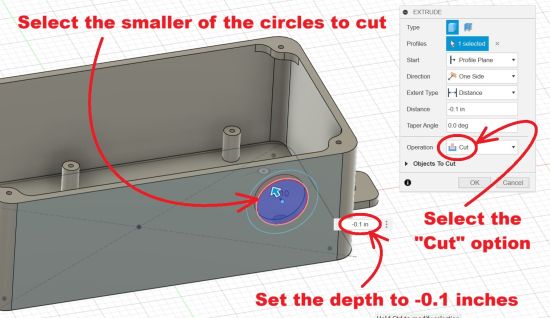

Hit the "OK" button to accept the hole.
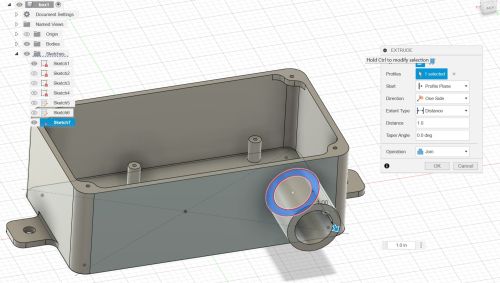
Select the (![]() ) "Extrude" tool again. This time, click in the donut-shaped space to select it. Set the height of the feature to 1". You should see a preview of a hollow cylindrical pass-through. Hit the "OK" button to accept it and add it to the design.
) "Extrude" tool again. This time, click in the donut-shaped space to select it. Set the height of the feature to 1". You should see a preview of a hollow cylindrical pass-through. Hit the "OK" button to accept it and add it to the design.
Add a Label
Select the face on the opposite side of the box and open a new sketch. From the "Create" menu, select the (![]() ) "Text" tool.
) "Text" tool.
This tool will allow you to draw a box in the sketch plane and add a text string by way of an edit box. You can pick different font styles, sizes, and text alignments and check the appearance in the preview.
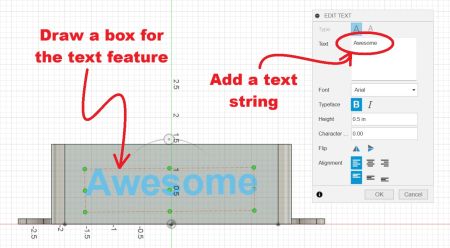
Hit the "OK" button to close the edit box and hit the "Finish Sketch" button to exit the sketch. This feature can be reopened and edited at any point later.
Select the (![]() ) "Extrude" tool one last time. The text string constitutes a single contour to extrude. You can make it stand as tall as you want or cut into the wall of the box. If you cut all of the way through you may want to use a "stencil" font or manually add solid blocks to hold the floating bits of letters in place.
) "Extrude" tool one last time. The text string constitutes a single contour to extrude. You can make it stand as tall as you want or cut into the wall of the box. If you cut all of the way through you may want to use a "stencil" font or manually add solid blocks to hold the floating bits of letters in place.
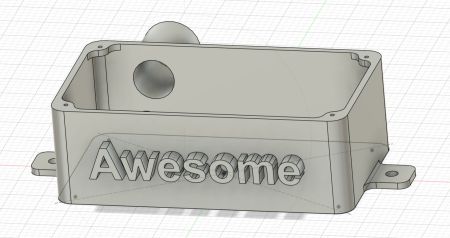
Hit the "OK" button to accept the feature and add it to the solid body.
Conclusion
This concludes Tutorial Series 1 for Autodesk Fusion. In these lessons you have learned a collection of the basic tools for designing relatively simple parts. We haven't covered more sophisticated curves, lofts, and splines. These are left for some future lesson.
With the tools we have covered here, you will be able to make many functional parts, though they will have a somewhat blocky appearance. If you want to advance to the skill level where your designs have a more professional look, you will need to study the more sophisticated modeling tools in Fusion.