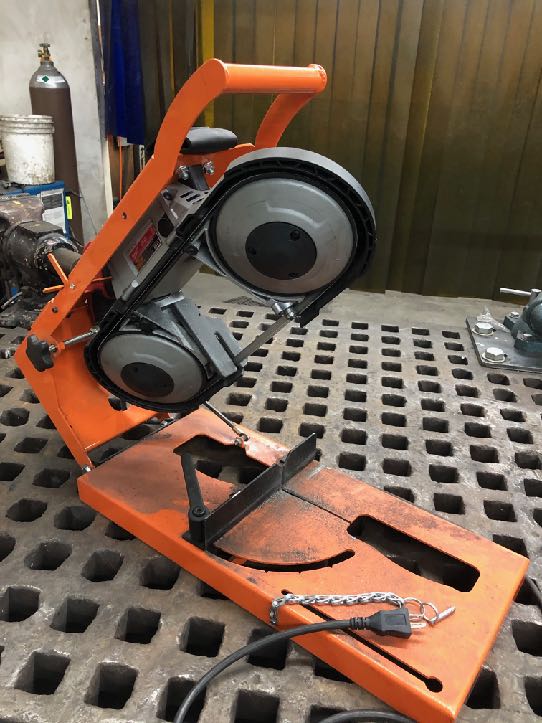
Milwaukee 6232 Portable Band Saw
From Artisans Asylum Wiki
Link to: Metal Shop main page
Link to: Metal Shop tool list
| Portable Band Saw | |
|---|---|
| General Info | |
| Make | Milwaukee Tool |
| Model | 6232-20 Deep Cut Variable Speed Bandsaw |
| Serial | Unknown |
| Specs | Link to Website |
| Manual | Operators Manual |
| Asylum Info | |
| Location | Metal Shop |
| Rubric | Ask the shop lead |
| Training | Sign up here |
| Testing | Sign up here |
| Restrictions | green |
| Safety First Hazard Analysis |
|---|
|
| Use For | Do Not Use For |
|---|---|
|
|
Operation Notes
- A Milwaukee Portable Deep Cut Band Saw is housed in an orange Portaband Pro (EZ-CUT Jig) to improve ease of use as a horizontal band saw.
- Check that your workpiece matches the machine’s blade. For safety and for blade life, it’s important to keep at least three teeth in the cut.
- Cut slowly to avoid breakage and personal injury. Do not force the tool.
- A small amount of cutting oil or cutting fluid will improve cut quality and extend the life of the blade.
- New blades are stored in the shop’s supply cabinet.
Basic Operation Instructions
- Perform a safety check prior to use.
- Check blade before cutting for dull or missing teeth.
- Check for misaligned parts, and for moving parts that might bind.
- Gas spring can be unhooked when checking alignment.
- Metal cuts best at slow speeds. The band saw’s speed dial should be set to “1.”
- Plug in, unhook the locking chain, and lift the handle to raise the blade.
- Insert workpiece against the fence and secure with a clamp. If the workpiece is long enough and can be safely held by hand, hold securely.
- Adjustable fence for 30º to 90º cuts.
- Cut should start on a surface where the greatest number of teeth will be in contact with the workpiece. Keep the Three 3 Tooth Rule in mind.
- Keep hands away from the cutting area and the blade.
- Be creative with clamps found in the shop.
- Apply a small amount of cutting oil or cutting fluid.
- Be familiar with the operation of the Trigger Arm and Trigger Arm Release.
- The Trigger Arm flips the band saw’s power switch to the “on” position and can lock it there. Use the Trigger Arm Release for quick release.
- Flip the Trigger Arm to start blade rotation, then pull down on the handle to lower the blade and perform the cut.
- Do not start saw while blade is touching the workpiece. Allow to reach full speed before performing the cut.
- Do not bear down while cutting. The weight of the tool will supply adequate pressure for the fastest cut.
- When done, clean the machine and workspace of debris, reattach the locking chain, and return the machine to the storage shelves.
On Blades and Blade Selection
- Blades purchased by the metal shop are for cutting metal, and therefore have a fine pitch.
- Blades are available in several “pitches” (number of teeth per inch) Blade selection depends on the size, shape, and type of material to be cut.
- This band saw requires a blade .020" thick, 1/2" wide, and 44-7/8" long.
Changing Blades
- UNPLUG THE TOOL before removing or installing blades.
- Release the blade tension. Turn the tension lock handle 180° counterclockwise.
- Remove the old blade. Remove from Blade Wheels first, then from Roller Guides.
- Install the new blade. Place blade on the Blade Wheels, then insert into the Roller Guides. Check to see that the blade lies freely within the guard channel.
NOTE: Pay attention to the direction of the blade teeth, which need to bite into the cut. If necessary, flip the blade right side out prior to installation. - Turn the tension lock handle 180° clockwise to lock the position. This will secure the blade on the Blade Wheels. BE SURE THAT THE BLADE IS PROPERLY SEATED ON THE BLADE WHEELS BEFORE STARTING THE CUT.
